Hisense LED19T28 Скачать руководство пользователя страница 22

Digital multimedia function 

Introduction to Function Menu
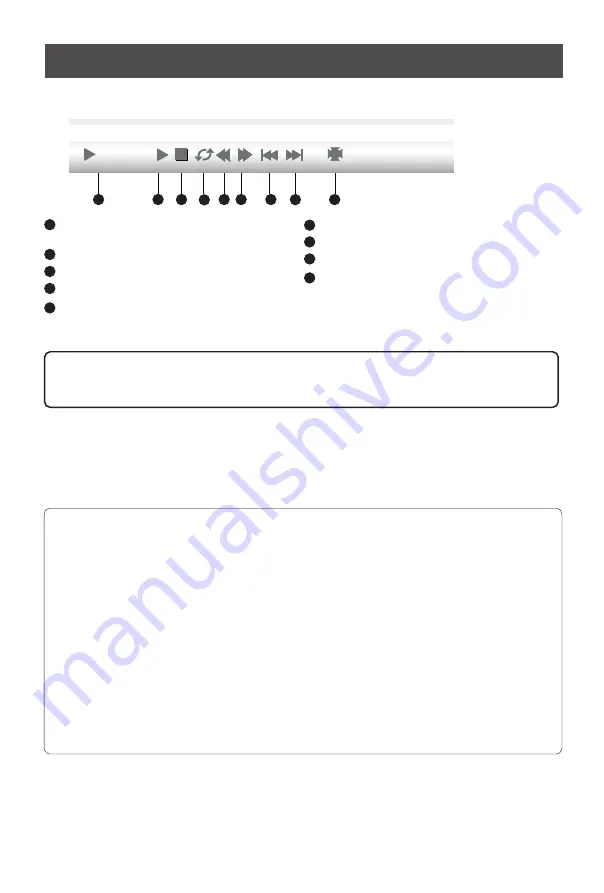
Play

1

2

3

4

5

6

7

8

9

State information column, displaying the 
current state.

Pause/Play

Stop playing the AV file and return to root file

A ,B-point repeat playback

1

2

3

4

5

6

Backward


the movie

Forward the movie

7

8

9

Browse the previous AV file
Browse the next AV file

Display the specific information of the AV file

Note: A, B point to repeat playback, click this button to select the A-point, and then 
click the button to select the B point. In this way, the screen play will be A, B Loop 
between two points. If cancel the circle of players, and then click the button.


Attentions:

1. The USB port of Digital multimedia player supports most hard disks, digital cameras, U 

disks, etc. If the unidentified phenomenon appears, it does not belong to the breakdown 
of this unit, for it has something to do with the driver of the equipment.

2.  The USB port of this unit provides 5V voltage and the maximum current is 500mA. 

Because the port specification adopted by certain storage devices is different from that of 
the standard USB agreement, so it may affect the correct identification of the multimedia 
player. This belongs to the normal phenomenon.

3.  Due to the difference of the equipment and the storage capacity, the time which the 

digital multimedia player needs to read the information also differs. The speed of reading 
the information may slow down temporarily. Please note that this is not the breakdown of 
this unit.

4. USB system only can support FAT32 format and NTFS format is not supported at 

present.

Exit the DMP source

When you are under the source of DMP, you can exit it as followed:
1. Press  Source button to display the main source.
2. Press 


button to exit the apparatus list, then press 

  button to select the source you 

want to enter.

/

21

Press Display button to display the function menu.

Содержание LED19T28

Страница 1: ...LCD TV USER S MANUAL Before using the TV Please read this manual thoroughly retain it for future reference English IES010 LED19T28 22T28P 26T28 LED LED...

Страница 2: ...ote control Brief operation of the remote control Basic operation Turn on off Changing channels volume Channel setting Picture setting Sound setting Screen setting Function setting Digital multimedia...

Страница 3: ...eceiving systems AV PAL SECAM NTSC Channel range C1 C57 Z1 Z38 Environmental conditions Temperature 5 35 Humidity 20 80 RH Atmospheric pressure 86kPa 106kPa Component Input 480I 480P 576I 576P 720P 60...

Страница 4: ...ffect the overall performance Incorrect maintenance will lead to damage to the LCD screen which will affect the image effect so you must pay attention to the following items Please do not clean the sc...

Страница 5: ...s close to furnace or places to which water oil or smoke is easy to enter Places where ventilating openings are closed Unsteady places Places suffering from easy vibration Places of lot of dust or moi...

Страница 6: ...Channel down Power Main power switch Power indicator Remote sensing window View the control panel and connection panel 5 LED19T28 LED22T28P LED19T28 LED22T28P T28 LED26 NOTE The above picture is for...

Страница 7: ...the interference caused by the mismatched impedance n The antenna cable should not be bound together with the power cord n When using the cable TV please insert the plug of the coaxial cable 75 direc...

Страница 8: ...te red green and blue signals Use this connection for high definition video signals from a DVD or other equipment L R Y Audio L Audio R Red Red White Blue Green DVD With Component jacks Connecting the...

Страница 9: ...y information button CH Channel up Down Cursor up Down VOL Volume up Down Cursor Left Right OK Enter or confirm your operations Picture still button Zoom button Picture mode selecting button Sound mod...

Страница 10: ...et Picture Mode Brief operation of the remote control 9 Mode Sound feature Music Various music mode Standard Standard music Speech Enhance the dialogue effect User The sound feature you set Sound Mode...

Страница 11: ...4 3 Shows the standard 4 3 ratio picture image in the center of the TV with dark bars on the left and right 16 9 This mode display the picture of input source expanded to fill the screen Zoom1 Proport...

Страница 12: ...se the abnormal phenomena occurred Changing Channels Volume 1 Press CH button on the remote control you can change the channels Press VOL button to raise or lower the volume 2 Press CH button on the f...

Страница 13: ...elect skip function If you want to cancel skip press Green button again The channels which are set to skipped will be skipped when pressing the button on the remote control to brows the programs Howev...

Страница 14: ...ide noise interference and return the pure initial signal It has four ratings Low Standard Strong and Off CTI Marginal improvements in color that color the edge of a sharp transition Flesh Tone When t...

Страница 15: ...djusts the volume from the left and right speakers Speakers Choice of internal speaker or external speakers when the speaker is set to internal the TV sound is output to the machine speaker when the s...

Страница 16: ...l Clock are only available under VGA source Take Windows2000 as an example and the Windows system display setting is as illustrated 1 Click Setting on the Windows Start menu and select Setting to move...

Страница 17: ...normal state or you want to make it return to the factory reset Light Effect To set the front of TV indicate Light mode On or Off VOL button to press VOL button to Function OSD Language English Blue S...

Страница 18: ...e sub picture Sub Color Sets the color of the sub picture 1 Press Menu button to display the main menu 2 Press button to select PIP Mode item 3 Press OK button to enter PIP Mode menu 4 Press button to...

Страница 19: ...signal mode support format Brief Function Introduction Introduction to the functions of the remote control buttons Picture Music Movie JPEG MP3 MPEG1 dat MPEG2 mpg MPEG4 mpg DIVX3 1 avi DMP setup menu...

Страница 20: ...ing and return to the contents where the file is stored picture Digital multimedia function Picture Browsing Browse the pictures The state of the being browsed picture Picture browsing Pause and press...

Страница 21: ...DMP main interface and the contents of the storage device will appear on the screen 2 Press the Media button on the remote control the icon is chromatic in the main menu of DMP so that the other type...

Страница 22: ...t for it has something to do with the driver of the equipment 2 The USB port of this unit provides 5V voltage and the maximum current is 500mA Because the port specification adopted by certain storage...

Страница 23: ...included in this product match to the RoHS directive Important safety instructions and Environment Environment WEEE Waste Electronic Electric Equipment European Directive 2002 96 EC 2003 108 EC ROHS R...

Страница 24: ...uction Pedestal Installation Instruction Put the TV set on the level table on which is the pad cloth or other soft material Use the provided 4 screws in the enclosed bag of the base to fix the base to...

Страница 25: ...let 1 Check the direction position and connection of your antenna 2 Adjust the direction of your antenna or reset or fine tune the channel 1 Change the batteries in the remote control 2 Clean the uppe...

Отзывы: