background image

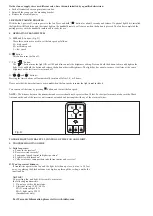
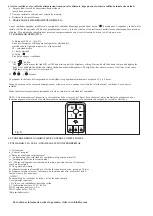
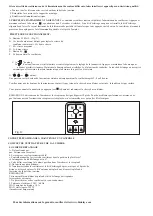
4. OPERATING TRANSMITTER:

A.

H, M

 and 

L

 buttons: (Fig. D)

These three buttons are used to set the fan speed as follows:

H= high speed

M= medium speed

L= low speed

B.

button:

This button turns the fan off.

C. The "         " button:

The "        " button turns the light ON or OFF and also controls the brightness setting. Press and hold the button to dim and brighten the 

light. Press and hold the button and release the button at desired brightness. The light key has an auto-resume, it will stay at the same 

brightness as the last time it was turned off.

D. "      ,       and       " buttons:

Pressing the timer buttons will automatically turn fan off after 2, 4, or 8 hours.

Please note that the timer buttons is active 

only

 when the fan speeds turn 

on

. the light is 

not

 included.

You can cancel the timer by pressing 


  button and re-start the fan speed.

NOTE:

  The distance between the transmitter and receiver should not be greater than 30 feet. For best performance, make sure the Black 

Antenna on the end of the receiver unit remains extended and not tangled with any of the electrical wires.

YOUR REMOTE NOW HAS FULL CONTROL OF THE FAN AND LIGHT.
5. TROUBLESHOOTING GUIDE
A. Fails to operate:

a. Power to the receiver?

b. Receiver wired correctly?

c. Fan manual speed control in highest position?

d. Light kit switch turned on?

e. Code set at exact same position in both transmitter and  receiver?

B. Won't operate at distance:  

   .

If transmitter operates the fan and the light kit when up close, but not a 30 feet

away, try placing the black antenna wire higher; up through the ceiling, outside the

junction box.

If other fan or supply wires are different color, have this unit installed by a qualified electrician.

e. Push all connected wires up into junction box.

f. Reinstall the canopy on the mounting bracket.

g. Restore the electrical power.

Fig.D

3. REMOTE PAIRING PROCESS:

With the fan’s power off, restore power to the fan. Press and hold “


” button for about 5 seconds and release. If optional light kit is installed,

the light kit will flash twice and the signal light on the handheld remote will come on when the button is pressed. The fan has completed the

pairing process with the handheld remote and is ready for use.

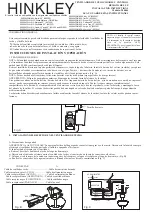
NOTICE!

Your ceiling fan and light kit assembly must meet

the following requirements:

1. Do not use with solid state fans.

2. Electrical rating: 120V / 60 Hz

MAX. motor amps:1.0 A

MAX. light watts: 250 W

(Incandescent only)

For Warranty Information please visit www.hinkley.com

Содержание 980004

Страница 1: ...ention The batteries shall be disposed of properly including keeping them away from children Even used cells may cause injury 2 INSTALLING RECEIVER IN THE CEILING FAN A Safety precautions WARNING HIGH VOLTAGE Household electrical power can cause serious injury or death Disconnect the source of electrical power to the ceiling fan by removing the fuse or switching off the circuit breaker B Installin...

Страница 2: ...G GUIDE A Fails to operate a Power to the receiver b Receiver wired correctly c Fan manual speed control in highest position d Light kit switch turned on e Code set at exact same position in both transmitter and receiver B Won t operate at distance If transmitter operates the fan and the light kit when up close but not a 30 feet away try placing the black antenna wire higher up through the ceiling...

Страница 3: ...n on and off to indicate discovery mode B Add a device per the instruction above C After you download the app register new account and password NOTE Please keep this account property you will use this account when you connect with you smart speaker D After you Log into the main page you will see the on the right side of top space E You will see ADD a new device screen and choose Smart by Bond Then...

Страница 4: ...ecuadamente incluso mantenerlas fuera del alcance de los niños Incluso las células usadas pueden causar lesiones 2 INSTALACIÓN DEL RECEPTOR EN EL VENTILADOR DE TECHO A Precauciones de seguridad ADVERTENCIA ALTO VOLTAJE La energía eléctrica del hogar puede causar lesiones graves o la muerte Desconecte la fuente de energía eléctrica del ventilador de techo quitando el fusible o apagando el disyuntor...

Страница 5: ... diferente haga que un electricista calificado instale esta unidad e Empuje todos los cables conectados hacia arriba en la caja de conexiones f Vuelva a instalar la cubierta en el soporte de montaje g Restaurar la energía eléctrica Fig D 3 PROCESO DE EMPAREJAMIENTO REMOTO Con el ventilador apagado restablezca la energía del ventilador Mantenga presionado el botón durante unos 5 segundos y suéltelo...

Страница 6: ...el modo de descubrimiento B Agregue un dispositivo según las instrucciones anteriores C Después de descargar la aplicación registre una nueva cuenta y contraseña NOTA Mantenga esta propiedad de la cuenta usará esta cuenta cuando se conecte con sus smart s D Después de iniciar sesión en la página principal verá la en el lado derecho del espacio superior E Verá AGREGAR una nueva pantalla de disposit...

Страница 7: ...ière appropriée notamment en les tenant hors de portée des enfants Même les cellules utilisées peuvent provoquer des blessures 2 INSTALLATION DU RÉCEPTEUR DANS LE VENTILATEUR DE PLAFOND Relier À Fil vert du ventilateur Fil d alimentation nu Câble récepteur noir AC IN L Câble d alimentation noir Câble récepteur blanc AC IN N Câble d alimentation blanc Fil blanc du récepteur TO MOTOR N Fil blanc du ...

Страница 8: ... appareil par un électricien qualifié e Poussez tous les fils connectés vers le haut dans la boîte de jonction F Réinstallez la verrière sur le support de montage g Rétablissez l alimentation électrique Fig D 3 PROCESSUS D APPARIEMENT À DISTANCE Le ventilateur étant hors tension rétablissez l alimentation du ventilateur Appuyez et maintenez enfoncé le bouton pendant environ 5 secondes et relâchez ...

Страница 9: ...e B Ajoutez un appareil selon les instructions ci dessus C Après avoir téléchargé l application enregistrez un nouveau compte et un nouveau mot de passe REMARQUE Veuillez conserver cette propriété de compte vous avez un compte lorsque vous vous connectez avec votre haut parleur intelligent D Après vous être connecté à la page principale vous verrez le sur le côté droit de l espace supérieur E Vous...

Отзывы: