background image


10 


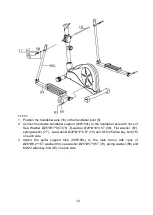
STEP4 

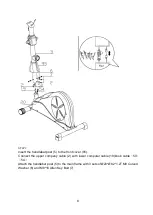
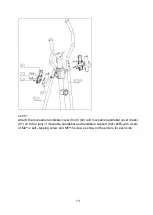
1.  Position the handlebar axle (18) in the handlebar post (5)   
2.  Connect moveable handlebar support (82R+82L) to the handlebar axle with 1pcs of 

Sea  Washer  Ø25*Ø17*0.5T(79)  ,D-washer  Ø28*Ø16*4.5T  (98),  Flat  washer  (67), 
spring washer (77)

sea washer Ø25*Ø17*0.5T (79) and M10*25 Allen key bolt (78) 

on each side.   

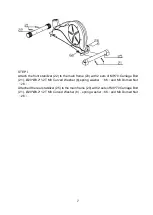
3.  Attach  the  pedal  support  tube  (89R+89L)  to  the  main  frame  with  1pcs  of 

Ø28*Ø8.2*1.5T washer (94), sea washer Ø25*Ø17*0.5T (79), spring washer (66) and 
M8*20 Allen key bolt (83) on each side.   


Содержание 520

Страница 1: ...520 MAGNETIC ELLIPTICAL TRAINER ...

Страница 2: ... continuing with your exercise program 4 Keep children and pets away from the equipment The equipment is designed for adult use only 5 Use the equipment on a solid flat level surface with a protective cover for your floor or carpet For safety the equipment should have at least 0 5 metre of free space all around it 6 Before using the equipment check the nuts and boits are securely tightened 7 The s...

Страница 3: ...2 ...

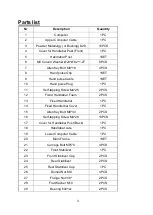
Страница 4: ... 1PC 11 Self tapping Screw M4 25 2PCS 12 Fixed Handlebar Foam 2PCS 13 Fixed Handlebar 1PC 14 Fixed Handlerbar Cover 1PC 15 Allen Key Bolt M8 30 2PCS 16 Self tapping Screw M4 20 10PCS 17 Cover for Handlebar Post Back 1PC 18 Handlebar Axle 1PC 19 Lower Computer Cable 1PC 20 Main Frame 1SET 21 Carriage Bolt M8 70 4PCS 22 Front Stabilizer 1PC 23 Front Stabilizer Cap 2PCS 24 Rear Stabilizer 2PCS 25 Rea...

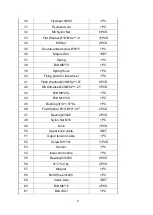
Страница 5: ... Washer Ø20 Ø8 2 1 2T 5PCS 42 M8 Anti lose Ø20 Ø8 2 1 2T 3PCS 43 Bolt M8 25L 1PC 44 Bolt M10 40 1PC 45 Bushing Φ14 1 5T 6L 1PC 46 Flat Washer Ø14 Ø10 1 0T 2PCS 47 Bearing 6300Z 2PCS 48 Nylon Nut M10 1PC 49 knob 1PCS 50 Upper knob cable 1SET 51 Upper tension cable 1PC 52 Screw M5 15L 11PCS 53 Sensor 1PC 54 lower knob cable 1PC 55 Bearing 6300ZZ 2PCS 56 Φ17 C Clip 2PCS 57 Magnet 1PC 58 Belt Wheel Φ2...

Страница 6: ...ar 2PCS 76 Allen Key Bolt M8 35 4PCS 77 Spring Washer Ø17 Ø10 2 2 0T 2PCS 78 Allen Key Bolt M10 25 2PCS 79 Sea Washer Ø25 Ø17 0 5T 4PCS 80 Moveable handlebar Cover Front 2PCS 81 Moveable handlebar Cover Back 2PCS 82 Moveable handlebar support R L 2SET 83 Allen key bolt M8 20 4PCS 84 Cover for pedal R L 2SET 85 Bushing 4PCS 86 Front Pedal Axle 2PCS 87 Bolt M6 15 8PCS 88 Pedal R L 2PCS 89 Pedal Supp...

Страница 7: ...6 94 Washer Ø28 Ø8 2 1 5T 2PCS 95 Front Cover 1PC 96 Self tapping M5 25 7PCS 98 Washer Ø28 Ø16 4 5T 2PCS 99 Screw M5 2PCS ...

Страница 8: ...h 2 sets of M8 70 Carriage Bolt 21 Ø20 Ø8 2 1 2T M8 Curved Washer 6 spring washer 66 and M8 Domed Nut 26 Attached the rear stabilizer 25 to the main frame 20 with 2 sets of M8 70 Carriage Bolt 21 Ø20 Ø8 2 1 2T M8 Curved Washer 6 spring washer 66 and M8 Domed Nut 26 ...

Страница 9: ... post 5 to the front cover 95 Connect the upper company cable 2 with lower computer cable 19 knob cable 50 54 Attach the handlebar post 5 to the main frame with 3 sets of Ø20 Ø8 2 1 2T M8 Curved Washer 6 and M8 16 Allen Key Bolt 7 ...

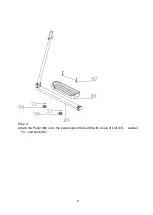
Страница 10: ...9 Step 3 Attach the Pedal 88 on to the pedal support tube 89 with 2 sets of bolt 87 washer 33 and knob 98 ...

Страница 11: ...1pcs of Sea Washer Ø25 Ø17 0 5T 79 D washer Ø28 Ø16 4 5T 98 Flat washer 67 spring washer 77 sea washer Ø25 Ø17 0 5T 79 and M10 25 Allen key bolt 78 on each side 3 Attach the pedal support tube 89R 89L to the main frame with 1pcs of Ø28 Ø8 2 1 5T washer 94 sea washer Ø25 Ø17 0 5T 79 spring washer 66 and M8 20 Allen key bolt 83 on each side ...

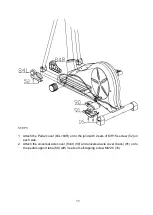
Страница 12: ...al cover 84L 84R on to the joint with 2 sets of M5 15L screw 52 on each side 2 Attach the universal axle cover front 90 and universal axle cover back 91 on to the pedal support tube 89 with 3 sets of self tapping screw M4 20 16 ...

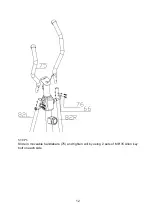
Страница 13: ...12 STEP6 Slide in moveable handlebars 75 and tighten will by using 2 sets of M8 35 Allen key bolt on each side ...

Страница 14: ...ble handlebar cover front 80 and moveable handlebar cover back 81 on to the joint of moveable handlebar and handlebar support 82L 82R with 4 sets of M4 12 self tapping screw and M5 15 screw as show on the picture for each side ...

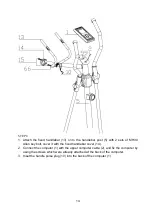
Страница 15: ... M8 30 Allen key bolt cover it with the fixed handlebar cover 14 2 Connect the computer 1 with the upper computer cable 2 and fix the computer by using the screws which were already attached at the back of the computer 3 Inset the handle pulse plug 10 into the back of the computer 1 ...

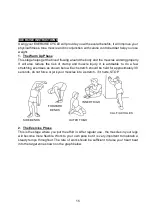
Страница 16: ... is advisable to do a few stretching exercises as shown below Each stretch should be held for approximately 30 seconds do not force or jerk your muscles into a stretch if it hurts STOP 2 The Exercise Phase This is the stage where you put the effort in After regular use the muscles in your legs will become more flexible Work to your own pace but it is very important to maintain a steady tempo throu...

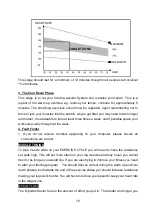
Страница 17: ...der 1 If you do not receive numbers appearing on your computer please ensure all connections are correct MUSCLE TONING To tone muscle while on your EXERCISE CYCLE you will need to have the resistance set quite high This will put more strain on your leg muscles and may mean you cannot train for as long as you would like If you are also trying to improve your fitness you need to alter your training ...

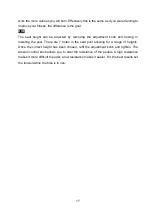
Страница 18: ...nt knob and raising or lowering the seat There are 7 holes in the seat post allowing for a range of heights Once the correct height has been chosen refit the adjustment knob and tighten The tension control knob allows you to alter the resistance of the pedals A high resistance makes it more difficult to pedal a low resistance makes it easier For the best results set the tension while the bike is i...

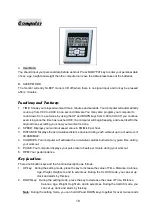
Страница 19: ...your workout is done 2 SPEED Displays your workout speed value in KM MILE per hour 3 DISTANCE Displays the accumulative distance traveled during each workout up to a maximum of 99 9KM MILE 4 CALORIES Your computer will estimate the cumulative calories burned at any given time during your workout 5 PULSE Your computer displays your pulse rate in beats per minute during your workout 6 RPM Your pedal...

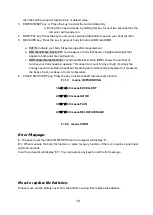
Страница 20: ...ber of calories your body needs to operate This doesn t account for any activity it s simply the energy needed to sustain a heartbeat breathing and normal body temperature It measures the body at rest not sleep at room temperature 6 PULSE RECOVERY key Press the key to activate heart rate recovery function F 1 0 means OUTSTANDING 1 0 F 2 0 means EXCELLENT 2 0 F 2 9 means GOOD 3 0 F 3 9 means FAIR 4...

Отзывы: