background image

101 


Search online devices manually 

You  can  also  click 

Refresh

  to  refresh  the  online  device  list  manually.  The 

newly searched devices will be added to the list. 


Note: 

You  can  click 

  or 

  on  each  column  heading  to  order  the 

information;  you  can  click 

  to  expand  the  device  table  and  hide  the 

network parameter panel on the right side, or click 

  to show the network 

parameter panel. 


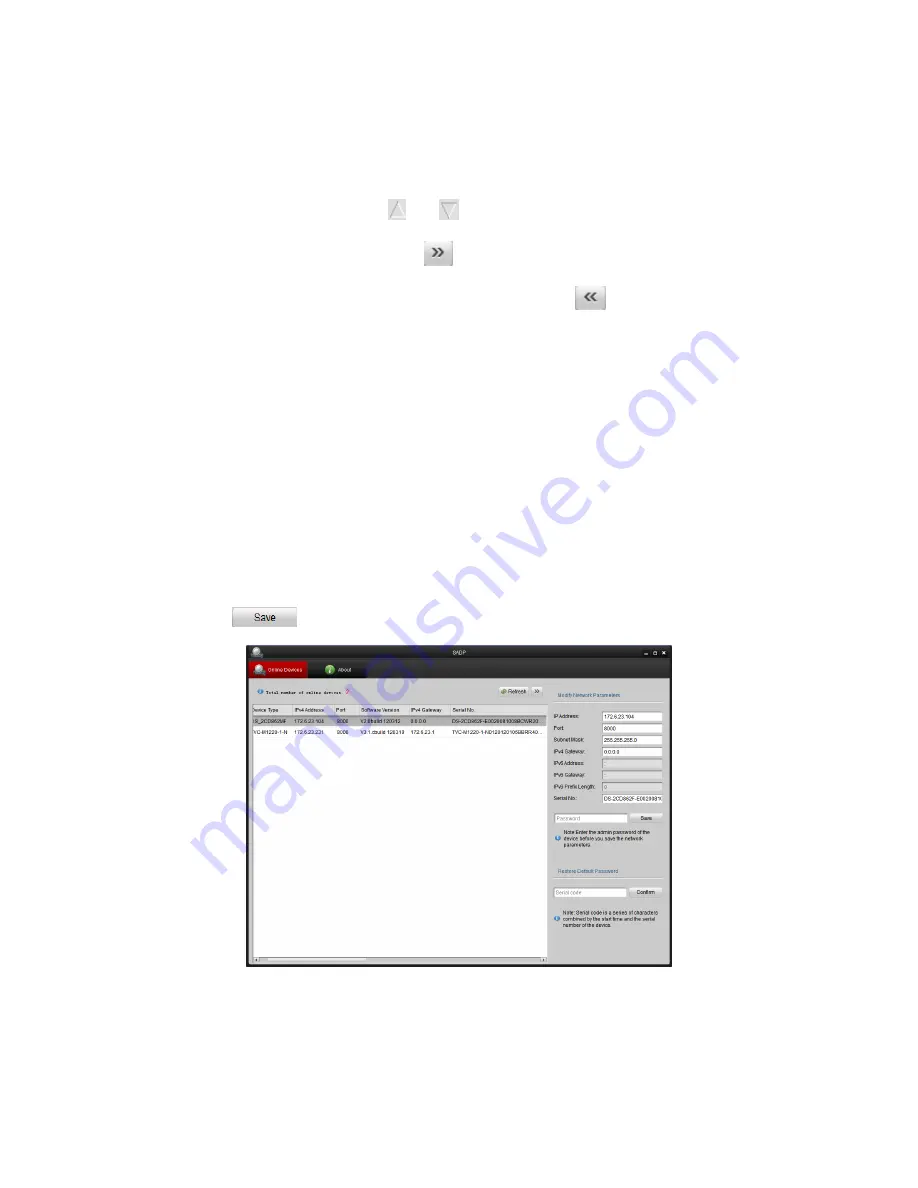
Modify network parameters 

Steps: 

1.


Select the device to be modified in the device list and the network parameters of 

the  device  will  be  displayed  in  the 

Modify  Network  Parameters

  panel  on  the 

right side. 

2.


Edit the modifiable network parameters, e.g. IP address and port number. 

3.


Enter the password of the admin account of the device in the 

Password

 field and 

click 

  to save the changes.   


Figure A.1.2 Modify Network Parameters 


Restore default password


Steps: 

Содержание NVC-BM1

Страница 1: ...0 Network Cameras NVC BM1 NVC DF1 NVC DT1 NVC DM1 User Manual V1 0 ...

Страница 2: ...1 For further information including full user and installation manual and technical support please visit www hills com au videosecurity ...

Страница 3: ...era Configuration 20 5 1 Configuring Local Parameters 20 5 2 Configuring Time Settings 22 5 3 Configuring Network Settings 24 5 3 1 Configuring TCP IP Settings 24 5 3 2 Configuring Port Settings 25 5 3 3 Configuring PPPoE Settings 26 5 3 4 Configuring DDNS Settings 26 5 3 5 Configuring SNMP Settings 29 5 3 6 Configuring 802 1X Settings 31 5 3 7 Configuring QoS Settings 31 5 3 8 Configuring UPnP Se...

Страница 4: ...ing Defocus Detection 66 5 6 9 Configuring Scene Change Detection 66 5 7 VCA Configuration 67 5 7 1 Behavior Analysis 67 5 7 2 Face Capture 73 Chapter 6 Storage Settings 77 6 1 Configuring NAS Settings 77 6 2 Configuring Recording Schedule 79 6 3 Configuring Snapshot Settings 83 Chapter 7 Playback 86 Chapter 8 Log Searching 89 Chapter 9 Others 90 9 1 Managing User Accounts 90 9 2 Authentication 92...

Страница 5: ...4 Appendix 100 Appendix 1 HVS Discovery Tool Software Introduction 100 Appendix 2 Port Mapping 103 ...

Страница 6: ...Vista Win7 Server 2003 Server 2008 32bits CPU Intel Pentium IV 3 0 GHz or higher RAM 1G or higher Display 1024 768 resolution or higher Web Browser Internet Explorer 6 0 and above version Safari 5 02 and above version Mozilla Firefox 3 5 and above version and Google Chrome8 and above versions ...

Страница 7: ...etwork camera in the same subnet with your computer and install the HVS Discovery Toll or HVS PC Client software to search and change the IP of the network camera Note For the detailed introduction of HVS Discovery Tool refer to Appendix 1 2 1 1 Wiring over the LAN The following figures show the two ways of cable connection of a network camera and a computer Purpose To test the network camera you ...

Страница 8: ...st the online devices Please refer to the user manual of HVS PC Client software for detailed information 2 Change the IP address and subnet mask to the same subnet as that of your computer 3 Enter the IP address of network camera in the address field of the web browser to view the live video Notes By default DHCP is enabled camera will search for DHCP server for a duration of 30 seconds If there i...

Страница 9: ...to the WAN with a static IP or a dynamic IP 2 2 1 Static IP Connection Before you start Please apply a static IP from an ISP Internet Service Provider With the static IP address you can connect the network camera via a router or connect it to the WAN directly Connecting the network camera via a router Steps 1 Connect the network camera to the router ...

Страница 10: ...ing 5 Visit the network camera through a web browser or the client software over the internet Figure 2 4 Accessing the Camera through Router with Static IP Connecting the network camera with static IP directly You can also save the static IP in the camera and directly connect it to the internet without using a router Refer to Section 2 1 2 Detecting and Changing the IP Address for detailed IP addr...

Страница 11: ...he DDNS settings in the setting interface of the router 7 Visit the camera via the applied domain name Connecting the network camera via a modem Purpose This camera supports the PPPoE auto dial up function The camera gets a public IP address by ADSL dial up after the camera is connected to a modem You need to configure the PPPoE parameters of the network camera Refer to Section 5 3 3 Configuring P...

Страница 12: ...S Settings for detailed configuration 3 Visit the camera via the applied domain name Private Domain Name Resolution Figure 2 8 Private Domain Name Resolution Steps 1 Install and run the IP Server software in a computer with a static IP 2 Access the network camera through the LAN with a web browser or the client software 3 Enable DDNS and select IP Server as the protocol type Refer to Section 6 3 4...

Страница 13: ...12 ...

Страница 14: ...ss bar e g 10 1 1 1 and press the Enter key to enter the login interface 3 Input the user name and password and click Login Figure 3 1 Login Interface Notes The default user name is admin and the default password is admin 4 Install the plug in before viewing the live video and operating the camera Please follow the installation prompts to install the plug in ...

Страница 15: ...14 Figure 3 2 Download and Install Plug in Figure 3 3 Install Plug in 1 Figure 3 4 Install Plug in 2 ...

Страница 16: ...cessing by Client Software Download HVS PC Client software from website www hills com au videosecurity You can view the live video and manage the camera with the software Follow the installation prompts to install the software The control panel and live view interface of HVS PC Client software are shown as bellow Figure 3 5 HVS PC Client Control Panel ...

Страница 17: ...16 Figure 3 6 HVS PC Client Configuration Panel Note For detailed information about the software please refer to the user manual of the HVS PC Client ...

Страница 18: ... page Descriptions of the live view page Figure 4 1 Live View Page Menu Bar Click each tab to enter Live View Playback Log and Configuration page respectively Display Control Click each tab to adjust the layout and the stream type of the live view And you can click the drop down to select the plug in For IE internet explorer user webcomponents and quick time are selectable And for Non IE user webc...

Страница 19: ...idow size Self adaptive window size Live view with the main stream Live view with the sub stream Live view with the third stream Click to select the third party plug in Manually capture the picture Manually start stop recording Audio on and adjust volume Mute Turn on off microphone Turn on off 3D zooming function 4 3 Recording and Capturing Pictures Manually In the live view interface click on the...

Страница 20: ...19 scheduled recording please refer to Section 7 2 Note The captured image will be saved as JPEG file or BMP file in your computer ...

Страница 21: ...the browser Steps 1 Enter the Local Configuration interface Configuration Local Configuration Figure 5 1 Local Configuration Interface 2 Configure the following settings Live View Parameters Set the protocol type and live view performance Protocol Type TCP UDP MULTICAST and HTTP are selectable TCP Ensures complete delivery of streaming data and better video quality yet the real time transmission w...

Страница 22: ... video files Valid for the record files you recorded with the web browser Record File Size Select the packed size of the manually recorded and downloaded video files to 256M 512M or 1G After the selection the maximum record file size is the value you selected Save record files to Set the saving path for the manually recorded video files Save downloaded files to Set the saving path for the download...

Страница 23: ...ings Or Configuration Advanced Configuration System Time Settings Figure 5 2 Time Settings Select the Time Zone Select the Time Zone of your location from the drop down menu Synchronizing Time by NTP Server 1 Check the checkbox to enable the NTP function 2 Configure the following settings Server Address IP address of NTP server NTP Port Port of NTP server Interval The time interval between the two...

Страница 24: ...used to establish a NTP server for time synchronization Synchronizing Time Synchronization Manually Enable the Manual Time Sync function and then click to set the system time from the pop up calendar Note You can also check the Sync with computer time checkbox to synchronize the time of the camera with that of your computer Figure 5 4 Time Sync Manually Click the DST tab page to enable the DST fun...

Страница 25: ... configured simultaneously without conflicting to each other and at least one IP version should be configured Steps 1 Enter TCP IP Settings interface Configuration Basic Configuration Network TCP IP Or Configuration Advanced Configuration Network TCP IP Figure 5 6 TCP IP Settings 2 Configure the basic network settings including the NIC Type IPv4 or IPv6 Address IPv4 or IPv6 Subnet Mask IPv4 or IPv...

Страница 26: ... required for the settings to take effect 5 3 2 Configuring Port Settings Purpose You can set the port No of the camera e g HTTP port RTSP port and HTTPS port Steps 1 Enter the Port Settings interface Configuration Basic Configuration Network Port Or Configuration Advanced Configuration Network Port Figure 5 7 Port Settings 2 Set the HTTP port RTSP port HTTPS port and server port of the camera HTT...

Страница 27: ...PoE Settings interface Configuration Advanced Configuration Network PPPoE Figure 5 8 PPPoE Settings 2 Check the Enable PPPoE checkbox to enable this feature 3 Enter User Name Password and Confirm password for PPPoE access Note The User Name and Password should be assigned by your ISP 4 Click Save to save and exit the interface Note A reboot is required for the settings to take effect 5 3 4 Configu...

Страница 28: ...eck the Enable DDNS checkbox to enable this feature 3 Select DDNS Type Four DDNS types are selectable HiDDNS IPServer NO IP and DynDNS DynDNS Steps 1 Enter Server Address of DynDNS e g members dyndns org 2 In the Domain text field enter the domain name obtained from the DynDNS website 3 Enter the Port of DynDNS server 4 Enter the User Name and Password registered on the DynDNS website 5 Click Save...

Страница 29: ...you have to apply a static IP subnet mask gateway and preferred DNS from the ISP The Server Address should be entered with the static IP address of the computer that runs the IP Server software Figure 5 11 IPServer Settings Note For the US and Canada area you can enter 173 200 91 74 as the server address NO IP Steps 1 Choose the DDNS Type as NO IP ...

Страница 30: ...the network Before you start Before setting the SNMP please download the SNMP software and manage to receive the camera information via SNMP port By setting the Trap Address the camera can send the alarm event and exception messages to the surveillance center Note The SNMP version you select should be the same as that of the SNMP software And you also need to use the different version according to...

Страница 31: ...ck the corresponding version checkbox to enable the feature 3 Configure the SNMP settings Note The settings of the SNMP software should be the same as the settings you configure here 4 Click Save to save and finish the settings Note A reboot is required for the settings to take effect ...

Страница 32: ... and password for 802 1X in the server Steps 1 Enter the 802 1X Settings interface Configuration Advanced Configuration Network 802 1X Figure 5 14 802 1X Settings 2 Check the Enable IEEE 802 1X checkbox to enable the feature 3 Configure the 802 1X settings including EAPOL version user name and password Note The EAPOL version must be identical with that of the router or the switch 4 Enter the user ...

Страница 33: ...ed in the IP header to indicate the priority of the data 3 Click Save to save the settings Note A reboot is required for the settings to take effect 5 3 8 Configuring UPnP Settings Universal Plug and Play UPnP is a networking architecture that provides compatibility among networking equipment software and other hardware devices The UPnP protocol allows devices to connect seamlessly and to simplify...

Страница 34: ...ore you start Please configure the DNS Server settings under Basic Configuration Network TCP IP or Advanced Configuration Network TCP IP before using the Email function Steps 1 Enter the TCP IP Settings Configuration Basic Configuration Network TCP IP or Configuration Advanced Configuration Network TCP IP to set the IPv4 Address IPv4 Subnet Mask IPv4 Default Gateway and the Preferred DNS Server No...

Страница 35: ...s 25 not secured And the SSL SMTP port is 465 Enable SSL Check the checkbox to enable SSL if it is required by the SMTP server Attached Image Check the checkbox of Attached Image if you want to send emails with attached alarm images Interval The interval refers to the time between two actions of sending attached pictures Authentication optional If your email server requires authentication check th...

Страница 36: ...anced Configuration Network NAT 2 Choose the port mapping mode To port mapping with the default port numbers Choose Port Mapping Mode To port mapping with the customized port numbers Choose And for manual port mapping you can customize the value of the port number by yourself Figure 5 18 Configure NAT Settings 3 Click Save to save the settings 5 3 11Configuring FTP Settings Purpose You can configu...

Страница 37: ... selected you have the option to use the Device Name Device Number or Device IP for the name of the directory and when the Child Directory is selected you can use the Camera Name or Camera No as the name of the directory Upload type To enable uploading the captured picture to the FTP server Anonymous Access to the FTP Server in which case the user name and password won t be required Check the Anon...

Страница 38: ...ociated web server that one is communicating with which protects against Man in the middle attacks Perform the following steps to set the port number of https Example If you set the port number as 443 and the IP address is 192 0 0 64 you may access the device by inputting https 192 0 0 64 443 via the web browser Steps 1 Enter the HTTPS settings interface Configuration Advanced Configuration Networ...

Страница 39: ...icate is grayed out Create the authorized certificate 1 Click Create button to create the certificate request 2 Download the certificate request and submit it to the trusted certificate authority for signature 3 After receiving the signed valid certificate import the certificate to the device 3 There will be the certificate information after you successfully create and install the certificate Figu...

Страница 40: ...m Type of the camera to main stream normal sub stream or third stream The main stream is usually for recording and live viewing with good bandwidth and the sub stream and third stream can be used for live viewing when the bandwidth is limited 3 You can customize the following parameters for the selected main stream or sub stream Video Type Select the stream type to video stream or video audio comp...

Страница 41: ...er video quality but the higher bandwidth is required Video Encoding If the Stream Type is set to main stream H 264 and MJPEG are selectable and if the stream type is set to sub stream H 264 MJPEG and MPEJ4 are selectable Note The supported video encoding may differ according to the different platform Profile Basic profile Main Profile and High Profile for coding are selectable I Frame Interval Se...

Страница 42: ...4kbps and 128kbps are supported if MP2L2 is selected Audio Input MicIn and Linein are selectable for the connected microphone and pickup respectively Input Volume 0 100 Environmental Noise Filter Set it as OFF or ON When you set the function on the noise detected can be filtered 3 Click Save to save the settings 5 4 3 Configuring ROI Encoding ROI stands for the region of interest And the ROI encod...

Страница 43: ...ation Advanced Configuration Video Audio ROI Figure 5 26 Region of Interest Settings 2 Draw the region of interest on the image There are four regions can be drawn 3 Choose the stream type to set the ROI encoding 4 Choose the ROI type There are two options for ROI encoding the fixed region encoding and the dynamic tracking ...

Страница 44: ...5 1 Configuring Display Settings Purpose You can set the image quality of the camera including brightness contrast saturation hue sharpness etc Note The display parameters vary according to the different camera model Please refer to the actual interface for details Steps 1 Enter the Display Settings interface Configuration Basic Configuration Image Display Settings Or Configuration Advanced Config...

Страница 45: ...50 Sharpness describes the edge contrast of the image which ranges from 1 100 and the default value is 50 Exposure Settings If the camera is equipped with the fixed lens only Manual is selectable and the iris mode is not configurable If Auto is selected you can set the auto iris level from 0 100 For the camera supports P Iris lens if P Iris lens is adopted then the P Iris lens type is selectable e...

Страница 46: ...rm input are selectable for day night switch Day the camera stays at day mode Night the camera stays at night mode Auto the camera switches between the day mode and the night mode according to the illumination automatically The sensitivity ranges from 0 7 the higher the value is the easier the mode switches The filtering time refers to the interval time between the day night switch You can set it ...

Страница 47: ...OFF Up Down Left Right Center and customize are selectable WDR Wide Dynamic Range can be used when there is a high contrast of the bright area and the dark area of the scene HLC High Light Compression function can be used when there are strong lights in the scene affecting the image quality White Balance White balance is the white rendition function of the camera used to adjust the color temperatu...

Страница 48: ...ll get a normal view of the scene with 9 16 aspect ratio to ignore the needless information such as the wall and get more meaningful information of the scene Scene Mode Choose the scene as indoor or outdoor according to the real environment Video Standard 50 Hz and 60 Hz are selectable Choose according to the different video standards normally 50 Hz for PAL standard and 60 Hz for NTSC standard Cap...

Страница 49: ...mode Note The detailed information of each parameter please refers to day night auto switch session 3 Click Day tab to configure the parameters applicable for day mode 4 Click Night tab to configure the parameters applicable for night mode Note The settings saved automatically if any parameter is changed 5 5 2 Configuring OSD Settings Purpose You can customize the camera name and time on the scree...

Страница 50: ...ra name in the text field of Camera Name 4 Select from the drop down list to set the time format date format display mode and the OSD font size 5 Define the font color of the OSD by clicking the drop down and black white self adaptive and custom are selectable Figure 5 32 Font Color Custom 6 You can use the mouse to click and drag the text frame in the live view window to adjust the OSD position ...

Страница 51: ...ve to activate the above settings 5 5 3 Configuring Text Overlay Settings Purpose You can customize the text overlay Steps 1 Enter the Text Overlay Settings interface Configuration Advanced Configuration Image Text Overlay Figure 5 34 Text Overlay ...

Страница 52: ...sk Purpose Privacy mask enables you to cover certain areas on the live video to prevent certain spots in the surveillance area from being live viewed and recorded Steps 1 Enter the Privacy Mask Settings interface Configuration Advanced Configuration Image Privacy Mask 2 Check the checkbox of Enable Privacy Mask to enable this function 3 Click Draw Area Figure 5 35 Privacy Mask Settings 4 Click and...

Страница 53: ...logo on the image Note The picture must be in RGB24 bmp format and the maximum size of the picture is 128 128 Steps 1 Enter the Picture Overlay Settings interface Configuration Advanced Configuration Image Picture Overlay Figure 5 36 Picture Overlay 2 Click Browse to select a picture 3 Click Upload to upload it 4 Check Enable Picture Overlay checkbox to enable the function X Coordinate and Y Coord...

Страница 54: ... you configure the intelligent functions including face detection audio exception detection intrusion detection defocus detection scene change detection etc A help document will guide you to go through the configuration steps 5 6 1 Configuring Motion Detection Purpose Motion detection detects the moving objects in the configured surveillance area and triggers the certain action as a respond to det...

Страница 55: ... the detected objected displayed with the rectangles Select disable from Configuration Local Configuration Live View Parameters rules Figure 5 37 Enable Motion Detection 4 Click Draw Area Click and drag the mouse on the live video to draw a motion detection area 5 Click Stop Drawing to finish drawing one area 6 Optional Click Clear All to clear all of the areas 7 Optional Move the slider to set th...

Страница 56: ... the day you want to set the arming schedule 3 Click to set the time period for the arming schedule 4 Optional After you set the arming schedule you can copy the schedule to other days 5 Click OK to save the settings Note The time of each period can t be overlapped Up to 4 periods can be configured for each day Figure 5 39 Arming Time Schedule ...

Страница 57: ...tion or alarm signal to remote management software when an event occurs Send Email Send an email with alarm information to a user or users when an event occurs Note To send the Email when an event occurs you need to refer to Section 6 6 6 to set the related parameters Upload to FTP Capture the image when an alarm is triggered and upload the picture to a FTP server Note Set the FTP address and the ...

Страница 58: ...ct on area of each area for different day night switch Figure 5 41 Expert Mode of Motion Detection Day Night Switch OFF Steps 1 Draw the detection area as in the normal configuration mode Up to 8 areas are supported 2 Select OFF for Switch Day and Night Settings 3 Select the area by clicking the area No 4 Slide the cursor to adjust the sensitivity and proportion of object on the area for the selec...

Страница 59: ...nsitivity and proportion of object on the area for the selected area in the daytime 5 Slide the cursor to adjust the sensitivity and proportion of object on the area for the selected area at night 6 Set the arming schedule and linkage method as in the normal configuration mode 7 Click Save to save the settings Day Night Scheduled Switch 1 Draw the detection area as in the normal configuration mode...

Страница 60: ...ursor to adjust the sensitivity and proportion of object on the area for the selected area at night 7 Set the arming schedule and linkage method as in the normal configuration mode 8 Click Save to save the settings 5 6 2 Configuring Video Tampering Alarm Purpose You can configure the camera to trigger the alarm when the lens is covered and take alarm response action Steps 1 Enter the video tamperi...

Страница 61: ... arming schedule for motion detection Refer to Task 2 Set the Arming Schedule for Motion Detection in Section 6 6 1 5 Check the checkbox to select the linkage method taken for the video tampering Audible warning notify surveillance center send email and trigger alarm output are selectable Please refer to Task 3 Set the Alarm Actions for Motion Detection in Section 6 6 1 6 Click Save to save the se...

Страница 62: ...6 6 1 4 Check the checkbox to select the linkage method taken for the alarm input Refer to Task 3 Set the Alarm Actions for Motion Detection in Section 6 6 1 5 You can also choose the PTZ linking for the alarm input if your camera is installed with a pan tilt unit Check the relative checkbox and select the No to enable Preset Calling Patrol Calling or Pattern Calling 6 You can copy your settings t...

Страница 63: ...ns in effect after alarm occurs 4 Click Edit to enter the Edit Schedule Time interface The time schedule configuration is the same as the settings of the arming schedule for motion detection Refer to Task 2 Set the Arming Schedule for Motion Detection in Section 6 6 1 5 You can copy the settings to other alarm outputs 6 Click Save to save the settings Figure 5 46 Alarm Output Settings 5 6 5 Handli...

Страница 64: ...irtual Plane This function can be used for detecting people vehicles and objects traversing a pre defined virtual plane The traversing direction can be set as bidirectional from left to right or from right to left And a series of linkage method will be triggered if any object is detected Steps 1 Check the Enable Traversing Virtual Plane Detection checkbox 2 Click the Draw Area and a virtual plane ...

Страница 65: ...be detected and alarms are triggered A B Only the object crossing the virtual plane from the A side to the B side can be detected B A Only the object crossing the virtual plane from the B side to the A side can be detected 4 Set the sensitivity 1 100 5 Choose another virtual plane on the dropdown list to configure Up to 4 virtual planes are configurable 6 Click Save to save the settings ...

Страница 66: ...rted Figure 5 49 Configuring Intrusion Area You can click Clear to clear the areas you drawn The defense region parameters can be set separately 3 Choose the region to be configured Threshold Range 0 10s the threshold for the time of the object loitering in the region If you set the value as 0 alarm is triggered immediately after the object entering the region Sensitivity Range 1 100 The value of ...

Страница 67: ...hannel or trigger the Alarm Output 3 Click Save to save the settings 5 6 8 Configuring Defocus Detection Purpose The image blur caused by defocus of the lens can be detected and a series of alarm action can be triggered Steps 1 Check the Enable Defocus Detection checkbox 2 Choose to trigger alarm actions as Notify Surveillance Center and Send Email or trigger the Alarm Output 3 Click Save to save ...

Страница 68: ...is configured to set the time you want the function to be enabled 2 Click Edit to set the arming schedule 3 Choose to trigger alarm actions as Notify Surveillance Center and Send Email or trigger the Alarm Output 4 Click Save to save the settings Figure 5 51 Scene Change Detection 5 7 VCA Configuration 5 7 1 Behavior Analysis The behavior analysis detects a series of suspicious behavior and the ce...

Страница 69: ...nfo on Stream The green frames will be displayed on the target if in a live view or playback Note Make sure the rules are enabled in your local settings Go to Configuration Local configuration Rules to enable it Snapshot Setting You can set the quality and resolution for the captured picture Picture Quality Good better and best are selectable Picture Resolution CIF 4CIF 720P and 1080P are selectab...

Страница 70: ...ld With the drawn reference lines and their real length the camera can conclude other objects appear in the live view Notes Click Delete to delete the drawn lines If the live view is stopped the camera calibration will not function 3 Click Save to save the settings Figure 5 53 Draw on Live View Window Shield Region The shield region allows you to set the specific region in which the behavior analy...

Страница 71: ... the shield regions 3 Click Save to save the settings Rule The behavior analysis support a series of behaviors including traversing virtual plane intrusion region entrance region exiting and null Note The definition of the each behavior please refer to each chapter for detailed information Figure 5 54 Configure the Rule Steps 1 Click Rule Tab to enter the rule configuration interface ...

Страница 72: ...ote Make sure the camera calibration is configured if actual size is selected 5 Draw areas If the intrusion region entrance or region existing is selected you have to draw the configure area by left click end points in the live view window and right click to finish the area drawing If traversing virtual plane is selected you have to draw a line and select the crossing direction which is bidirectio...

Страница 73: ... same target will cause the continuous alarm in the same configured area Leave Interference Suppression Check this checkbox to stop the interference caused by the leaves in the configured area Output Type Select the position of the frame Target center bottom center and top centers are selectable E g The target will be in the center of the frame if target center is selected Restore Default Click to...

Страница 74: ...angle of the min size on the live view And click Maximum Size to draw the rectangle of the max size on the live view The target is smaller than the min size or larger than the max size will be filtered Notes The drawn area will be converts to the pixel by the background algorithm The global size filter cannot be configured if the live view is stopped The length of the maximum size should be longer...

Страница 75: ...k Snapshot Setting Select the picture quality for the captured picture Good better and best are selectable Shield Region The shield region allows you to set the specific region in which the face capture will not function Up to 4 shield regions are supported Steps 4 Click Shield Region tab to enter the shield region configuration interface 5 Click Draw Area Draw area by left click four end points i...

Страница 76: ...onfiguration Configure the following parameters according to your actual environment Detection Parameters Generation Speed 1 5 The speed to identify a target The higher the value the fast the target will be recognized Setting the value quite low and if there was a face in the configured area from the start this face will not be captured It can reduce the misinformation of the faces in the wall pai...

Страница 77: ...ce is detected the camera adjusts the face brightness according to the value you set The higher the value the brighter the face is Minimum Duration 1 60min The minimum duration of the camera exposures the face The default value is 1 minute Note If the face exposure is enabled please make sure the WDR function is disabled and the manual iris is selected Enable Face ROI If the camera captures a face...

Страница 78: ... within the network and properly configured to store the recorded files log files etc Steps 1 Add the network disk 1 Enter the NAS Network Attached Storage Settings interface Configuration Advanced Configuration Storage NAS Figure 6 1 Add Network Disk 2 Enter the IP address of the network disk and enter the file path 3 Select the mounting type NFS and SMB CIFS are selectable And you can set the us...

Страница 79: ... type and property of the disk Figure 6 2 Storage Management Interface 2 If the status of the disk is Uninitialized check the corresponding checkbox to select the disk and click Format to start initializing the disk When the initialization completed the status of disk will become Normal Figure 6 3 View Disk Status 3 Define the quota for record and pictures 1 Input the quota percentage for picture ...

Страница 80: ... recording for the cameras manual recording and scheduled recording For the manual recording refer to Section 5 3 Recording and Capturing Pictures Manually In this section you can follow the instructions to configure the scheduled recording By default the record files of scheduled recording are stored in the SD card if supported or in the network disk Steps 1 Enter the Record Schedule Settings int...

Страница 81: ...r the event For example if an alarm triggers recording at 10 00 and the pre record time is set as 5 seconds the camera starts to record at 9 59 55 The Pre record time can be configured as No Pre record 5 s 10 s 15 s 20 s 25 s 30 s or not limited Post record The time you set to stop recording after the scheduled time or the event For example if an alarm triggered recording ends at 11 00 and the pos...

Страница 82: ...igure the all day recording please check the All Day checkbox If you want to record in different time sections check the Customize checkbox Set the Start Time and End Time Note The time of each segment can t be overlapped Up to 4 segments can be configured 2 Select a Record Type The record type can be Continuous Motion Detection Alarm Motion Alarm Motion Alarm PIR Alarm Wireless Alarm Emergency Al...

Страница 83: ...check the checkbox of Trigger Channel in the Linkage Method of Alarm Input Settings interface For detailed information please refer to Section 6 6 4 Record Triggered by Motion Alarm If you select Motion Alarm the video will be recorded when the motion and alarm are triggered at the same time Besides configuring the recording schedule you have to configure the settings on the Motion Detection and A...

Страница 84: ...onfiguring Snapshot Settings Purpose You can configure the scheduled snapshot and event triggered snapshot The captured picture can be stored in the SD card if supported or the netHDD For detailed information about netHDD please refer to Section 7 1 Configuring NAS Settings You can also upload the captured pictures to a FTP server Basic Settings Steps 1 Enter the Snapshot Settings interface Config...

Страница 85: ...ection 6 3 10 Configuring FTP Settings for more details to configure FTP parameters 2 Check the Enable Timing Snapshot checkbox Upload event triggered snapshots to FTP Steps 1 Configure the FTP settings and check Upload Picture checkbox in FTP Settings interface Please refer to Section 6 3 8 Configuring FTP Settings for more details to configure FTP parameters 2 Check Upload Picture checkbox in Mo...

Страница 86: ...85 Figure 6 9 Snapshot Settings ...

Страница 87: ...tely recorded video files stored in the network disks or SD cards Steps 1 Click Playback on the menu bar to enter playback interface Figure 7 1 Playback Interface 2 Select the date and click Search Figure 7 2 Search Video 3 Click to play the video files found on this date ...

Страница 88: ...by frame Enable Disable digital zoom Note You can choose the file paths locally for downloaded playback video files and pictures in Local Configuration interface Please refer to Section 6 1 for details Drag the progress bar with the mouse to locate the exact playback point You can also input the time and click to locate the playback point in the Set playback time field You can also click to zoom o...

Страница 89: ...88 Figure 7 6 Video Types ...

Страница 90: ...ert a SD card in the camera Steps 1 Click Log on the menu bar to enter log searching interface Figure 8 1 Log Searching Interface 2 Set the log search conditions to specify the search including the Major Type Minor Type Start Time and End Time 3 Click Search to search log files The matched log files will be displayed on the Log interface Figure 8 2 Log Searching 4 To export the log files click Sav...

Страница 91: ... the User Name select Level and input Password Notes Different level user owns different permissions Operator and user are selectable The system will judge the password strength automatically it is highly recommended to set a password with high security level to ensure the security A good password should be no less than 6 characters and is the combination of numeric upper case letters and lower ca...

Страница 92: ...Left click to select the user from the list and click Modify 2 Modify the User Name Level or Password 3 In the Basic Permission field and Camera Configuration field you can check or uncheck the permissions 4 Click OK to finish the user modification ...

Страница 93: ... You can specifically secure the stream data of live view Steps 1 Enter the Authentication interface Configuration Advanced Configuration Security Authentication Figure 9 4 RTSP Authentication 2 Select the RTSP Authentication type basic or disable in the drop down list to enable or disable the RTSP authentication Note If you disable the RTSP authentication anyone can access the video stream by ...

Страница 94: ... and password of the device Steps 1 Enter the Anonymous Visit interface Configuration Advanced Configuration Security Anonymous Visit Figure 9 5 Anonymous Visit 2 Set the Anonymous Visit permission Enable or Disable in the drop down list to enable or disable the anonymous visit 3 Click Save to save the settings There will be a checkbox of Anonymous by the next time you logging in Figure 9 6 Login ...

Страница 95: ...dress Filter Figure 9 7 IP Address Filter Interface 2 Check the checkbox of Enable IPAddress Filter 3 Select the type of IP Address Filter in the drop down list Forbidden and Allowed are selectable 4 Set the IP Address Filter list Add an IP Address Steps 1 Click the Add to add an IP 2 Input the IP Adreess Figure 9 8 Add an IP 3 Click the OK to finish adding Modify an IP Address ...

Страница 96: ... 5 Security Service To enable the remote login and improve the data communication security the camera provides the security service for better user experience Go to Configuration Advanced configuration Security Security Service to enter the security service configuration interface Figure 9 10 Security Service Check the checkbox of Enable Telnet to enable the remote login by the telnet and uncheck ...

Страница 97: ...Serial No Firmware Version Encoding Version Number of Channels Number of HDDs Number of Alarm Input and Number of Alarm Output are displayed The information cannot be changed in this menu It is the reference for maintenance or modification in future Figure 9 11 Device Information 9 7 Maintenance 9 7 1 Rebooting the Camera Steps 1 Enter the Maintenance interface Configuration Basic Configuration Sy...

Страница 98: ...ion 9 7 3 Exporting Importing Configuration File Purpose Configuration file is used for the batch configuration of the camera which can simplify the configuration steps when there are a lot of cameras needing configuring Steps 1 Enter the Maintenance interface Configuration Basic Configuration System Maintenance or Configuration Advanced Configuration System Maintenance 2 Click Export to export th...

Страница 99: ...e directory to locate the upgrade file Firmware Locate the exact path of the upgrade file Firmware Directory Only the directory the upgrade file belongs to is required 3 Click Browse to select the local upgrade file and then click Upgrade to start remote upgrade Figure 9 15 Remote Upgrade Note The upgrading process will take 1 10 minutes Please don t disconnect power of the camera during the proce...

Страница 100: ...vice the camera supports and it varies according to the different cameras For the cameras support IR LED ABF Auto Back Focus Auto Defog or Status LED you can go to the hardware service and select to enable or disable the corresponding service according to the actual demands ...

Страница 101: ...are Search active devices online Search online devices automatically After launch the software it automatically searches the online devices every 15 seconds from the subnet where your computer locates It displays the total number and information of the searched devices in the Online Devices interface Device information including the device type IP address port number gateway etc will be displayed ...

Страница 102: ...the right side or click to show the network parameter panel Modify network parameters Steps 1 Select the device to be modified in the device list and the network parameters of the device will be displayed in the Modify Network Parameters panel on the right side 2 Edit the modifiable network parameters e g IP address and port number 3 Enter the password of the admin account of the device in the Pas...

Страница 103: ...engineers to get the serial code Note Serial code is a series of characters combined by the start time and the serial number of the device 2 Input the code in the Serial code field and click Confirm to restore the default password ...

Страница 104: ...ters of the router as in the following figure including IP address and subnet mask settings Figure A 2 2 Set the LAN parameters 3 Set the port mapping in the virtual severs of Forwarding By default camera uses port 80 8000 and 554 You can change these ports value with web browser or client software Example When the cameras are connected to the same router you can configure the ports of a camera as...

Страница 105: ...era at 192 168 1 23 2 Map the port 81 8001 555 and 8201 for the network camera at 192 168 1 24 3 Enable ALL or TCP protocols 4 Check the Enable checkbox and click Save Figure A 2 3 Port Mapping Note The port of the network camera cannot conflict with other ports For example some web management port of the router is 80 Change the camera port if it is the same as the management port ...

Страница 106: ...105 For further information including full user and installation manual and technical support please visit www hills com au videosecurity ...

Страница 107: ......

Отзывы: