background image

7

6

Installation

Installation

Drill 2 holes using  

masonry drill

Product centre line

30mm

Mount hole centres

Top of 

product

Product centr

e line

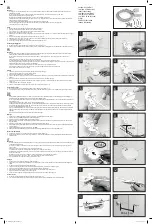
Step 3 – Mounting your cabinet to a wall

3.1   Prepare your cabinet location 
 

Determine the best location for the installation of your product (refer to page 4).


Mark out a centre line for your product within your allocated site.

3.2

  Ensure that either side of this centre line and the area where the cabinet is to be installed on 

the wall is free from pipes and other obstructions (

Fig. 1

).

3.3

  Mark the cabinet mount centres on the wall at the desired installation height (refer to page 5 

and the table below).

Centres

(mm)

Centres

(inch)

705

27¾

Fig. 1

3.4  Drill holes in wall 
 

Masonry fasteners are 

not

 included with this product. When attaching to a sound masonry 

wall, we recommend using masonry sleeve (hex head) anchors (diameter 8mm x 45mm). 

3.5

  If you are using these fasteners, drill an 8mm (5/16") hole using a masonry drill (

Fig 2

).

 Note:

 If you are mounting to a different wall type, consult your hardware store for advice on 

the appropriate fasteners to use.

Fig. 2

Mount 

centres

Ensure surrounding  

area is free from 

obstructions

‘Mount Hole Centres’

2.0m (6'6") to 


6.5m (21’4")

Step 3 (continued) – Mounting your cabinet to a wall

3.6 

Remove the arm from the cabinet by pulling on the two blue end caps. Remove the end 
covers only from the cabinet by unscrewing the two screws (

Fig 3

).


3.7 

Locate the cabinet on the wall, ensure cabinet is level. Using appropriate wall fasteners 
secure cabinet to the wall.

3.8

  Reattach the cabinet end covers and secure with the screws. Refit arm into cabinet.

Fig. 3

Masonry anchor 

(Not included)

Masonry anchor 

(Not included)

End cover

End cover screw

Arm

End cover screw

Blue end cap

Содержание FD52007

Страница 1: ...the retracting clothesline product manual 5 line ...

Страница 2: ...ct Manual Record the following information for future reference Product Number printed on carton Date of purchase Name and location of store Introduction Made in China Designed and tested under a Quality System that meets Hills demanding quality specifications Carton contents Part name Qty Retracting line cabinet 1 Receiving bracket 1 Optional Post Mounting Kits If you choose to mount your Retract...

Страница 3: ...0mm 2 User s head height 50mm 2 60mm 2 115mm 4 125mm 5 Receiving bracket fasteners Receiving bracket fasteners Note The receiving bracket should be located at a height to ensure the clothesline is close to horizontal Location of receiving bracket fasteners are approximately 25mm 1 above user s head height when installed on level ground For post mounting a receiving bracket the top of the post shou...

Страница 4: ...en attaching to a sound masonry wall we recommend using masonry sleeve hex head anchors diameter 8mm x 45mm 3 5 If you are using these fasteners drill an 8mm 5 16 hole using a masonry drill Fig 2 Note If you are mounting to a different wall type consult your hardware store for advice on the appropriate fasteners to use Fig 2 Mount centres Ensure surrounding area is free from obstructions Mount Hol...

Страница 5: ...h your mount bar kit Fig 4 Ensure surrounding area is free from obstruction Product centre line 2 0m 6 6 to 6 5m 21 4 Step 4 continued Mounting your cabinet to a post 4 5 Remove the arm from the cabinet by pulling on the two blue end caps Remove the end covers only from the cabinet by unscrewing the two screws Fig 5 4 6 Locate the cabinet with the pre drilled holes in the mount bar sold separately...

Страница 6: ...Fig 6 Receiving bracket Product centre line Masonry anchor Fig 6 Step 6 Mounting your receiving bracket to a post 6 1 Prepare your receiving bracket location On the pre determined product centre locate the position for your post and receiving bracket Refer to page 4 6 2 Install your post as per the instructions supplied with your post kit Refer to diagram on page 5 to determine the installation he...

Страница 7: ... lines rotate the tension knob anti clockwise Fig 11 Fig 10 Tension Release tension Fig 11 Step 7 continued Operation 7 5 Hold the arm firmly remove it from the receiving bracket and walk it back to the cabinet keeping the arm horizontal and in line with the cabinet Warning Do not release the arm and allow it to retract uncontrolled 7 6 Replace the arm into its position in the cabinet Fig 12 Note ...

Страница 8: ... is not sitting in the receiving bracket parallel to the wall and requires adjustment Fig 17 Tensioning knob in the unlocked position Figure 8 knot diameter when tight 10mm PVC line Grommet Arm tube Knot detail Fig 15 Parallel to wall 10mm tail 8 6 If after trying the method in steps 8 2 to 8 5 your product is still not evenly tensioned to your satisfaction you can manually adjust the tension of i...

Страница 9: ...ts and check for wear and tear or damage Ensure fasteners are secure If there is any damage parts should be replaced with original Hills spares The Clothesline should be repaired before using again Your Clothesline should be periodically wiped clean with a damp cloth and mild detergent We do not recommend the use of oil or WD type lubricants on any part of the Clothesline To maintain appearance an...

Страница 10: ...e Product or part Hills will be responsible for the collection and freight costs of returning that Product or part The consumer agrees to assist Hills with any reasonable request to enable Hills to collect such Product or part d Hills also agrees to be responsible for the freight costs to deliver any new Product or replacement part to the consumer 5 This warranty is in addition to any non excludab...

Страница 11: ...Hills Limited ABN 35 007 573 417 Issue January 2014 PD4205d ...

Отзывы: