Service Manual Viking™ M
mobile lift
• 3EN370401 Rev. 21
12
www.liko.com
l
www.hill-rom.com
Trouble Shooting for CBL20
3EN902101-01
Customers FAQ:
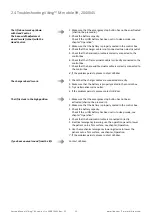
- The liftarms up/down function or base width in/out function doesn´t work?
a) Change position on actuator and base motor cables.
b) Perform step 2 and see if fault is on output channel or motors.
- The control panel function´s on controlbox is ok, but the hand control has no function?
a) Check to ensure that battery contact plates in the hand control are not defective or broken.
- There´s no charging function?
a) Verify contact between control box and battery. Perform step 4.
b) Check charging function. Perform step 5.
Note!
Begin with Simple trouble shooting from Service manual for the
actual product. If problem remains continue as described below.
Tools Required
Multimeter
1 2 3
Instructions regarding the check points for
Lift type:
Serial No: Prod. Year:
Contract No:
Name:
Address:
(Zip Code)
Viking M
www.liko.com
14
Tools required
Ah 140
280
420
560
700
Check:
8 Battery
Battery capacity
Check battery capacity by pressing the i button (1).
The following information is displayed:
2 – Green light:
More than 50% of battery capacity remaining.
3 – Yellow light:
25% -50% of battery capacity remaining.
4 – Yellow light:
0% -25% of battery capacity remaining.
The indicator lamps light for about 30 seconds before switching off.
Battery capacity is also displayed during lift operation.
Maximum charge is reached after about 5 hours. When the batteries are fully charged, the charger switches
automatically to maintenance charging.
The lamps blink alternately (yellow/yellow/green) during charging. A blinking green lamp indicates that charging
is complete. When operating time is noticeably shorter than normal, the batteries should probably be replaced.
Discontinue charging and replace the batteries with 2006107 Extra battery box.
1
4
3
2
Prod. No.
2006107 Extra battery box
Replace:
2
1 2 3
1
Instructions regarding the check points for
Lift type:
Serial No: Prod. Year:
Contract No:
Name:
Address:
(Zip Code)
Viking M
www.liko.com
14
Tools required
Ah 140
280
420
560
700
Check:
8 Battery
Battery capacity
Check battery capacity by pressing the i button (1).
The following information is displayed:
2 – Green light:
More than 50% of battery capacity remaining.
3 – Yellow light:
25% -50% of battery capacity remaining.
4 – Yellow light:
0% -25% of battery capacity remaining.
The indicator lamps light for about 30 seconds before switching off.
Battery capacity is also displayed during lift operation.
Maximum charge is reached after about 5 hours. When the batteries are fully charged, the charger switches
automatically to maintenance charging.
The lamps blink alternately (yellow/yellow/green) during charging. A blinking green lamp indicates that charging
is complete. When operating time is noticeably shorter than normal, the batteries should probably be replaced.
Discontinue charging and replace the batteries with 2006107 Extra battery box.
1
4
3
2
Prod. No.
2006107 Extra battery box
Replace:
3
green, LED
yellow, LED
5
4
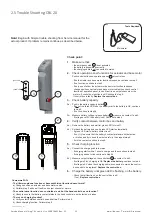
1.
Make sure that:
- the emergency stop 1 is not activated.
- the battery is assembled correctly.
- the charging cable is not connected to mains.
2.
Check operation panel function´s for actuator and base motor
Push control buttons on operation panel 2 at control box
- If both actuator and base motor functions response, continue to step 5.
- If no function, continue to step 3.
- If only one of either the actuator or base motor function response:
change position on actuator and base motor cables then check control
function of operation panel, to see if fault is on output channels or the
motors. If control box function is ok! Continue to step 5.
If control box is faulty.
Replace the control box.
3.
Check battery capacity
3a) Push in the battery capacity button 3 :
- If any of the three LED´s on the battery start´s the battery is OK, continue
to step 4.
- If not, continue to step 3b.
3b)
Measure battery voltage: release battery, 4 measure on contact 1 and 3:
- If voltage over 0V the battery is ok! Continue to step 4.
4.
Verify contact between control box and battery
.
4a)
Remove the battery and wait for green LED to turn off.
4b)
Put back the battery and see if green LED start automatically.
- If green LED starts, battery contact is ok!
- If not, try to ensure that the battery´s contact plates are not defective
or broken and try to bend them out carefully, then repeat step 4.
- If still no contact, continue to step 5.
5.
Check charging function
5a)
Connect the charging cable to mains
- If charging starts within 1 minute, charge and then continue to step 6.
- If charging doesn´t start, continue to step 5b.
5b)
Measure output voltage on the control box 5 on contact 1 and 3.
- If voltage is 3-4V charging is OK!
Replace the battery
, continue to step 6.
- If voltage is 0V when the charging cable is connected to mains the control
box needs to be replaced!
Replace the control box
.
6.
Charge the battery until green LED is flashing, on the battery.
- Check that all function´s on the control box is ok!
If not ,
Replace control box
.
Check point:
2.5 Trouble Shooting CBL 20


