background image

User Manual of Digital Video Recorder 


65 


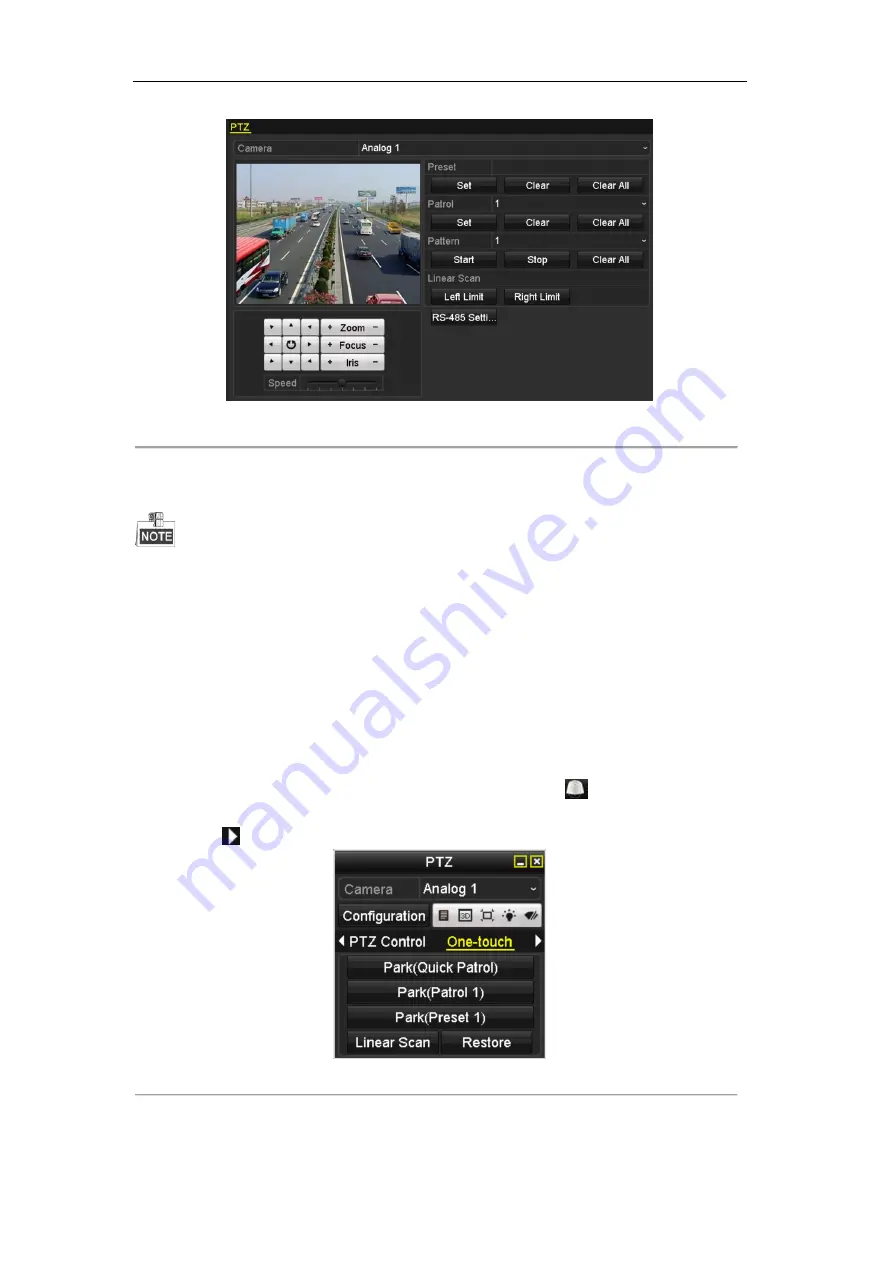
Figure 4. 10


PTZ Settings 


2.


Use the directional button to wheel the camera to the location where you want to set the limit, and click 

the 

Left Limit

 or 

Right Limit

 button to link the location to the corresponding limit. 


The speed dome starts linear scan from the left limit to the right limit, and you must set the left limit on the left 

side of the right limit, as well the angle from the left limit to the right limit should be no more than 180º

.


4.2.8


Calling Linear Scan 

Purpose: 

Follow the procedure to call the linear scan in the predefined scan range.


Steps: 

1.


Click the button 

PTZ

 in the lower-right corner of the PTZ setting interface; 

Or press the PTZ button on the front panel or click the PTZ Control icon 

  in the quick setting bar to 

enter the PTZ setting menu in live view mode. 

2.


Click the 

  button to show the one-touch function of the PTZ control. 


Figure 4. 11


PTZ Panel - One-touch 


3.


Click 

Linear Scan 

button to start the linear scan and click the Linear Scan button again to stop it. 

You can click the 

Restore

 button to clear the defined left limit and right limit data and the dome needs to 

Содержание PS-7104HQHI-SH

Страница 1: ...Digital Video Recorder User Manual UD 6L0202D1874A01...

Страница 2: ...ES OF MERCHANTABILITY AND FITNESS FOR A PARTICULAR PURPOSE REGARDING THIS MANUAL HIKVISION DOES NOT WARRANT GUARANTEE OR MAKE ANY REPRESENTATIONS REGARDING THE USE OF THE MANUAL OR THE CORRECTNESS ACC...

Страница 3: ...rence received including interference that may cause undesired operation EU Conformity Statement This product and if applicable the supplied accessories too are marked with CE and comply therefore wit...

Страница 4: ...ory recommended HDD should be used for this device Improper use or replacement of the battery may result in hazard of explosion Replace with the same or equivalent type only Dispose of used batteries...

Страница 5: ...HGHI SH DS 7204HGHI SH DS 7208HGHI SH DS 7216HGHI SH Network DVR DS 7200HQHI SH DS 7204HQHI SH DS 7208HQHI SH Network DVR DS 7200HGHI E1 DS 7204HGHI E1 DS 7208HGHI E1 DS 7216HGHI E1 Network DVR DS 720...

Страница 6: ...rovided the interval of automatic cycle can be adjusted Quick setting menu is provided for live view The selected live view channel can be shielded Motion detection video tampering detection video exc...

Страница 7: ...d and skip backward when playback locating by dragging the mouse on the progress bar 4 8 16 24 32 ch synchronous playback Backup Export data by a USB SATA or eSATA device Export video clips when playb...

Страница 8: ...t Auto Manual port mapping by UPnPTM Remote search playback download locking and unlocking the record files and downloading files broken transfer resume Remote parameters setup remote import export of...

Страница 9: ...View 46 3 2 Operations in Live View Mode 47 3 2 1 Front Panel Operation 48 3 2 2 Using the Mouse in Live View 48 3 2 3 Main Aux Output Switching 49 3 2 4 Quick Setting Toolbar in Live View Mode 50 3 3...

Страница 10: ...ack Frame by Frame 102 6 2 2 Digital Zoom 102 6 2 3 Reverse Playback of Multi channel 102 Chapter 7 Backup 104 7 1 Backing up Record Files 105 7 1 1 Backing up by Normal Video Search 105 7 1 2 Backing...

Страница 11: ...g S M A R T Information 167 10 8 Detecting Bad Sector 168 10 9 Configuring HDD Error Alarms 169 Chapter 11 Camera Settings 170 11 1 Configuring OSD Settings 171 11 2 Configuring Privacy Mask 172 11 3...

Страница 12: ...User Manual of Digital Video Recorder 11 Appendix 191 Glossary 192 Troubleshooting 193 List of Compatible Hikvision IP Cameras 196 List of Compatible Third party IP Cameras 197...

Страница 13: ...User Manual of Digital Video Recorder 12 Chapter 1 Introduction...

Страница 14: ...n data is being read from or written to HDD 3 Indicator blinks blue when network connection is functioning properly Figure 1 2 Front Panel of DS 7204 7208HGHI SH Figure 1 3 Front Panel of DS 7216HGHI...

Страница 15: ...ns yellow when the SHIFT function is realized Tx Rx Tx Rx indictor blinks yellow when network connection is functioning properly 2 Composite Keys SHIFT Switch between the numeric or letter input and f...

Страница 16: ...meric input 3 DIRECTION The DIRECTION buttons are used to navigate between different fields and items in menus In the Playback mode the Up and Down button is used to speed up and slow down recorded vi...

Страница 17: ...well b when the DVR is controlled by IR remote control with the address from 1 254 and the SHIFT button is used ALARM Alarm indicator turns red when a sensor alarm is detected HDD HDD indicator blink...

Страница 18: ...used to navigate between different fields and items in menus In the Playback mode the Up and Down button is used to speed up and slow down recorded video The Left and Right button will select the next...

Страница 19: ...blinks in blue when network connection is functioning properly GUARD Indicator turns blue when the device is armed Indicator does not light when the device is disarmed The arm disarm state can be init...

Страница 20: ...e Manual Record setting menu In PTZ control settings press the button and then you can call a PTZ preset by pressing Numeric button It is also used to turn audio on off in the Playback mode PLAY AUTO...

Страница 21: ...t for DVD R W Figure 1 7 Front Panel of DS 9000HQHI SH Table 1 6 Description of Control Panel Buttons No Name Function Description 1 ALARM Alarm indicator turns red when a sensor alarm is detected REA...

Страница 22: ...mode It is also used to auto scan in the PTZ Control menu ZOOM Zoom in the PTZ camera in the PTZ Control setting A FOCUS Adjust focus in the PTZ Control menu It is also used to switch input methods u...

Страница 23: ...ugh channels In PTZ control mode it can control the movement of the PTZ camera ENTER The ENTER button is used to confirm selection in any of the menu modes It can also be used to tick checkbox fields...

Страница 24: ...Remote Control Buttons No Name Description 1 POWER Power on off the device Power on off the device by pressing and holding the button for 3 seconds 2 MENU Button Press the button to return to the mai...

Страница 25: ...ck to the previous menu Press for Arming disarming the device in Live View mode 9 PLAY Button The button is used to enter the All day Playback mode It is also used to auto scan in the PTZ Control menu...

Страница 26: ...igital Video Recorder 25 2 Batteries are fresh and not out of charge 3 IR receiver is not obstructed If the remote still cannot function properly please change the remote and try again or contact the...

Страница 27: ...t from your provider The operation of the mouse Table 1 8 Description of the Mouse Control Name Action Description Left Click Single Click Live view Select channel and show the quick set menu Menu Sel...

Страница 28: ...Description Figure 1 9 Soft Keyboard Description of the buttons on the soft keyboard Table 1 9 Description of the Soft Keyboard Icons Icons Description Icons Description English Capital English Numbe...

Страница 29: ...ersal Serial Bus USB port for additional devices 8 GND Ground 9 Power Supply DC 12V power supply Figure 1 11 DS 7200HGHI Figure 1 12 DS 7200HQHI Table 1 11 Description of Front Panel No Item Descripti...

Страница 30: ...tch for turning on off the device 11 GND Ground 12 Alarm In Out for DS 7200HQHI SH only Connectors for alarm inputs and alarm outputs Figure 1 13 DS 7316HQHI SH and DS 7316HGHI SH Figure 1 14 DS 7332H...

Страница 31: ...VGA DB15 connector for VGA output Display local video output and menu 7 AUDIO OUT RCA connector 8 Network Interface Connector for network 9 RS 485 Interface Connector for RS 485 devices T and T pins...

Страница 32: ...User Manual of Digital Video Recorder 31 Chapter 2 Getting Started...

Страница 33: ...r panel and the Power indicator LED should turn on indicating that the unit begins to start up 3 After startup the Power indicator LED remains on Shutting down the DVR Steps There are two proper ways...

Страница 34: ...r shutting down and the POWER indicator turns red you can turn on the device by pressing the POWER button on the remote control Rebooting the DVR While in the Shutdown menu Figure 2 1 you can also reb...

Страница 35: ...demand Figure 2 3 Language Selection 2 The Setup Wizard can walk you through some important settings of the DVR If you do not want to use the Setup Wizard at this time click the Cancel button You can...

Страница 36: ...void safety problem 5 To change the admin password check the New Admin Password checkbox Enter the new password and confirm the password in the given fields 6 Click the Next button to enter the date a...

Страница 37: ...work fault tolerance and 1 self adaptive 10M 100M 1000M network interface for other models 8 Click Next button after you having configured the network parameters which will take you to the Advanced Ne...

Страница 38: ...the Init button Initialization will remove all the data saved in the HDD 12 Click Next button to enter the Record Settings window as shown in Figure 2 10 Figure 2 10 Record Settings 13 Click Copy to...

Страница 39: ...g in purposes only You must change this default password to better protect against security risks such as the unauthorized access by others to the product that may prevent the product from functioning...

Страница 40: ...cameras to the connection list of the device Before you start Ensure the network connection is valid and correct For detailed checking and configuring of the network please see Chapter 9 1 9 3 and 9...

Страница 41: ...Cameras Default without disabling analog channel Max Number by disabling all analog channels DS 7200HGHI E1 DS 7204HGHI E1 1 ch 1 ch DS 7208HGHI E1 2 ch 2 ch DS 7216HGHI E1 2 ch 2 ch DS 7200HGHI E2 D...

Страница 42: ...ompatible IP cameras 3 The online cameras with same network segment will be displayed in the camera list Click the button to add the camera Or you can click the Add All button to add all the detected...

Страница 43: ...epeat the step 3 and 4 of OPTION 1 to add the camera Figure 2 17 IP Camera Management Interface Table 2 3 Explanation of the icons Icon Explanation Icon Explanation Edit basic parameters of the camera...

Страница 44: ...rmation of the camera lists in the page you can configure the basic setting of the IP cameras Steps 1 Click the icon to edit the parameters you can edit the IP address protocol and other parameters Fi...

Страница 45: ...4 Figure 2 20 Network Configuration of the Camera 2 You can edit the network information and the password of the camera Figure 2 21 Password Configuration of the Camera 3 Click Apply to save the setti...

Страница 46: ...User Manual of Digital Video Recorder 45 Chapter 3 Live View...

Страница 47: ...the live view mode there are icons at the right top of the screen for each channel showing the status of the record and alarm in the channel so that you can know whether the channel is recorded or wh...

Страница 48: ...me basic operation on the live view mode for the Aux output The DS 7100 DS 7200 and DS 7324 7332HGHI SH models do not support Aux Main output switch The priority level for the main and aux output for...

Страница 49: ...Switch to the previous screen Next Screen Switch to the next screen Start Stop Auto switch Enable disable the auto switch of the screens The dwell time of the live view configuration must be set befo...

Страница 50: ...can perform the following operation to switch to CVBS or HDMI2 DS 8124 8132HGHI SH output as the main output Steps 1 Use the mouse wheel to double click on the HDMI 1 VGA output screen and the follow...

Страница 51: ...the screen Figure 3 3 Quick Setting Toolbar Table 3 6 Description of Quick Setting Toolbar Icons Icons Description Icons Description Icons Description Enable Disable Manual Record Instant Playback Mu...

Страница 52: ...image is relatively clearer and sharper The degree of contrast and saturation is high Figure 3 5 Image Settings You can adjust the image parameters including brightness contrast saturation hue sharpne...

Страница 53: ...cting the image quality channel zero encoding is supported as an option for you Steps 1 Enter the Live View Settings interface Menu Configuration Live View 2 Select the Channel Zero Encoding tab Figur...

Страница 54: ...provide HDMI VGA outputs DS 8124 8132HGHI SH provides HDMI1 VGA and HDMI2 outputs and other models provide HDMI VGA and CVBS outputs for selection Live View Mode Designates the display mode to be use...

Страница 55: ...en double click a camera name in the camera list you would like to display Setting an X means the window will not display any camera 3 You can also click to start live view of all channels in order an...

Страница 56: ...anual Manual Video Quality Diagnostics Figure 3 10 Video Quality Diagnostics 2 Check the checkboxes to select the channels for diagnostics 3 Click the button Diagnose and the results will be displayed...

Страница 57: ...Logout Purpose After logging out the monitor turns to the live view mode and if you want to do some operation you need to enter user name and password to log in again Steps 1 Enter the Shutdown menu...

Страница 58: ...User Manual of Digital Video Recorder 57 Chapter 4 PTZ Controls...

Страница 59: ...before you control the PTZ camera Steps 1 Enter the PTZ Settings interface Menu Camera PTZ Figure 4 1 PTZ Settings 2 Choose the camera for PTZ setting in the Camera dropdown list 3 Click the RS 485 Se...

Страница 60: ...protocol to HIKVISION C Coaxitron Make sure the protocol selected here is supported by the connected camera dome When the Coaxitron protocol is selected all the other parameters like the baud rate da...

Страница 61: ...e the directional button to wheel the camera to the location where you want to set preset and the zoom and focus operations can be recorded in the preset as well 3 Enter the preset No 1 255 in the pre...

Страница 62: ...responding text field 5 Click the Call Preset button to call it When the Coaxitron camera dome connected and the PTZ protocol is selected to HIKVISION C Coaxitron you can call the preset 95 to enter t...

Страница 63: ...The Speed defines the speed at which the PTZ will move from one key point to the next 5 Click the Add button to add the next key point to the patrol or you can click the OK button to save the key poin...

Страница 64: ...Customizing Patterns Purpose Patterns can be set by recording the movement of the PTZ You can call the pattern to make the PTZ movement according to the predefined path Steps 1 Enter the PTZ Control...

Страница 65: ...ng bar or select the PTZ option in the right click menu to show the PTZ control panel 2 Click the button to show the general settings of the PTZ control Figure 4 9 PTZ Panel General 3 Click the Call P...

Страница 66: ...no more than 180 4 2 8 Calling Linear Scan Purpose Follow the procedure to call the linear scan in the predefined scan range Steps 1 Click the button PTZ in the lower right corner of the PTZ setting i...

Страница 67: ...live view mode 2 Click the button to show the one touch function of the PTZ control Figure 4 12 PTZ Panel One touch 3 There are 3 one touch park types selectable click the corresponding button to acti...

Страница 68: ...e In PTZ control mode the PTZ panel will be displayed when a mouse is connected with the device If no mouse is connected the icon appears in the lower left corner of the window indicating that this ca...

Страница 69: ...User Manual of Digital Video Recorder 68 Chapter 5 Recording Settings...

Страница 70: ...e of the HDD 1 Whether the HDD mode is Quota please set the maximum record capacity For detailed information see Chapter 10 5 Configuring Quota Mode 2 If the HDD mode is Group you should set the HDD g...

Страница 71: ...ile to be kept in the HDD if the deadline is reached the file will be deleted You can set the expired time to 0 and then the file will not be deleted The actual keeping time for the file should be det...

Страница 72: ...rs for sub stream 1 Select the Substream tab Figure 5 5 Sub stream Encoding 2 Select a camera in the camera dropdown list 3 Configure the parameters 4 Click Apply to save the settings 5 Optional If th...

Страница 73: ...tion alarm motion alarm and VCA triggered recording types Purpose Set the record schedule and then the camera will automatically start stop recording according to the configured schedule Steps 1 Enter...

Страница 74: ...tart End time Figure 5 8 Edit Schedule Set Time Period Up to 8 periods can be configured for each day And the time periods cannot be overlapped with each other Repeat the above steps 1 4 to schedule r...

Страница 75: ...in the figure below Figure 5 11 Descriptions of the Color Icons 2 Click and drag the mouse on the schedule 3 Click on the other area except for the schedule table to finish and exit the drawing You ca...

Страница 76: ...audio warning notifying the surveillance center sending email and so on Steps 1 Enter the Motion Detection interface Menu Camera Motion Figure 5 12 Motion Detection 2 Configure Motion Detection 1 Choo...

Страница 77: ...ou want the motion detection event to trigger recording 6 Click Apply to save the settings 7 Click OK to back to the upper level menu 8 Exit the Motion Detection menu 3 Configure the schedule Please r...

Страница 78: ...Steps 1 Enter the Alarm setting interface Menu Configuration Alarm Figure 5 15 Alarm Settings 2 Click the Alarm Input tab Figure 5 16 Alarm Settings Alarm Input 1 Select Alarm Input number and configu...

Страница 79: ...vel menu Repeat the above steps to configure other alarm input parameters If the setting can also be applied to other alarm inputs click Copy and choose the alarm input number Figure 5 18 Copy Alarm I...

Страница 80: ...for DS 7200 7300 8100 9000HQHI models DS 7100 SH does not support VCA Steps 1 Enter the VCA settings interface and select a camera for the VCA settings Menu Camera VCA Figure 5 19 VCA Settings 2 Confi...

Страница 81: ...of VCA Alarm The PTZ Linking function is only available for the VCA settings of IP cameras 4 Enter Record Schedule settings interface Menu Record Schedule Record Schedule and then set VCA as the recor...

Страница 82: ...Manual settings interface Menu Manual Figure 5 21 Manual Record 2 Enable manual record Click the status icon before camera number to change it to Or click the status icon of Analog to enable manual r...

Страница 83: ...Record 2 Choose Holiday on the left bar Figure 5 22 Holiday Settings 3 Enable Edit Holiday schedule 1 Click to enter the Edit interface Figure 5 23 Edit Holiday Settings 2 Check the checkbox of Enabl...

Страница 84: ...line of Holiday Figure 5 24 Edit Schedule Holiday Up to 8 periods can be configured for each day And the time periods cannot be overlapped each other In the time table of the channel both holiday sche...

Страница 85: ...e you set the HDD property to Redundant For detailed information please refer to Chapter 10 4 Managing HDD Group There should be at least another HDD which is in Read Write status Steps 1 Enter HDD In...

Страница 86: ...coding Parameters 2 Select Camera you want to configure 3 Check the checkbox of Redundant Record 4 Click Apply to save settings If the encoding parameters can also be used to other channels click Copy...

Страница 87: ...er editing interface 4 Configuring HDD group 1 Choose a group number for the HDD group 2 Click Apply to save your settings 3 Click OK to back to the upper level menu Repeat the above steps to configur...

Страница 88: ...investigate by checking the checkbox to 3 Configure the record type file type start time and end time 4 Click Search to show the results Figure 5 30 Export Search Result 5 Protect the record files 1 F...

Страница 89: ...l Editing 3 Set the HDD to Read only 4 Click OK to save settings and back to the upper level menu You cannot save any files in a Read only HDD If you want to save files in the HDD change the property...

Страница 90: ...User Manual of Digital Video Recorder 89 Chapter 6 Playback...

Страница 91: ...is supported OPTION 1 Choose a channel in live view mode using the mouse and click the button in the quick setting toolbar Only record files recorded during the last five minutes on this channel will...

Страница 92: ...ack recording files of the channel under single screen live view mode Under multi screen live view mode the recorded files of the top left channel will be played back For the DS 7300 8100 9000 pressin...

Страница 93: ...back Table 6 1 Detailed Explanation of Playback Toolbar Button Operation Button Operation Button Operation Mute Audio on Start Stop clipping Save clip s Add default tag Add customized tag Tag manageme...

Страница 94: ...o select a date on the calendar Figure 6 5 Playback Calendar In the Playback interface The toolbar in the bottom part of Playback interface can be used to control playing process Please refer to Chapt...

Страница 95: ...ick Back to return to the search interface If there is only one channel triggered clicking button takes you to Full screen Playback interface of this channel If several channels are triggered clicking...

Страница 96: ...ample when an alarm triggered the recording ends at 11 00 if you set the post play time as 5 seconds the video plays back till 11 00 05 7 You can click or button to select the previous or next event P...

Страница 97: ...can be added to a single video file 3 Tag management Click button to check edit and delete tag s Figure 6 10 Tag Management Interface Steps 1 Select the Tag from the drop down list in the Playback int...

Страница 98: ...ugh the less effective information When you select the smart playback mode the system will analyze the video containing motion or VCA information and mark it with green color on the playback process b...

Страница 99: ...point of the line Intrusion Detection Click the button and specify 4 points to set a quadrilateral region for intrusion detection Only one region can be set Motion Detection Click the button and then...

Страница 100: ...or schedule represents event recording represents smart search recording Table 6 2 Detailed Explanation of Smart Playback Button Operation Button Operation Button Operation Smart search Stop Pause pla...

Страница 101: ...ype and click Search button Figure 6 15 Result of System Log Search 3 Choose a log with record file and click button to enter Playback interface If there is no record file at the time point of the log...

Страница 102: ...ok up and play back files in the external devices Steps 1 Enter Tag Search interface Menu Playback 2 Select the External File in the drop down list on the top left side The files are listed in the rig...

Страница 103: ...panel Not supported by DS 7100 SH and DS 7200HGHI SH Press the button to set the speed to Single frame One click on the playback screen or press button on the front panel represents playback or adver...

Страница 104: ...ed Steps 1 Enter Playback interface Menu Playback 2 Check more than one checkboxes to select multiple channels and click to select a date on the calendar Figure 6 19 4 ch Synchronous Playback Interfac...

Страница 105: ...User Manual of Digital Video Recorder 104 Chapter 7 Backup...

Страница 106: ...h drives USB HDDs and USB writer Steps 1 Enter Export interface Menu Export Normal Figure 7 1 Normal Export Interface 2 Set search condition and click Search button to enter the search result interfac...

Страница 107: ...icking the Format button Figure 7 3 Export by Normal Video Search using USB Flash Drive Figure 7 4 Export by Normal Video Search using USB Writer Stay in the Exporting interface until all record files...

Страница 108: ...t interface Menu Export Normal Set search condition and click Search button to enter the search result interface 3 Select record files you want to back up Click button to play the record file if you w...

Страница 109: ...and click button to check it The Player player exe will be exported automatically during record file export Figure 7 7 Checkup of Export Result Using eSATA HDD 7 1 2 Backing up by Event Search Purpose...

Страница 110: ...enter the Search Result interface Figure 7 8 Event Search for Backup 3 Select record files to export 1 Select an alarm input in the list and click Quick Export button to enter Export interface 2 Click...

Страница 111: ...Refresh button Reconnect device Check for compatibility from vendor You can also format USB flash drive or USB HDDs via the device Figure 7 11 Export by Event Using USB Flash Drive Stay in the Export...

Страница 112: ...deo clips to export directly during Playback using USB devices such as USB flash drives USB HDDs and USB writers Steps 1 Enter Playback interface Please refer to Chapter 6 Playback Figure 7 13 Interfa...

Страница 113: ...not recognized Click the Refresh button Reconnect device Check for compatibility from vendor You can also format USB devices by clicking the Format button Figure 7 15 Export Video Clips Using USB Fla...

Страница 114: ...e video clips and enter Export interface or click No to quit without saving video clips 7 Check backup result The Player player exe will be exported automatically during record file export Figure 7 17...

Страница 115: ...n to enter Search Result interface At least one channel shall be selected Figure 7 18 Normal Video Search for Backup 2 Select record files you want to back up Click Export button to enter Export inter...

Страница 116: ...tton to play it Click Format button to format the backup device If the inserted USB device is not recognized Click the Refresh button Reconnect device Check for compatibility from vendor Management of...

Страница 117: ...User Manual of Digital Video Recorder 116 Chapter 8 Alarm Settings...

Страница 118: ...sensitivity bar to set sensitivity Click to set alarm response actions Figure 8 2 Set Detection Area and Sensitivity 3 Click Trigger Channel tab and select one or more channels which will start to re...

Страница 119: ...s of motion alarm please refer to Chapter 8 8 Setting Alarm Response Actions Repeat the above steps to set up arming schedule of other days of a week Click the OK button to complete the motion detecti...

Страница 120: ...arm Status Interface of System Configuration 2 Set the handling method of the selected alarm input Check the Setting checkbox and click button to set its alarm response actions Figure 8 6 Alarm Input...

Страница 121: ...schedule to other days 6 If necessary select PTZ Linking tab and set PTZ linkage of the alarm input Set PTZ linking parameters and click the OK button to complete the settings of the alarm input Pleas...

Страница 122: ...User Manual of Digital Video Recorder 121 Figure 8 9 Copy Settings of Alarm Input...

Страница 123: ...ideo Loss Alarm Click button to set up handling method of video loss 3 Set arming schedule of the channel Select Arming Schedule tab to set the channel s arming schedule Choose one day of a week and u...

Страница 124: ...arm response action of video loss please refer to Chapter 8 8 Setting Alarm Response Actions 5 Click the OK button to complete the video loss settings of the channel Repeat the above steps to finish s...

Страница 125: ...box of Enable Video Tampering 3 Drag the sensitivity bar and choose a proper sensitivity level 4 Click to set handling method of video tampering Set arming schedule and alarm response actions of the c...

Страница 126: ...days of a week You can also use Copy button to copy an arming schedule to other days 4 Click the OK button to complete the video tampering settings of the channel Repeat the above steps to finish set...

Страница 127: ...Menu Camera VCA The selected camera must support the VCA function Figure 8 14 VCA Alarm Setting Interface 2 Select the analog camera to configure the VCA 3 Select the detection type to Line Crossing D...

Страница 128: ...h day Click Apply to save the settings Time periods shall not be repeated or overlapped Repeat the above steps to set up arming schedule of other days of a week You can also use Copy button to copy an...

Страница 129: ...e settings Task2 Configure the Intrusion Detection 1 Select the intrusion region from the drop down list Up to 4 regions are selectable 2 Select the sensitivity of the intrusion detection to 1 100 3 S...

Страница 130: ...triggered 5 Click and draw a quadrilateral or click to draw the full screen in the preview window for the selected intrusion region You can use the to clear the existing region and re draw it 6 Repea...

Страница 131: ...e threshold you set the harder the exception will be detected 4 Click to set handling method of video tampering Set arming schedule and alarm response actions of the channel 1 Click Arming Schedule ta...

Страница 132: ...cording resolution Record Exception No space for saving recorded files Steps 1 Enter Exceptions interface and handle various exceptions Menu Configuration Exceptions DS 7100HGHI SH and DS 7200HGHI SH...

Страница 133: ...User Manual of Digital Video Recorder 132 Figure 8 22 Detailed Event 3 Set the alarm linkage actions For details see Chapter 8 8 Setting Alarm Response Actions 4 Click Apply to save the settings...

Страница 134: ...dible Warning Trigger an audible beep when an alarm is detected Notify Surveillance Center Sends an exception or alarm signal to remote alarm host when an event occurs The alarm host refers to the PC...

Страница 135: ...be set within each day Time periods shall not be repeated or overlapped Figure 8 24 Set Arming Schedule of Alarm Output 3 Repeat the above steps to set arming schedule of other days of a week You can...

Страница 136: ...dwell time of an alarm output the alarm can be cleared only by clicking Clear button in the following interface Steps Select the alarm output you want to trigger or clear and make related operations...

Страница 137: ...User Manual of Digital Video Recorder 136 Chapter 9 Network Settings...

Страница 138: ...al Settings Purpose Network settings must be properly configured before you operate DVR over network Steps 1 Enter the Network Settings interface Menu Configuration Network DS 8100 9000 SH DS 7100 and...

Страница 139: ...gs click the Apply button to save the settings Working Mode There are two 10M 100M 1000M NIC cards provided by the DS 8100HGHI HQHI SH series devices and it allows the device to work in the Multi addr...

Страница 140: ...checkbox to activate this feature 4 If required check the Enable Stream Encryption checkbox to encrypt the video stream 5 Enter the verification code of the device The verification code consists of 6...

Страница 141: ...e Figure 9 3 DDNS Settings Interface 3 Check the DDNS checkbox to enable this feature 4 Select DDNS Type Five different DDNS types are selectable IPServer DynDNS PeanutHull NO IP and HiDDNS IPServer E...

Страница 142: ...w hik online com 2 Enter the Device Domain Name You can use the alias you registered in the HiDDNS server or define a new device domain name If a new alias of the device domain name is defined in the...

Страница 143: ...www hik online com alias in the address bar Alias refers to the Device Domain Name on the device or the Device Name on the HiDDNS server Example http www hik online com dvr If you mapped the HTTP por...

Страница 144: ...nterface Figure 9 12 PPPoE Settings Interface 3 Check the PPPoE checkbox to enable this feature 4 Enter User Name and Password for PPPoE access The User Name and Password should be assigned by your IS...

Страница 145: ...es and the default value is 60 minutes If the DVR is connected to a public network you should use a NTP server that has a time synchronization function such as the server at the National Time Center I...

Страница 146: ...unction to enable the fast connection of the device to the WAN via a router without port mapping Before you start If you want to enable the UPnP function of the device you must enable the UPnP functio...

Страница 147: ...SP port respectively You can use the default port No or change it according to actual requirements External Port indicates the port No for port mapping in the router The value of the RTSP port No shou...

Страница 148: ...an the maximum number of cameras through network A multicast address spans the Class D IP range of 224 0 0 0 to 239 255 255 255 It is recommended to use the IP address ranging from 239 252 0 0 to 239...

Страница 149: ...through the web browser Steps 1 Open web browser input the IP address of device and the web server will select the language automatically according to the system language and maximize the web browser...

Страница 150: ...end an Email notification to all designated users if an event is detected e g an alarm or motion event is detected etc Before configuring the Email settings the DVR must be connected to a local area n...

Страница 151: ...Receiver The name of the receiver of the Email Receiver s Address The Email address of the receiver Enable Attached Pictures Check the checkbox of Enable Attached Picture if you want to send email wit...

Страница 152: ...er Manual of Digital Video Recorder 151 Figure 9 27 Network Traffic Interface 2 You can view the sending rate and receiving rate information on the interface The traffic data is refreshed every 1 seco...

Страница 153: ...text field of Destination Address 5 Click the Test button to start testing network delay and packet loss 9 4 2 Exporting Network Packet Purpose By connecting the DVR to network the captured network d...

Страница 154: ...igital Video Recorder 153 Figure 9 29 Export Network Packet 4 Click the Export button to start exporting 5 After the exporting is complete click OK to finish the packet export Up to 1M data can be exp...

Страница 155: ...Status If the network is normal the following message box pops out Figure 9 31 Network Status Checking Result If the message box pops out with other information instead of this one you can click Netw...

Страница 156: ...Maintenance Net Detect 2 Click the Network Stat tab to enter the Network Statistics menu Figure 9 33 Network Stat Interface 3 View the bandwidth of Remote Live View bandwidth of Remote Playback and ba...

Страница 157: ...User Manual of Digital Video Recorder 156 Chapter 10 HDD Management...

Страница 158: ...ce 2 Select HDD to be initialized 3 Click the Init button Figure 10 2 Confirm Initialization 4 Select the OK button to start initialization Figure 10 3 Start Initialization 5 After the HDD has been in...

Страница 159: ...of the HDDs Click Menu HDD Advanced Figure 10 5 Enable HDD Sleeping Check the checkbox of Enable HDD Sleeping by default and the HDDs which are free of working for a long time will be set to sleep Un...

Страница 160: ...NetHDD interface as shown in Figure 10 7 Figure 10 7 HDD Information Interface 3 Add the allocated NetHDD 4 Select the type to NAS or IP SAN 5 Configure the NAS or IP SAN settings Add NAS disk 1 Ente...

Страница 161: ...the list shown below 4 Click the OK button to add the selected IP SAN disk Up to 1 IP SAN disk can be added Figure 10 9 Add IP SAN Disk 5 After having successfully added the NAS or IP SAN disk return...

Страница 162: ...fer to Backup using eSATA HDDs in Chapter 7 1 1 Backing up by Normal Video Search for operating instructions Record use the eSATA for record Refer to the following steps for operating instructions Fig...

Страница 163: ...face Menu HDD Advanced 2 Set the Mode to Group as shown in Figure 10 13 Figure 10 13 Storage Mode Interface 3 Click the Apply button and the following Attention box will pop up Figure 10 14 Attention...

Страница 164: ...W Before setting the HDD property please set the storage mode to Group refer to step1 4 of Chapter 10 4 1 Setting HDD Groups A HDD can be set to read only to prevent important recorded files from bei...

Страница 165: ...R W Read only or Redundancy 4 Click the OK button to save the settings and exit the interface 5 In the HDD Information menu the HDD property will be displayed in the list At least 2 hard disks must be...

Страница 166: ...the storage capacity in the text field of Max Record Capacity GB 5 You can copy the quota settings of the current camera to other cameras if required Click the Copy button to enter the Copy Camera int...

Страница 167: ...displayed on the list as shown in Figure 10 20 Figure 10 20 View HDD Status 1 If the status of HDD is Normal or Sleeping it works normally If the status is Uninitialized or Abnormal please initialize...

Страница 168: ...he hopes of anticipating failures Steps 1 Enter the HDD Detect interface Menu HDD HDD Detect 2 Click the S M A R T Settings tab to enter the interface 3 Select the HDD to view its S M A R T informatio...

Страница 169: ...t Figure 10 23 Bad Sector Detection 2 Click the Bad Sector Detection tab to enter the interface 3 Select a HDD and click the Detect button to start detecting Figure 10 24 Bad Sector Detecting 4 You ca...

Страница 170: ...below to select the linkage action s for HDD error as shown in Figure 10 25 The linkage actions can be selected to Audible Warning Notify Surveillance Center Send Email and Trigger Alarm Output Trigg...

Страница 171: ...User Manual of Digital Video Recorder 170 Chapter 11 Camera Settings...

Страница 172: ...ode and the OSD font Figure 11 1 OSD Configuration Interface 6 You can use the mouse to click and drag the text frame on the preview window to adjust the OSD position 7 Copy Camera Settings 1 If you w...

Страница 173: ...4 Use the mouse to draw a zone on the window The zones will be marked with different frame colors Up to 4 privacy mask zones can be configured and the size of each area can be adjusted 5 The configur...

Страница 174: ...t The time periods cannot be overlapped with each other 4 Select the mode from the drop down list of Mode there are four modes selectable Standard Indoor Dim Light and Outdoor 5 Adjust the image param...

Страница 175: ...User Manual of Digital Video Recorder 174 Chapter 12 DVR Management and Maintenance...

Страница 176: ...he system information of the device Figure 12 1 System Information Interface This alarm information is not available for the DS 7100 and DS 7200HGHI series 12 2 Searching and Exporting Log Files Purpo...

Страница 177: ...isplayed on the list shown below Up to 2000 log files can be displayed each time Figure 12 3 Log Search Results 5 You can click the button of each log or double click it to view its detailed informati...

Страница 178: ...the log files to the selected backup device You can click the New Folder button to create new folder in the backup device or click the Format button to format the backup device before log export Pleas...

Страница 179: ...on your PC like adding or deleting the content and copy the setting to other devices by importing the excel file to it Steps 1 Enter the camera management interface Menu Camera IP Camera Import Expor...

Страница 180: ...arameters Steps 1 Enter the Import Export Configuration File interface Menu Maintenance Import Export Figure 12 6 Import Export Config File 2 Click the Export button to export configuration files to t...

Страница 181: ...the backup device 5 Click the Upgrade button to start upgrading 6 After the upgrading is complete reboot the DVR to activate the new firmware 12 5 2Upgrading by FTP Before you start Configure PC runni...

Страница 182: ...face Menu Maintenance Default Figure 12 9 Restore Factory Default 2 Click the OK button to restore the default settings Except the network parameters including IP address subnet mask gateway MTU defau...

Страница 183: ...User Manual of Digital Video Recorder 182 Chapter 13 Others...

Страница 184: ...the same as the device s when connecting with the PC serial port Transparent Channel Connect a serial device directly to the device The serial device will be controlled remotely by the PC through the...

Страница 185: ...VBS output standard to NTSC or PAL which must be the same with the video input standard DS 7100 DS 7200 DS 7324 7332HGHI and DS 8124 8132HGHI provide no CVBS output Resolution Select the output resolu...

Страница 186: ...ter the General Settings interface Menu Configuration General 2 Choose DST Settings tab Figure 13 2 DST Settings Interface You can check the checkbox before the Auto DST Adjustment item Or you can man...

Страница 187: ...efault No is 255 CVBS Output Brightness Adjust the video output brightness via the CVBS interface DS 7100 DS 7200 DS 7324 7332HGHI and DS 8124 8132HGHI provide no CVBS output Auto Logout Set timeout t...

Страница 188: ...ndesirable consequences For your privacy we strongly recommend changing the password to something of your own choosing using a minimum of 8 characters including upper case letters lower case letters n...

Страница 189: ...e Permission settings interface as shown in Figure 13 7 Figure 13 7 User Permission Settings Interface 6 Set the operating permission of Local Configuration Remote Configuration and Camera Configurati...

Страница 190: ...f the selected camera s Local Playback Locally playing back recorded files of the selected camera s Remote Playback Remotely playing back recorded files of the selected camera s Local PTZ Control Loca...

Страница 191: ...u can edit the user information including user name password permission level and MAC address Check the checkbox of Change Password if you want to change the password and input the new one in the text...

Страница 192: ...User Manual of Digital Video Recorder 191 Appendix...

Страница 193: ...ansceiver modem over Ethernet and in plain Metro Ethernet networks DDNS Dynamic DNS is a method protocol or network service that provides the capability for a networked device such as a router or comp...

Страница 194: ...3 If it is solved finish the process If not please contact the engineer from our company to do the further process There is a beep sound after a new bought device starts up Possible Reasons a No HDD i...

Страница 195: ...arameters are correct Select Menu Record Parameters Record and set the Stream Type as Audio Video 3 Check if the fault is solved by the above steps If it is solved finish the process If not please con...

Страница 196: ...eneral and verify the Device Time is correct 2 Verify the search condition is correct Select Playback and verify the channel and time are correct 3 Verify the HDD status is normal Select Menu HDD Gene...

Страница 197: ...CD864FWD E V5 1 0 build 131202 1600 1200 DS 2CD4026FWD 14 33 V5 1 0 build5 131202 1920 1080 DS 2CD6233F 14 24 V5 1 0 build5 131202 2048 1536 DS 2CD2012 I V5 1 0build131202 1280 960 DS 2CD4012F V5 1 0...

Страница 198: ...r Model Version Max Resolution Sub stream Audio Axis P3304 5 2 1440 900 Sony SNC RH124 1 7 00 1280 720 SUMSANG SND 5080P 3 10_130416 1280 1024 Vivotek FD8134 0107a 1280 800 BOSH Dinion NBN 921 P V1050...

Отзывы: