background image

Digital Video Recorder User Manual 


117 

8.2 Setting PIR Camera Alarm 

Purpose 

DVR can receive the PIR (Passive Infrared) alarm of the analog cameras supporting the function via 
coaxial communication. You can enable false alarm filer for the motion detection of the PIR 
cameras. Then only when the motion detection events and PIR events are both triggered, the motion 
detection alarm will be triggered, and the alarm indicator will light on for the PIR cameras 
supporting enabling alarm indicator. 

Before you start 

Connect the PIR camera to the DVR. Configure 

White Light

 as 

Alarm

 and 

Trigger Mode

 as 

DVR


for the camera OSD. 

Step 1


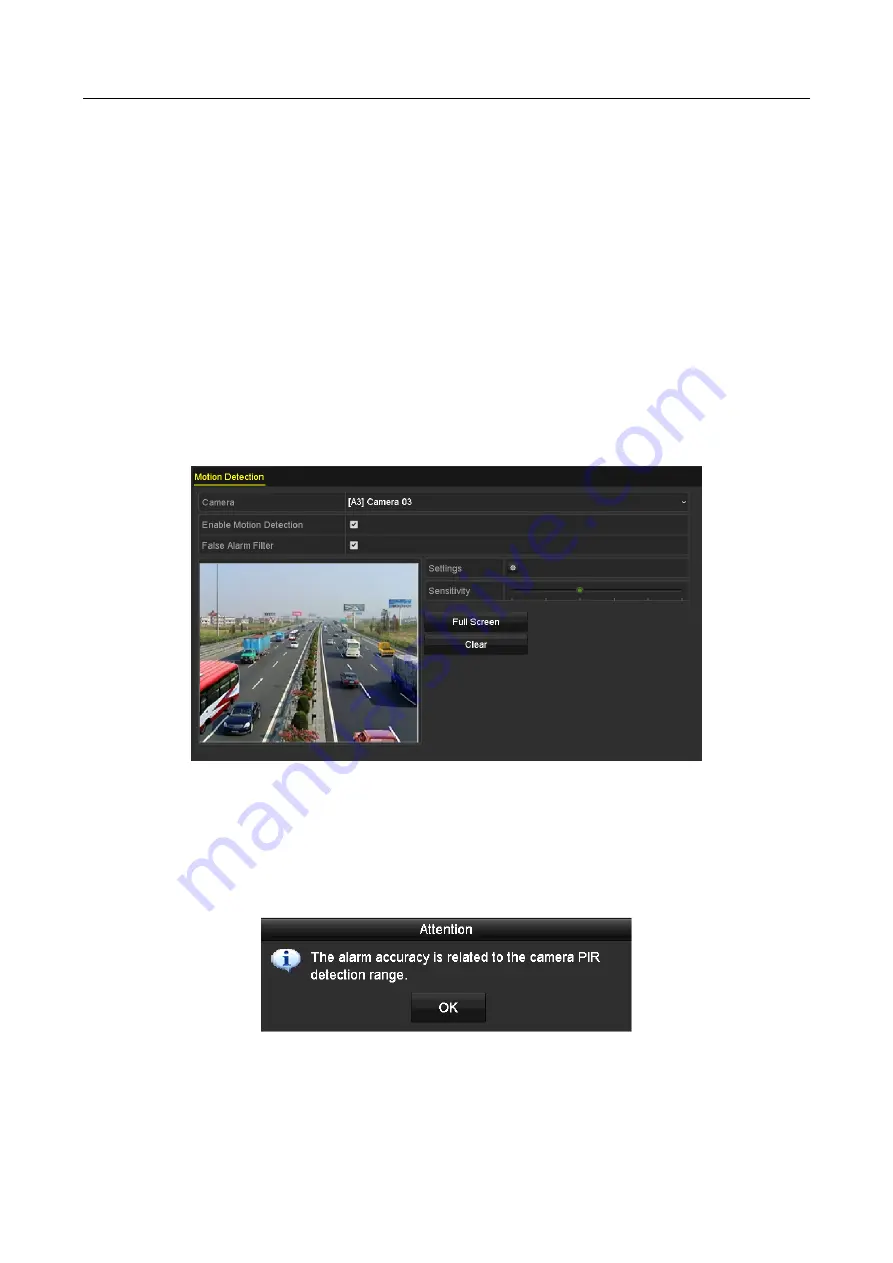
Go to 

Menu > Camera > Motion


Figure 8-5


Motion Detection 

Step 2


Select the connected PIR camera. 

Step 3


Check 

Enable Motion Detection

Step 4


Check 

False Alarm Filter

 to enable PIR motion detection. The message box pops up as 

below. 


Figure 8-6


Note 

Step 5


Click 

OK

 to enable PIR motion detection. Then only when the motion detection events and 

PIR events are both triggered, the motion detection alarm will be triggered.   

Содержание HWD-5104

Страница 1: ...Digital Video Recorder User Manual...

Страница 2: ...r the guidance of professionals Trademarks Acknowledgement and other Hikvision s trademarks and logos are the properties of Hikvision in various jurisdictions Other trademarks and logos mentioned belo...

Страница 3: ...LAWS IN YOUR JURISDICTION BEFORE USING THIS PRODUCT IN ORDER TO ENSURE THAT YOUR USE CONFORMS THE APPLICABLE LAW HIKVISION SHALL NOT BE LIABLE IN THE EVENT THAT THIS PRODUCT IS USED WITH ILLEGITIMATE...

Страница 4: ...nce 2 This device must accept any interference received including interference that may cause undesired operation EU Conformity Statement This product and if applicable the supplied accessories too ar...

Страница 5: ...Source with 100 to 240 VAC 12 VDC or 48 VDC according to the IEC60950 1 standard Please refer to technical specifications for detailed information Do not connect several devices to one power adapter...

Страница 6: ...t Use the device in conjunction with an UPS if possible Power down the unit before connecting and disconnecting accessories and peripherals A factory recommended HDD should be used for this device Imp...

Страница 7: ...e bit rate image quality etc The minimum frame rate for main stream and sub stream is 1 fps Encoding for both video stream and video audio stream audio and video synchronization during composite strea...

Страница 8: ...upported analog and IP cameras Motion detection video tampering detection video exception alarm video loss alarm and VCA alarm functions For HWD 7100MH and HWD 7200MH series DVR the enhanced VCA mode...

Страница 9: ...d frame rate will be overlaid on the bottom right corner of the live view for 5 seconds When CVBS input is connected the information such as NTSC or PAL will be overlaid on the bottom right corner of...

Страница 10: ...exceptions and log writing and searching Manually triggering and clearing alarms Importing and exporting of configuration file of devices Getting cameras type information automatically Unlock pattern...

Страница 11: ...to the remote host Remotely start stop recording Remotely start stop alarm output Remote PTZ control Two way audio and voice broadcasting Output bandwidth limit configurable Embedded WEB server If DHC...

Страница 12: ...izard 30 2 5 Login and Logout 35 2 5 1 User Login 35 2 5 2 User Logout 35 2 6 Resetting Your Password 36 2 7 Adding and Connecting the IP Cameras 37 2 7 1 Activating the IP Camera 37 2 7 2 Adding the...

Страница 13: ...iguring Alarm Triggered Recording and Capture 76 5 5 Configuring Event Recording and Capture 78 5 6 Configuring Manual Recording and Continous Capture 80 5 7 Configuring Holiday Recording and Capture...

Страница 14: ...larms 118 8 4 Detecting Video Loss 121 8 5 Detecting Video Tampering 122 8 6 Setting All day Video Quality Diagnostics 124 8 7 Handling Exceptions 125 8 8 Setting Alarm Response Actions 127 Chapter 9...

Страница 15: ...guring HTTPS Port 160 11 2 8 Configuring Email 162 11 2 9 Checking Network Traffic 163 11 3 Configuring Network Detection 164 11 3 1 Testing Network Delay and Packet Loss 164 11 3 2 Exporting Network...

Страница 16: ...191 14 4 Importing Exporting Configuration Files 191 14 5 Upgrading System 192 14 5 1 Upgrading by Local Backup Device 192 14 5 2 Upgrading by FTP 192 14 6 Upgrading Camera 192 14 7 Restoring Default...

Страница 17: ...cription 1 Turns red when DVR is powered up 2 Turns red when data is being read from or written to HDD 3 Flickers blue when network connection is functioning properly 1 2 IR Remote Control Operations...

Страница 18: ...ription 1 POWER Power on off the device Power on off the device by pressing and holding the button for 5 seconds 2 MENU Button Press the button to return to the main menu after successful login Press...

Страница 19: ...control the movement of the PTZ camera ENTER Button Confirm selection in any of the menu modes It can also be used to tick checkbox fields In Playback mode it can be used to play or pause the video I...

Страница 20: ...DVR No is 255 This number valid for all IR remote controls Step 3 Press the DEV button on the remote control Step 4 Enter the DVR No in step 2 Step 5 Press the ENTER button on the remote If the Statu...

Страница 21: ...ion Description Left Click Single Click Live view Select channel and show the quick set menu Menu Select and enter Double Click Live view Switch between single screen and multi screen Drag PTZ control...

Страница 22: ...Keyboard Icons Icon Description Icon Description Number English letter Lowercase Uppercase Backspace Switch the keyboard Space Positioning the cursor Enter Symbols Reserved 1 5 Rear Panel The rear pa...

Страница 23: ...Rear Panel 1 8 No Item Description 1 VIDEO IN BNC interface for Turbo HD and analog video input 2 AUDIO IN RCA connector 3 AUDIO OUT RCA connector 4 VGA DB15 connector for VGA output Display local vid...

Страница 24: ...Digital Video Recorder User Manual 23 No Item Description 9 Power Switch Switch for turning on off the device 10 GND Ground...

Страница 25: ...p 1 Check the power supply is plugged into an electrical outlet It is HIGHLY recommended that an Uninterruptible Power Supply UPS be used in conjunction with the device Step 2 Turn on the power switch...

Страница 26: ...r the password to activate the IP camera s connected to the device Figure 2 3 Settings Admin Password STRONG PASSWORD RECOMMENDED We highly recommend you create a strong password of your own choosing...

Страница 27: ...ng password Figure 2 4 Warning Step 4 After the device is activated the Attention box pops up as below Figure 2 5 Attention Step 5 Optional Click Yes to export GUID The Reset Password interface pops u...

Страница 28: ...the unlock pattern for device login 2 3 1 Configuring the Unlock Pattern After the device is activated you can enter the following interface to configure the device unlock pattern Figure 2 8 Set Unloc...

Страница 29: ...ssfully Figure 2 10 Confirm the Pattern If the two patterns are different you must set the pattern again Figure 2 11 Reset the Pattern 2 3 2 Logging in via Unlock Pattern Only the admin user has the p...

Страница 30: ...e normal mode If you have forgotten your pattern you can select the Forget My Pattern or Switch User option to enter the normal login dialog box When the pattern you draw is different from the pattern...

Страница 31: ...nfiguration Operating the Setup Wizard Step 1 The Start Wizard can walk you through some important settings of the device If you don t want to use the Start Wizard at that moment click Exit You can al...

Страница 32: ...or resetting password Refer to Chapter 17 5 3 Editing a User for reference Figure 2 17 Change the Password Step 3 Click Next button and the Attention box pops up as shown below Click Yes to duplicate...

Страница 33: ...ers Then you will enter the Guarding Vision interface Configure the Guarding Vision according to your need Refer to Chapter 12 2 2 Configuring Guarding Vision for detailed operations Step 2 Guarding V...

Страница 34: ...n below Figure 2 22 HDD Management Step 4 To initialize the HDD click the Init button Initialization will remove all the data saved in the HDD Step 5 Click Next button to enter the IP Camera Managemen...

Страница 35: ...to add the camera 3 Optional Check the checkbox of Enable H 265 For Initial Access for the connected IP camera supporting H 265 Then the IP camera will be encoded with H 265 Figure 2 23 IP Camera Man...

Страница 36: ...ace for the admin if you have entered the wrong password for 7 times the account will be locked for 60 seconds For the operator if you have entered the wrong password for 5 times the account will be l...

Страница 37: ...urpose When you forget the password of the admin you can reset the password by importing the GUID file The GUID file must be exported and saved in the local USB flash drive after you have activated th...

Страница 38: ...ice to IP cameras that are connected with default protocol Click Yes to duplicate the password or No to cancel it Figure 2 32 Duplicate the Password If you want to retrieve the password when you forge...

Страница 39: ...nactive icon of the camera to enter the following interface to activate it You can also select multiple cameras from the list and click the One touch Activate to activate the cameras in batch Figure 2...

Страница 40: ...curity system resetting the password monthly or weekly can better protect your product Step 4 Click OK to finish the acitavting of the IP camera And the security status of camera will be changed to Ac...

Страница 41: ...d all cameras with the same admin password from the list Make sure the camera to add has already been actiavted by setting the admin password and the admin password of the camera is the same with the...

Страница 42: ...nterface Step 2 You can edit the IP address protocol management port and other information of the IP camera to be added If the IP camera to add has not been actiavated you can activate it from the IP...

Страница 43: ...The camera is disconnected You can click the icon to get the exception information of camera Delete the IP camera Play the live video of the connected camera Advanced settings of the camera Upgrade th...

Страница 44: ...nd other parameters Figure 2 40 Edit IP Camera Channel Port If the connected device is an encoding device with multiple channels you can choose the channel to connect by selecting the channel port No...

Страница 45: ...CVI and CVBS can be connected randomly for the selected channel If you select IP IP camera can be connected for the selected channel Step 3 Click Apply to save the settings You can view the max access...

Страница 46: ...and HWD 7200MH Series Step 2 Click to enter the 5 MP Long Distance Transmission Settings interface Figure 2 44 5 MP Long Distance Transmission Settings Step 3 Check the checkbox to enable 5 MP Long D...

Страница 47: ...m video loss tampering motion detection VCA or sensor alarm Record manual record schedule record motion detection or alarm triggered record Alarm Record Event Exception motion detection sensor alarm o...

Страница 48: ...an be used at the same time 3 2 1 Using the Mouse in Live View You can refer to Table 3 4 for the description of mouse operation in live view mode Table 3 3 Mouse Operation in Live View Name Descripti...

Страница 49: ...utput is disabled If you enter Aux monitor mode and the Aux monitor is not connected the mouse operation is disabled You need to switch back to the Main output with the F1 button on front panel or VOI...

Страница 50: ...Auto and HDMI VGA and then reboot the device to switch the main output 3 2 3 Quick Setting Toolbar in Live View Mode On the screen of each channel there is a quick setting toolbar which shows when yo...

Страница 51: ...l the zoom in out Figure 3 4 Digital Zoom Image Settings icon can be selected to enter the Image Settings menu You can drag the mouse or click to adjust the image parameters including brightness contr...

Страница 52: ...d target frame s will be shown on the live view Click the icon again to hide the VCA information Figure 3 8 Enable VCA Information Overlay In the live view only the analog cameras support VCA informat...

Страница 53: ...me from web browser or CMS Client Management System software in order to decrease the bandwidth requirement without affecting the image quality channel zero encoding is supported as an option for you...

Страница 54: ...following message box will pop up as below Figure 3 11 Note for Live View Mode If you have set the video output resolution larger than 1280 1024 and then switch to low resolution the former live view...

Страница 55: ...or to go to the previous or next page 4 Click the Apply button 3 5 Manual Video Quality Diagnostics Purpose The video quality of the analog channels can be diagnosed manually and you can view the dia...

Страница 56: ...o Recorder User Manual 55 Figure 3 14 Diagnostics Result Connect the camera to the device for the video quality diagnostics Three exception types can be diagnosed Blurred Image Abnormal Brightness and...

Страница 57: ...cedure to set the parameters for PTZ The configuring of the PTZ parameters should be done before you control the PTZ camera Step 1 Go to Menu Camera PTZ Figure 4 1 PTZ Settings Step 2 Select the camer...

Страница 58: ...ted here is supported by the connected camera dome When the Coaxitron protocol is selected all the other parameters like the baud rate data bit stop bit parity and flow control are not configurable Wh...

Страница 59: ...Z camera to point to when an event takes place Step 1 Go to Menu Camera PTZ Figure 4 4 PTZ Settings Step 2 Use the directional button to wheel the camera to the location where you want to set preset a...

Страница 60: ...ntrol Figure 4 5 PTZ Panel General Step 4 Click to enter the preset No in the corresponding text field Step 5 Click the Call Preset button to call it When the Coaxitron camera dome connected and the P...

Страница 61: ...ough the patrol The Duration refers to the time span to stay at the corresponding key point The Speed defines the speed at which the PTZ will move from one key point to the next Step 5 Click the Add b...

Страница 62: ...the PTZ control Figure 4 8 PTZ Panel General Step 3 Select a patrol in the drop down list and click the Call Patrol button to call it Step 4 You can click the Stop Patrol button to stop calling it 4 2...

Страница 63: ...erface Or press the PTZ button on the front panel or click the PTZ Control icon in the quick setting bar or select the PTZ option in the right click menu to show the PTZ control panel Step 2 Click the...

Страница 64: ...e left limit on the left side of the right limit as well the angle from the left limit to the right limit should be no more than 180 4 2 8 Calling Linear Scan Purpose Follow the procedure to call the...

Страница 65: ...ch Park Purpose For some certain model of the speed dome it can be configured to start a predefined park action scan preset patrol and etc automatically after a period of inactivity park time Step 1 C...

Страница 66: ...n again to inactivate it 4 3 PTZ Control Panel To enter the PTZ control panel there are two ways supported OPTION 1 In the PTZ Settings interface click the PTZ button on the lower right corner which i...

Страница 67: ...iption Direction button and the auto cycle button Zoom Focus Iris Zoom Focus Iris The speed of the PTZ movement Light on off Wiper on off 3D Zoom Image Centralization Menu Switch to the PTZ control in...

Страница 68: ...ral Figure 5 1 HDD General Step 2 Click Advanced tab to check the storage mode of the HDD Menu HDD Advanced Storage Mode 1 If the HDD mode is Quota please set the maximum record capacity For detailed...

Страница 69: ...Set recording resolution HWD 7108MH G2 and HWD 7216MH G2 series DVR support up to 8 MP resolution of all the channels HWD 7104MH G2 series DVR support up to 5 MP resolution of all the channels HWD 620...

Страница 70: ...ignal input is connected the frame rate of the main stream cannot exceed 15 fps For HWD 7100MH and HWD 7200MH series DVR when 8 MP signal input is connected the frame rate of the main stream cannot ex...

Страница 71: ...ce detection are not supported For the connnected IP camera the H 264 or H 265 should be supported by the camera and added to the DVR with the HIKVISION protocol You should reboot the device to activa...

Страница 72: ...ction For detailed information see Chapter 14 3 2 Setting HDD Property For network cameras the parameters of Main Stream Event are not editable Step 5 Click Apply to save the settings Step 6 Optionall...

Страница 73: ...In this chapter we take the record schedule procedure as an example and the same procedure can be applied to configure schedule for recording Purpose Set the record schedule and then the camera will a...

Страница 74: ...le All Day 4 To arrange other schedule leave the All Day checkbox blank and set the Start End time Figure 5 10 Edit Schedule Set Time Period Up to 8 periods can be configured for each day And the time...

Страница 75: ...n you enable holiday schedule in Holiday settings See Chapter 5 7 Configuring Holiday Record 6 Click OK to save the settings and return to upper level menu Draw the schedule 1 Click the color icon to...

Страница 76: ...etection parameters In the live view mode once a motion detection event takes place the DVR can analyze it and do many actions to handle it Enabling motion detection function can trigger certain chann...

Страница 77: ...7 Click Apply to save the settings 8 Click OK to back to the upper level menu 9 Exit the Motion Detection menu Step 3 Configure the schedule Please refer to the step 4 of Chapter 5 2 Configuring Recor...

Страница 78: ...able Alarm Step 6 Click the button after Settings to set the triggered channels arming schedule linkage actions and PTZ linking Refer to step 4 of Chapter 5 2 Configuring Recording and Capture Schedul...

Страница 79: ...ed full channel line crossing detection and intrusion detection and 2 ch sudden scene change detection are supported but 2K 4K output and 4 MP 5 MP 8 MP signal input are not supported if enhanced VCA...

Страница 80: ...alarm linkage actions for the VCA events Select Trigger Channel tab and select one or more channels which will start to record when VCA alarm is triggered Step 5 Click Apply to save the settings Figur...

Страница 81: ...5 22 Manual Record Step 2 Enable manual record Click the status icon before camera number to change it to Or click the status icon of Analog to enable manual record of all channels Step 3 Disable man...

Страница 82: ...are three different modes for the date format to configure holiday schedule By Month By Week and By Date are selectable 4 Set the start and end date 5 Click Apply to save settings 6 Click OK to exit...

Страница 83: ...dundant Recording and Capture Purpose Enabling redundant recording and capture which means saving the record files and captured pictures not only in the R W HDD but also in the redundant HDD will effe...

Страница 84: ...lect Camera you want to configure 2 Click More Settings button Figure 5 28 More Settings 3 Check the checkbox of Redundant Record 4 Click OK to save the settings 5 If the encoding parameters can also...

Страница 85: ...menu Step 4 Repeat the above steps to configure more HDD groups Step 5 Choose the Channels which you want to save the record files in the HDD group 1 Go to Menu HDD Advanced Storage Mode Figure 5 29 H...

Страница 86: ...rd mode record type file type start time and end time Step 4 Click Search to show the results Figure 5 31 Export Search Result Step 5 Protect the record files 1 Find the record files you want to prote...

Страница 87: ...lick OK to save settings and back to the upper level menu You cannot save any files in a Read only HDD If you want to save files in the HDD change the property to R W If there is only one HDD and is s...

Страница 88: ...function and reboot the device to have new settings taken effect Task 2 One Key Disabling H 264 H 265 for All Analog Cameras Step 1 Go to Menu Record Advanced Step 2 Click Disable to disable H 264 H 2...

Страница 89: ...lite mode the 3 MP signal is not accessible to analog channel Figure 5 39 Attention Step 3 Click Yes to reboot the device to have new settings taken effect Task 2 Disabling the 1080P Lite Mode Step 1...

Страница 90: ...channel Choose a channel in live view mode and click the button in the quick setting toolbar In the instant playback mode only record files recorded during the last five minutes on this channel will...

Страница 91: ...channel simultaneous playback and channel switch are supported Step 1 Go to Menu Playback Step 2 Check the checkbox of channel s in the channel list and then double click to select a date on the cale...

Страница 92: ...n the following figure Figure 6 4 Playback Interface Select the channel s if you want to switch playback to another channel or execute simultaneous playback of multiple channels Figure 6 5 Toolbar of...

Страница 93: ...presents normal recording manual or schedule represents event recording motion alarm motion alarm motion alarm Playback progress bar use the mouse to click any point of the progress bar to locate spec...

Страница 94: ...ack interface of this channel If several channels are triggered clicking button takes you to the Synchronous Playback interface Check checkbox to select one channel for playback or select multiple cha...

Страница 95: ...ou set the post play time as 5 seconds the video plays back till 11 00 05 Step 7 You can click or button to select the previous or next event Please refer to Table 6 1 for the description of buttons o...

Страница 96: ...Interface of Playback by Time Click button to add default tag Click button to add customized tag and input tag name Figure 6 10 Add Tag Max 64 tags can be added to a single video file Step 3 Tag manag...

Страница 97: ...t Interface Steps Step 1 Select Tag from the drop down list in the Playback interface Step 2 Choose channels edit start time and end time and then click Search to enter Search Result interface You can...

Страница 98: ...Search Purpose The smart playback function provides an easy way to get through the less effective information When you select the smart playback mode the system will analyze the video containing the m...

Страница 99: ...Camera Step 2 Configure the required parameters of intrusion detection including area arming schedule and linkage methods Refer to the user manual of smart IP camera for detailed instructions Steps S...

Страница 100: ...r video files by setting the target characters Show Hide VCA information Step 5 Set the rules and areas for smart search of VCA event or motion event Line Crossing Detection Select the button and clic...

Страница 101: ...motion event type Step 7 Click to search and play the matched video files Step 8 Optional Click to filter the searched video files by setting the target characters including the gender and age of the...

Страница 102: ...cted camera does not support VCA the icon is grey and unavailable For the analog cameras the VCA information includes line crossing detection and intrusion detection For the IP cameras the VCA informa...

Страница 103: ...ure 6 19 Result of System Log Search Step 3 Choose a log with record file and click button to enter Playback interface If there is no record file at the time point of the log the message box No result...

Страница 104: ...ist in the upper left corner of the page to enter the Sub periods Playback interface Step 3 Select a date and start playing the video file Step 4 Select the Split screen Number from the drop down list...

Страница 105: ...listed in the right side list You can click the button to refresh the file list Step 3 Select and click the button to play back it Figure 6 22 Interface of External File Playback 6 2 Auxiliary Functi...

Страница 106: ...so scroll the mouse wheel to control the zoom in out Figure 6 23 Draw Area for Digital Zoom Step 3 Right click the image to exit the digital zoom interface 6 2 3 Reverse Playback of Multi Channel Purp...

Страница 107: ...t least 4 h 8 MP multi channel playback is supported For HWD 7100MH and HWD 7200MH series DVR with 16 video inputs at least 8 h 8 MP multi channel playback is supported 6 2 4 File Management Purpose Y...

Страница 108: ...nagement Step 3 You can view the saved video clips lock unlock the files and edit the tags which you added in the playback mode Step 4 If required select the items and click Export All or Export to ex...

Страница 109: ...ash drives USB HDDs USB writer SATA writer and e SATA HDD Backup using USB flash drives and USB HDDs Step 1 Go to Menu Export Normal Picture Step 2 Select the cameras to search Step 3 Set search condi...

Страница 110: ...to select all the video files for backup and enter the Export interface Figure 7 3 Export by Normal Video Search using USB Flash Drive Step 6 Select the backup device from the drop down list and you c...

Страница 111: ...ng USB writer or SATA writer has the same operating instructions Please refer to steps described above 7 1 2 Backing up by Event Search Purpose Back up event related record files using USB devices USB...

Страница 112: ...Select video files from the Chart or List interface to export Figure 7 7 Result of Event Search Step 6 Export the video files Please refer to step5 of Chapter 7 1 1 Backing up by Normal Video Picture...

Страница 113: ...r the file management interface Figure 7 8 Video Clips Export Interface Step 4 Export the video clips in playback Please refer to step5 of Chapter 7 1 1 Backing up by Normal Video Picture Search for d...

Страница 114: ...ce Select a record file or folder in the backup device and click button if you want to delete it Click Erase button if you want to erase the files from a re writable CD DVD Click Format button to form...

Страница 115: ...Setup Interface Step 2 Select a camera you want to set up motion detection Step 3 Set detection area and sensitivity Check checkbox to enable motion detection Use the mouse to draw detection area s o...

Страница 116: ...s triggered Figure 8 3 Set Trigger Camera of Motion Detection Step 5 Set arming schedule of the channel Select Arming Schedule tab to set the channel s arming schedule Choose one day of a week and up...

Страница 117: ...g Alarm Response Actions Repeat the above steps to set up arming schedule of other days of a week Click the OK button to complete the motion detection settings of the channel Step 7 If you want to set...

Страница 118: ...or will light on for the PIR cameras supporting enabling alarm indicator Before you start Connect the PIR camera to the DVR Configure White Light as Alarm and Trigger Mode as DVR for the camera OSD St...

Страница 119: ...ction area configuration It is full screen by default The PIR alarm does not support sensitivity configuration If you disable false alarm filter only when the motion detection events are triggered the...

Страница 120: ...verlapped Step 13 Select Linkage Action tab to set up alarm response actions of the alarm input Refer to Chapter 8 8 Setting Alarm Response Actions Repeat the above steps to set up arming schedule of...

Страница 121: ...larm Input Step 16 Optional Enable the one key disarming for local alarm input 1 Local 1 1 Check the checkbox of Enable One Key Disarming 2 Click the Settings button to enter the linkage action settin...

Страница 122: ...r alarm input settings are not configurable 8 4 Detecting Video Loss Purpose Detect video loss of a channel and take alarm response action s Step 1 Go to Menu Camera Video Loss Figure 8 12 Video Loss...

Страница 123: ...Video Loss Repeat the above steps to set arming schedule of other days of a week You can also use Copy button to copy an arming schedule to other days Step 5 Select Linkage Action tab to set up alarm...

Страница 124: ...actions of the channel 1 Click Arming Schedule tab to set the arming schedule of response action 2 Select one day of a week and up to eight time periods can be set within each day Time periods shall n...

Страница 125: ...tics Figure 8 16 Video Quality Diagnostics Interface Step 2 Select a Camera you want to detect video tampering Step 3 Check the checkbox of Enable Video Quality Diagnostics To enable video quality dia...

Страница 126: ...Click the OK button to complete the video quality diagnostics settings of the channel Step 6 Click the Apply button to save and activate settings Step 7 Optional you can copy the same settings to oth...

Страница 127: ...erface Step 2 Check the checkbox of Enable Event Hint to display the Event Exception icon when an exceptional event occurs And click the icon to select the detailed event hint for display Figure 8 19...

Страница 128: ...al monitor HDMI VGA or CVBS monitor displays in full screen the video image from the alarming channel configured for full screen monitoring If alarms are triggered simultaneously in several channels t...

Страница 129: ...il configuration Trigger Alarm Output Trigger an alarm output when an alarm is triggered Step 1 Go to Menu Configuration Alarm Alarm Output Step 2 Select an alarm output and set alarm name and dwell t...

Страница 130: ...above steps to set arming schedule of other days of a week You can also click Copy button to copy an arming schedule to other days Click the OK button to complete the arming schedule setting of alarm...

Страница 131: ...etection and 2 ch sudden scene change detection are supported and 2K 4K output and 4 MP 5 MP 8 MP signal input are also supported HWD 6200MH G2 series support up to 4 ch line crossing detection and in...

Страница 132: ...age action and PTZ linking for the face detection alarm Please refer to step 3 to step 5 of Chapter 8 2 Setting Sensor Alarms for detailed instructions Figure 9 2 PTZ Linking Step 5 Click the Rule Set...

Страница 133: ...Step 2 Select the camera to configure the VCA You can check the checkbox of Save VCA Picture to save the captured pictures of VCA detection Step 3 Select the VCA detection type to Vehicle Detection St...

Страница 134: ...mera VCA Step 2 Select the camera to configure the VCA You can check the checkbox of Save VCA Picture to save the captured pictures of VCA detection Step 3 Select the VCA detection type to Line Crossi...

Страница 135: ...the detection alarm can be triggered 3 Click OK to save the rule settings and return to the line crossing detection settings interface Figure 9 6 Set Line Crossing Detection Rules Step 7 Click and se...

Страница 136: ...ction alarm Step 6 Click the Rule Settings button to set the intrusion detection rules Set the following parameters 1 Threshold Range 1s 10s the threshold for the time of the object loitering in the r...

Страница 137: ...the settings The sudden scene change detection and the intrusion detection cannot be enabled at the same channel 9 5 Region Entrance Detection Purpose Region entrance detection function detects people...

Страница 138: ...rm can be triggered Step 7 Click and draw a quadrilateral in the preview window by specifying four vertexes of the detection region and right click to complete drawing Only one region can be configure...

Страница 139: ...if you set the value as 0 alarm is triggered immediately after the object entering the region Up to 4 rules can be configured 9 8 People Gathering Detection Purpose People gathering detection alarm is...

Страница 140: ...n for 10s Up to 4 rules can be configured 9 11 Unattended Baggage Detection Purpose Unattended baggage detection function detects the objects left over in the pre defined region such as the baggage pu...

Страница 141: ...red 9 13 Audio Exception Detection Purpose Audio exception detection function detects the abnormal sounds in the surveillance scene such as the sudden increase decrease of the sound intensity and some...

Страница 142: ...onment the louder the environment sound the higher the value should be You can adjust it according to the real environment 3 Check the checkbox of Sudden Decrease of Sound Intensity Detection to detec...

Страница 143: ...ction You can only enable one function If you have enabled line crossing detection or intrusion detection when you enable sudden scene change detection and apply the settings the following attention b...

Страница 144: ...igital Video Recorder User Manual 143 Step 5 Click the Rule Settings button to set the rules Please refer to the Chapter 9 1 Face Detection for instructions Step 6 Click Apply to activate the settings...

Страница 145: ...to the specified conditions Before you start Please refer to Chapter 10 1 Face Detection for configuring the face detection Step 1 Go to Menu VCA Search Face Search Step 2 Select the camera s for the...

Страница 146: ...cture item and click to play it You can also click to stop the playing or click to play the previous next file Step 8 If you want to export the captured face pictures to local storage device connect t...

Страница 147: ...pecify the start time and end time for searching the matched pictures Figure 10 4 Behavior Search Interface Step 4 Select the VCA detection type from the drop down list including the line crossing det...

Страница 148: ...to export the captured pictures to local storage device connect the storage device to the device and click Export All to enter the Export interface Click Export to export all pictures to the storage d...

Страница 149: ...p 7 to Step 8 of Chapter 10 1 Face Search for the operation of the search results 10 4 People Counting Purpose The People Counting is used to calculate the number of people entered or left a certain c...

Страница 150: ...map is a graphical representation of data represented by colors The heat map function is usually used to analyze the visit times and dwell time of customers in a configured area Step 1 Go to Menu VCA...

Страница 151: ...and start heat map statistics and the results are displayed in graphics marked in different colors As shown in Figure 10 8 red color block 255 0 0 indicates the most welcome area and blue color block...

Страница 152: ...oute And then the system is connecting with the extranet and the data will be forwarded through the default route Net fault Tolerance Mode The two NIC cards use the same IP address and you can select...

Страница 153: ...e system asks you to reboot the device to enable the new settings and the PPPoE dial up is automatically connected after reboot You can go to Menu Maintenance System Info Network interface to view the...

Страница 154: ...to save the settings and return to the Guarding Vision interface Guarding Vision is disabled by default The verification code is empty when the device leaves factory The verification code must contain...

Страница 155: ...uardingvision com For the iOS users please scan the QR code below to download the Guarding Vision application for the subsequent operations Figure 11 6 QR Code for iOS Users For the Android users plea...

Страница 156: ...ion with your ISP is required before configuring the system to use DDNS Step 1 Go to Menu Configuration Network DDNS Step 2 Check the Enable DDNS checkbox to enable this feature Step 3 Select DDNS Typ...

Страница 157: ...NO IP website www no ip com 3 Enter the User Name and Password registered in the NO IP website Figure 11 10 NO IP Settings Interface Step 4 Click the Apply button to save and exit the interface 11 2...

Страница 158: ...onization 11 2 5 Configuring NAT Purpose Universal Plug and Play UPnP can permit the device seamlessly discover the presence of other network devices on the network and establish functional network se...

Страница 159: ...dialog box Configure the external port No for server port http port and RTSP port respectively You can use the default port No or change it according to actual requirements External Port indicates the...

Страница 160: ...ware default port is 7200 Multicast IP The multicast can be configured to realize live view for more than the maximum number of cameras through network A multicast address spans the Class D IP range o...

Страница 161: ...ntication of the web site and associated web server that one is communicating with which protects against Man in the middle attacks Perform the following steps to set the port number of https Example...

Страница 162: ...tion 3 Click OK to save the settings OPTION 2 Create the authorized certificate 1 Click the Create button to create the certificate request 2 Download the certificate request and submit it to the trus...

Страница 163: ...server must be configured Before you start Make sure you have configured the IPv4 Address IPv4 Subnet Mask IPv4 Gateway and the Preferred DNS Server in the Network Settings menu Please refer to Chapte...

Страница 164: ...l Up to one picture can be sent for one IP camera The attached pictures of the linked cameras cannot be sent For analog cameras 3 attached pictures can be sent for one analog camera when the alarm is...

Страница 165: ...atus of DVR through the network detection function including network delay packet loss etc 11 3 1 Testing Network Delay and Packet Loss Step 1 Go to Menu Maintenance Net Detect Network Detection Figur...

Страница 166: ...e backup device please check whether it is compatible with the DVR You can format the backup device if the format is incorrect Figure 11 24 Export Network Packet Step 3 Click the Export button to star...

Страница 167: ...message box pops out with other information instead of this one you can click Network button to show the quick setting interface of the network parameters Figure 11 28 Network Parameters Configuratio...

Страница 168: ...ser Manual 167 Figure 11 29 Network Stat Interface Step 2 View the bandwidth of Remote Live View bandwidth of Remote Playback and bandwidth of Net Total Idle Step 3 Click Refresh button to get the lat...

Страница 169: ...General Figure 12 1 HDD Information Interface You can view the Total Capacity Free Space and Remaining Recording Time of the HDD The algorithm of the Remaining Recording Time is to use average bit rat...

Страница 170: ...hus to decrease the power consumption of the device and extend the life of the HDDs Go to Menu HDD Advanced Figure 12 5 Enable HDD Sleeping Check the checkbox of Enable HDD Sleeping by default and the...

Страница 171: ...the type to NAS or IP SAN Step 5 Configure the NAS or IP SAN settings Add NAS disk 1 Enter the NetHDD IP address in the text field 2 Click Search to search the available NAS disks 3 Select the NAS dis...

Страница 172: ...igure 12 9 Add IP SAN Disk 5 After having successfully added the NAS or IP SAN disk return to the HDD Information menu The added NetHDD will be displayed in the list If the added NetHDD is uninitializ...

Страница 173: ...Attention for Reboot Step 4 Click the Yes button to reboot the device to activate the changes Step 5 After reboot of device go to Menu HDD General Step 6 Select HDD from the list and click the icon to...

Страница 174: ...e recording mode When the HDD property is set to redundancy the video can be recorded both onto the redundancy HDD and the R W HDD simultaneously so as to ensure high security and reliability of video...

Страница 175: ...The DVR must be rebooted to enable the changes to take effect Figure 12 16 Storage Mode Settings Interface Step 3 Select a camera for which you want to configure quota Step 4 Enter the storage capaci...

Страница 176: ...ime and any place which can highly enhance the efficiency Step 1 Go to Menu HDD General Cloud Storage Step 2 Check the Enable Cloud checkbox to enable the feature Step 3 Select the Cloud Type from the...

Страница 177: ...pload the event triggered recording files to the cloud storage 1 Back to enter the cloud storage interface and select the camera you have set in the recording schedule interface 2 Select the upload ty...

Страница 178: ...e 12 6 Configuring Disk Clone This chapter is only applicable to the DVR with eSATA Purpose If the S M A R T detection result declares the HDD is abnormal you can choose to clone all the data on the H...

Страница 179: ...and click the OK button Figure 12 23 Setting eSATA Usage The capacity of destination disk must be the same as that of the clone source disk Step 4 Check the checkbox of the HDD to be cloned in the Clo...

Страница 180: ...initialized or Abnormal please initialize the HDD before use And if the HDD initialization is failed please replace it with a new one Checking HDD Status in System Information Interface Step 1 Go to M...

Страница 181: ...ctor Purpose You can detect the bad sector of the HDD to check the status of the HDD Step 1 Go to Menu Maintenance HDD Detect Bad Sector Detection Step 2 Select a HDD and click the Detect button to st...

Страница 182: ...from the drop down list Step 3 Check the checkbox s below to select the linkage action s for HDD error as shown in Figure 12 26 The linkage actions can be selected to Audible Warning Notify Surveilla...

Страница 183: ...Name in the text field Step 4 Configure the Display Name Display Date and Display Week by checking the checkbox Step 5 Select the Date Format Time Format Display Mode and the OSD Font Figure 13 1 OSD...

Страница 184: ...ettings and back to the OSD Configuration interface Step 8 Click the Apply button to apply the settings 13 2 Configuring Privacy Mask Purpose You are allowed to configure the four sided privacy mask z...

Страница 185: ...ed by clicking the corresponding Clear Zone1 4 icons on the right side of the window or click Clear All to clear all zones Figure 13 4 Set Privacy Mask Area Step 6 You can click the Copy button to cop...

Страница 186: ...ther Step 4 Select the mode from the drop down list of Mode there are four modes selectable for the analog cameras Standard Indoor Dim Light and Outdoor Step 5 Adjust the image parameters according to...

Страница 187: ...camera And set the Defog Level from 1 to 4 Adjust the parameters including Day to Night Sensitivity Night to Day Sensitivity and IR Light Brightness for the analog cameras Select the Day Night Mode o...

Страница 188: ...ved to the DVR The default value of Day to Night Sensitivity Night to Day Sensitivity and IR Light Brightness is 5 The effective value ranges from 1 to 9 If you exit from the interface and enter it ag...

Страница 189: ...ou can click the Device Info Camera Record Alarm Network and HDD tabs to view the system information of the device Figure 14 1 System Information Interface 14 2 Searching Log Files Purpose The operati...

Страница 190: ...Type Step 3 Click the Search button to start search log files Step 4 The matched log files will be displayed on the list shown below Up to 2000 log files can be displayed each time Figure 14 3 Log Sea...

Страница 191: ...ice from the drop down list of Device Name Step 8 Click the Export to export the log files to the selected backup device You can click the New Folder button to create new folder in the backup device o...

Страница 192: ...elected backup device and click the Import button After the importing process is completed you must reboot the DVR 14 4 Importing Exporting Configuration Files Purpose The configuration files of the D...

Страница 193: ...reboot the DVR to activate the new firmware 14 5 2 Upgrading by FTP Before you start Configure PC running FTP server and DVR to the same Local Area Network Run the 3rd party TFTP software on the PC an...

Страница 194: ...4 10 Restore Defaults Step 2 Select the restoring type from the following three options Restore Defaults Restore all parameters except the network including IP address subnet mask gateway MTU NIC work...

Страница 195: ...used is English Output Standard Select the output standard to be PAL or NTSC VGA HDMI Resolution Select the output resolution which must be the same with the resolution of the VGA HDMI display Time Zo...

Страница 196: ...Enable DST checkbox and then you choose the date of the DST period 15 3 Configuring More Settings Step 1 Go to Menu Configuration General More Settings Figure 15 3 More Settings Interface Step 2 Conf...

Страница 197: ...15 4 Enable Enhanced VCA Mode 3 Click Yes to apply the function and reboot the device Disable Enhanced VCA Mode 1 Uncheck the checkbox to disable enhanced VCA mode 2 Click Apply and the attention box...

Страница 198: ...me The Administrator has the permission to add and delete user and configure user parameters 15 4 1 Adding a User Step 1 Go to Menu Configuration User Figure 15 6 User Management Interface Step 2 Clic...

Страница 199: ...evel has permission of Two way Audio in Remote Configuration and all operating permission in Camera Configuration by default Guest The Guest user has no permission of Two way Audio in Remote Configura...

Страница 200: ...HDD setting HDD property upgrading system firmware Local Shutdown Reboot Shutting down or rebooting the device Remote Configuration Remote Log Search Remotely viewing logs that are saved on the devic...

Страница 201: ...output of the selected camera s Local Playback Locally playing back recorded files of the selected camera s Remote Playback Remotely playing back recorded files of the selected camera s Local PTZ Cont...

Страница 202: ...he password and MAC address Check the checkbox of Change Password if you want to change the password and input the correct old password and the new password in the text field of Password and Confirm S...

Страница 203: ...ttern for detailed instructions Figure 15 12 Set Unlock Patter for Admin User Step 6 Optional Click icon after Draw Unlock Pattern to modify the pattern Step 7 Optional Click icon after Export GUID to...

Страница 204: ...Digital Video Recorder User Manual 203 Step 9 Optional For the Operator or Guest user account you can also click the button on the User Management interface to edit the permission...

Страница 205: ...ting Point to Point Protocol PPP frames inside Ethernet frames It is used mainly with ADSL services where individual users connect to the ADSL transceiver modem over Ethernet and in plain Metro Ethern...

Страница 206: ...p 3 Verify Input mode of the monitor is correct Please check the input mode of the monitor matches with the output mode of the device e g if the output mode of DVR is HDMI output then the input mode o...

Страница 207: ...is real time frame rate Select Menu Record Parameters Record and set the Frame Rate to Full Frame Step 3 Check if the fault is solved by the above steps If it is solved finish the process If not pleas...

Страница 208: ...ot please contact the engineer from our company to do the further process No record file found in the device local HDD and the prompt No record file found pops up when you search the record files Poss...

Страница 209: ...Technologies Co Ltd MSA C2000IC12 0 24P DE 12 V 2 A 0000201935 MOSO Technology Co Ltd ADS 24S 12 1224GPG CE 100 to 240 VAC 12 V 2 A 24 W 2 1 0000200174 Shenzhen Honor Electronic Co Ltd MSA C2000IC12...

Страница 210: ...Digital Video Recorder User Manual 209...

Отзывы: