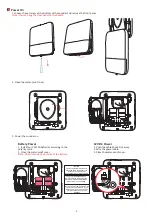
HIKVISION DS-PS1-E-WE Скачать руководство пользователя страница 2

3

Power On

1.Loosen the set screw at the bottom of the sounder and remove the front panel.

Note: You can hang the front panel on the buckle.

2. Open the water-proof cover.

3. Power the sounder on.

Battery Power

1. Install four

 C

R

12

3

A

 batteries according to the 

polarity mark.

2. Close the water-proof cover.

Note: Do not reverse the polarity of the battery. 

12 VDC Power

1. Push the Cable Knock-Out away.

2. Wire the power cable.

3. Close the water-proof cover.

ON

OFF

-12V+

ON

OFF

-12V+

ON

OFF

-12V+

-12V+

CAUTION

RISK OF EXPLOSION IF BATTERY IS 

REPLACED BY AN INCORRECT TYPE

DISPOSE OF USED BATTERIES 

ACCORDING TO THE INSTRUCTIONS

CHEMICAL BURNING DANGER

DO NOT SWALLOW THE BATTERY

KEEP NEW AND USED BATTERIES 

AWAY FROM THE CHILDREN

INSTALL THE BATTERIES ACCORDING 

TO THE POLARITY MARK ON THE 

BATTERY HOLDER. THE OPPOSITE 

POLARITY MAY CAUSE DEVICE 

DAMAGE

2

Содержание DS-PS1-E-WE

Страница 1: ...IVITIES IN THE CONTEXT RELATED TO ANY NUCLEAR EXPLOSIVE OR UNSAFE NUCLEAR FUEL CYCLE OR IN SUPPORT OF HUMAN RIGHTS ABUSES IN THE EVENT OF ANY CONFLICTS BETWEEN THIS MANUAL AND THE APPLICABLE LAW THE LATER PREVAILS Appearance 1 2 Indication This product and if applicable the supplied accessories too are marked with CE and comply therefore with the applicable harmonized European standards listed und...

Страница 2: ...se the polarity of the battery 12 VDC Power 1 Push the Cable Knock Out away 2 Wire the power cable 3 Close the water proof cover ON OFF 12V ON OFF 12V ON OFF 12V 12V CAUTION RISK OF EXPLOSION IF BATTERY IS REPLACED BY AN INCORRECT TYPE DISPOSE OF USED BATTERIES ACCORDING TO THE INSTRUCTIONS CHEMICAL BURNING DANGER DO NOT SWALLOW THE BATTERY KEEP NEW AND USED BATTERIES AWAY FROM THE CHILDREN INSTAL...

Страница 3: ...ll the peripheral locally with OR code or with serial No Note for re enrollment you need to hold the tamper button while powering the peripheral on simultaneously ON OFF 12V ON OFF 2 Loosen the set screw at the bottom of the sounder and remove the front panel Note You can hang the front panel on the buckle 1 Check signal strength and select tinstallation place Enter the signal checking mode by ope...

Страница 4: ...he sounder with other three screws 5 Fix the front panel on the sounder body Tighten the set screw to complete the installation 4 Operation 6 Formating Hold the tamper button and push the power switch to ON simultaneously Release the tamper button after 8 s and the device will strats formating While the formating is completed the red LED flashes 3 times ...

Страница 5: ...adiation The device for indoor use shall be kept from rain and moisture Exposing the equipment to direct sun light low ventilation or heat source such as heater or radiator is forbidden igno rance can cause fire danger Do not aim the device at the sun or extra bright places A blooming or smear may occur otherwise which is not a malfunction however and affecting the endurance of sensor at the same ti...

Отзывы: