HIKVISION DS-K3B220X Series Скачать руководство пользователя страница 102

All doors in the group will be closed and locked. No person can access the doors even if

he/she has the authorized credentials, except the super users.

Capture

Capture a picture manually.

Note

The Capture button is available when the device supports capture function. The picture is

saved in the PC running the client. For setting the saving path, refer to .

Result
The icon of the doors will change in real-time according to the operation if the operation is

succeeded.

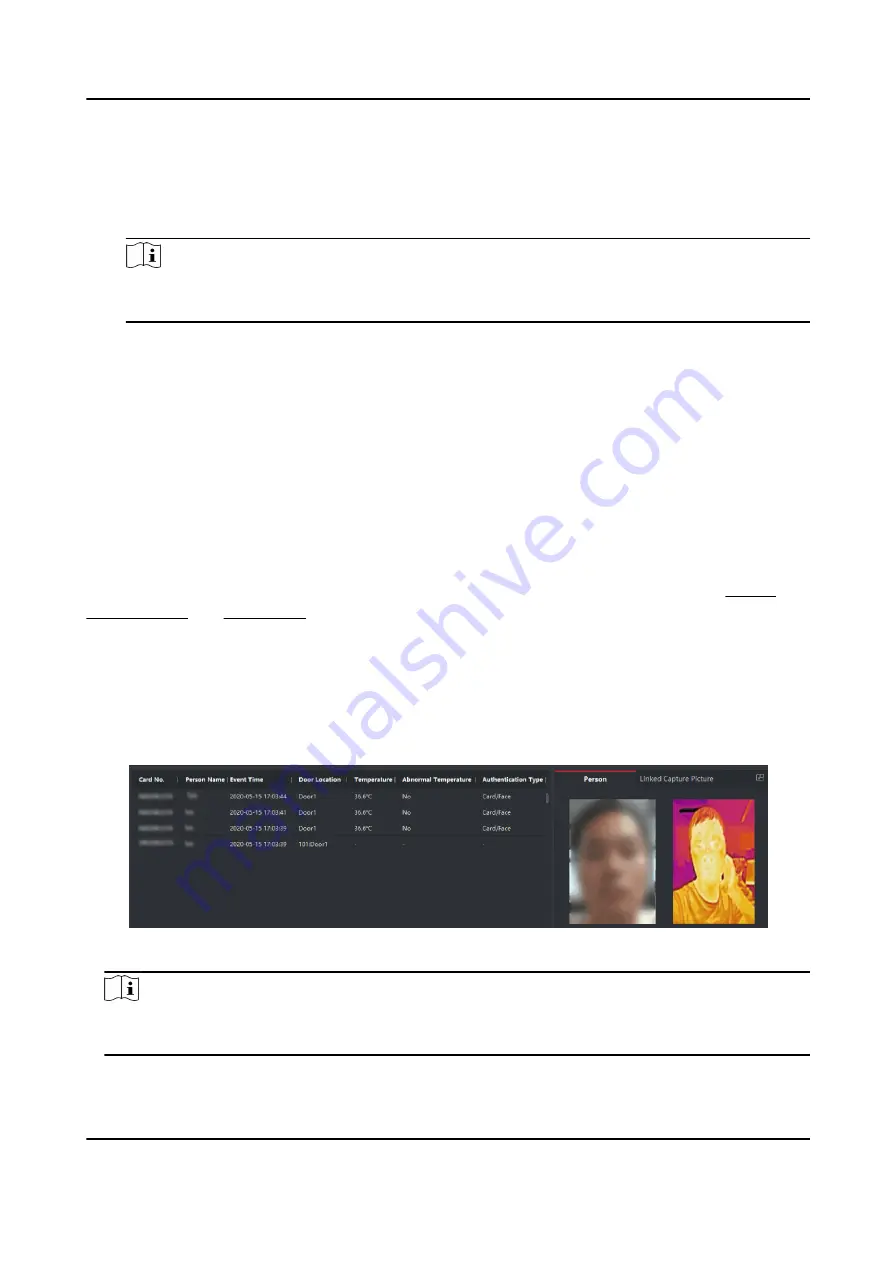
7.8.2 Check Real-Time Access Records

The real-time access records can be displayed in the client, including card swiping records, face

recognition records, skin-surface temperature information, etc. Also, you can view the person

information and view the picture captured during access.
Before You Start

You have added person(s) and access control device(s) to the client. For details, refer tPerson

Management and Add Device .
Steps
1. 
Click Monitoring to enter monitoring module.

Real-time access records are displayed on the bottom of the page. You can view record details,

including card No., person name, event time, door location, temperature, authentication type

etc.

Figure 7-4 Real-time Access Records

Note

You can right click the column name of access event table to show or hide the column according

to actual needs.

DS-K3B220X Series Swing Barrier User Manual

90

Содержание DS-K3B220X Series

Страница 1: ...DS K3B220X Series Swing Barrier User Manual...

Страница 2: ...YOU IS AT YOUR OWN RISK IN NO EVENT WILL HIKVISION BE LIABLE TO YOU FOR ANY SPECIAL CONSEQUENTIAL INCIDENTAL OR INDIRECT DAMAGES INCLUDING AMONG OTHERS DAMAGES FOR LOSS OF BUSINESS PROFITS BUSINESS IN...

Страница 3: ...cy by design principles For example for device with facial recognition features biometrics data is stored in your device with encryption method for fingerprint device only fingerprint template will be...

Страница 4: ...can be determined by turning the equipment off and on the user is encouraged to try to correct the interference by one or more of the following measures Reorient or relocate the receiving antenna Inc...

Страница 5: ...ollection points For more information see www recyclethis info 2006 66 EC battery directive This product contains a battery that cannot be disposed of as unsorted municipal waste in the European Union...

Страница 6: ...ake sure 1 Power off the fan to prevent the operator from getting injured accidentally 2 Do not touch bare high voltage components 3 Make sure the switch s wiring sequence is correct after maintenance...

Страница 7: ...ith the device cover because the acidic sweat of the fingers may erode the surface coating of the device cover Please use a soft and dry cloth when clean inside and outside surfaces of the device cove...

Страница 8: ...Available Models Product Name Model Description Swing Barrier DS K3B220X L Left Pedestal DS K3B220X M Middle Pedestal DS K3B220X R Right Pedestal DS K3B220X Series Swing Barrier User Manual vii...

Страница 9: ...trol Board Terminal Description 14 4 3 4 Main Optional Board Terminal Description Optional 16 4 3 5 Sub Optional Board Terminal Description Optional 18 4 3 6 Card Reader Board Terminal Description 18...

Страница 10: ...Online Users 42 6 5 6 View Device Arming Disarming Information 43 6 5 7 Network Settings 43 6 5 8 Event Linkage 45 6 5 9 Access Control Settings 46 6 5 10 Turnstile 50 6 5 11 Card Settings 54 6 5 12...

Страница 11: ...rd Issuing Parameters 73 7 5 Configure Schedule and Template 74 7 5 1 Add Holiday 74 7 5 2 Add Template 75 7 6 Set Access Group to Assign Access Authorization to Persons 76 7 7 Configure Advanced Func...

Страница 12: ...Appendix D Table of Audio Index Related Content 100 Appendix E Error Code Description 101 Appendix F Communication Matrix and Device Command 102 DS K3B220X Series Swing Barrier User Manual xi...

Страница 13: ...control mode inductive mode free passing mode remain open mode and remain close mode in both entrance and exit direction Anti forced accessing The barrier will be locked automatically without open ba...

Страница 14: ...opening and closing speed can be configured according to the visitor flow TCP IP network communication The communication data is specially encrypted to relieve the concern of privacy leak Permissions...

Страница 15: ...alled on the concrete surface or other non flammable surfaces If the installation area is too close to the wall make sure the distance between the pedestal and the wall should be no less than 20 mm or...

Страница 16: ...aw other parallel lines for installing the other pedestals Note The distance between the nearest two line is L 146 mm L represents the lane width 3 Slot on the installation surface and dig installatio...

Страница 17: ...communication cable length is 3 m The suggested inner diameter of the low voltage conduit is larger than 30 mm If you want to bury both of the AC power cord and the low voltage cable the two cables s...

Страница 18: ...unscrew and disassemble the pedestal Figure 3 1 Screw Hole 2 Keep the disassembled components and make sure the accessories are intact 3 Prepare for system wiring and installation For details see Syst...

Страница 19: ...screw and remove the maintenance door Figure 3 2 Maintenance Door 5 Place the platen on the expansion bolt and adjust the position of the pedestal to make sure the platen fits well to the bottom of th...

Страница 20: ...f the expansion bolts with a screwdriver shaft diameter under 7 mm and shank length more than 120 mm and reinstall the maintenance door Scan the QR Code to watch the installation guide video DS K3B220...

Страница 21: ...DS K3B220X Series Swing Barrier User Manual 9...

Страница 22: ...roduction By default basic components of the turnstile are connected well The pedestals can communicate by wiring the interconnecting cables And the turnstile supports wiring the AC electric supply fo...

Страница 23: ...nding at the entrance position in the lane the IR modules on your left are the IR sending modules the ones on your right are the IR receiving modules 4 2 Wiring Scan the QR code to watch the wiring gu...

Страница 24: ...necting interface USB flash drive interface reserved access control board interface fire input interface exit button interface 12 VDC output interface reserved 24 VDC input interface fan interface com...

Страница 25: ...access control board interface exit button interface 12 VDC power output interface reserved 24 VDC power input interface fan interface communication interface encoder interface power supply interface...

Страница 26: ...iption Access control board is mainly used for authority identification in places with high security levels such as public security or judicial place external device accessing and communication with t...

Страница 27: ...rt are for maintenance and debugging use only Press the Reset button for 5 s and the device will start to restore to factory settings The DIP switch is for study mode setting and keyfob paring For det...

Страница 28: ...onal Board Terminal Description Optional The main optional board contains the sub 1G antenna interface loudspeaker interface debugging port Wiegand exit button interface 5 VDC output and communication...

Страница 29: ...Figure 4 6 Main Optional Board Terminal DS K3B220X Series Swing Barrier User Manual 17...

Страница 30: ...efault RS 485D corresponds to uart 4 on web and is for card reader connection by default RS 232B corresponds to uart 2 on web and is for fingerprint reader connection by default RS 232C is reserved 4...

Страница 31: ...gure 4 8 Card Reader Board 4 3 7 General Wiring The general wiring of lane control board access control board and optional board Figure 4 9 General Wiring DS K3B220X Series Swing Barrier User Manual 1...

Страница 32: ...the access control board are suggested to connect with the face recognition module or the card reader Here takes connecting with a card reader as an example Note There are 2 RS 485 interfaces on the...

Страница 33: ...t There is 1 available RS 232 interface on the sub optional board The RS 232B corresponds to uart 2 on web connecting to fingerprint scanner by default The RS 232C interface is reserved Figure 4 11 RS...

Страница 34: ...to exit button or face recognition device Figure 4 14 Exit Button Wiring Note The face recognition devices are powered via 12 VDC power output interface of the main and sub lane control board Barrier...

Страница 35: ...igure via button web Memory Mode Configure via button web Parameter Settings Barrier Opening Speed Configure via button web Barrier Closing Speed Configure via button web Card Reading on the Alarm Are...

Страница 36: ...Passing Duration Enable or disable via button Intrusion Alarm Enable or disable via button Tailgating Alarm Enable or disable via button Overstaying Alarm Enable or disable via button Motor Inspection...

Страница 37: ...1 menu or exit the configuration from the level 1 menu OK Confirm the data or enter configuration mode or enter the submenu Note Configuration data is displayed by two digital tubes Level 1 Menu If t...

Страница 38: ...to set the configuration No Press OK to enter the level 2 menu and view the parameters Press CANCEL or conduct no operation for 5 s to cancel configuration 3 Press LEFT and RIGHT to set the parameters...

Страница 39: ...er off the device and swing the barrier until it is vertical to the pedestal 3 Power on the device The device will remember the current position automatically 4 Reboot the device when you hear Study a...

Страница 40: ...Figure 4 17 DIP Switch Location DS K3B220X Series Swing Barrier User Manual 28...

Страница 41: ...ue and meaning see DIP Switch Description The barrier will open automatically and turns back to the closed position At this circumstance the device enters the normal mode 4 4 3 Keyfob Pairing Pair key...

Страница 42: ...te control to the device through DIP switch to open close the barrier remotely Before You Start Ask our technique supports or sales and purchase the keyfob Steps 1 Power off the turnstile 2 Set the No...

Страница 43: ...hem to pair For details about DIP switch value and meaning see DIP Switch Description 6 Optional Go to System User Keyfob User on the remote control page of the client software to delete the keyfob 4...

Страница 44: ...Note Make sure no persons are in the lane when powering on the device DS K3B220X Series Swing Barrier User Manual 32...

Страница 45: ...be within the same subnet The following steps show how to activate a device and modify its IP address For batch activation and IP addresses modification refer to User Manual of SADP for details Steps...

Страница 46: ...d to create the password to activate them before they can be added to the iVMS 4200 software and work properly Steps Note This function should be supported by the device 1 Enter the Device Management...

Страница 47: ...r to increase the security of your product And we recommend you change your password regularly especially in the high security system changing the password monthly or weekly can better protect your pr...

Страница 48: ...r to enter the login page Enter the device user name and the password Click Login Login via Remote Configuration of Client Software Download and open the client software After adding the device click...

Страница 49: ...nd the end time and click Search The results will be displayed on the right panel Person Information You can view the added and not added information of person and card Network Status You can view the...

Страница 50: ...s basic information including the employee ID the person s name the gender and person type If you select Visitor as the person type you can set the visit times Click Save to save the settings Set Perm...

Страница 51: ...he Add Person page Click Add Card enter the Card No and select the Property and click OK to add the card Note Up to 50 cards can be added Click Save to save the settings Authentication Settings Click...

Страница 52: ...the search conditions including the event type the employee ID the name the card No the start time and the end time and click Search The results will be displayed on the right panel DS K3B220X Series...

Страница 53: ...utput local RS 485 alarm input alarm output and device capacity etc You can change Device Name and click Save 6 5 2 Set Time Set the device s time Click Configuration System System Settings Time Setti...

Страница 54: ...password 4 Confirm the new password 5 Click OK Caution The password strength of the device can be automatically checked We highly recommend you change the password of your own choosing using a minimum...

Страница 55: ...n You can view the device arming disarming information Click Refresh to refresh the page 6 5 7 Network Settings Set TCP IP and port Set Basic Network Parameters Click Configuration Network Network Set...

Страница 56: ...function the system will allocate the IPv4 address IPv4 subnet mask the IPv4 default gateway automatically DNS Server Set the preferred DNS server and the Alternate DNS server according to your actual...

Страница 57: ...e event alarm IP address or domain name URL port and protocol Note The event alarm IP address or domain name should support the HTTP protocol HTTPS protocol to receive the alarm information 6 5 8 Even...

Страница 58: ...he target event Linked Alarm Output Enable Linked Alarm Output check Alarm Output 1 or Alarm Output 2 and set the alarm output status for the target event 6 5 9 Access Control Settings Set Authenticat...

Страница 59: ...e configured interval A second authentication will be failed Alarm of Max Failed Attempts Enable to report alarm when the card reading attempts reach the set value Max Authentication Failed Attempts E...

Страница 60: ...uration ranges from 5 s to 60 s Exit Button Type You can set the exit button as Remain Open or Remain Closed according to your actual needs By default it is Remain Open Door Remain Open Duration with...

Страница 61: ...type connected device model and peripheral software version 5 Click Save Host Parameters Set door contact settings and RS 485 protocol Steps 1 Click Configuration Access Control Host Parameter to ente...

Страница 62: ...l Locally After enabling the function the device will only verify the person s permission without the schedule template etc Access Control Mode The device works normally and will verify the person s p...

Страница 63: ...can select the barrier status for the entrance and exit from the drop down list Note If you set barrier free mode the barrier remains open and will close when authentication fails If you choose Weekly...

Страница 64: ...keyfob and click Delete to delete the keyfob 6 Click Save IR Detector Set IR detector Steps 1 Click Configuration Turnstile IR Detector to enter the page Figure 6 14 IR Detector 2 Set the entrance an...

Страница 65: ...k Save People Counting Set people counting Steps 1 Click Configuration Turnstile People Counting to enter the page Figure 6 15 People Counting 2 Check to enable People Counting 3 Enable Device Offline...

Страница 66: ...s number exceeds the card presenting number or after the latest person passing with no other person passing within the door open duration the door will close automatically 8 Choose the control mode S...

Страница 67: ...s available M1 Card Encryption Sector M1 card encryption can improve the security level of authentication Enable the function and set the encryption sector By default Sector 13 is encrypted It is reco...

Страница 68: ...Parameters Set the event storage type Go to Configuration Security Privacy Settings The event storage type is overwriting by default The earliest 5 events will be deleted when the system detects the...

Страница 69: ...to export the device parameters Note You can import the exported device parameters to another device Import Click and select the file to import Click Import to start import configuration file 6 5 14...

Страница 70: ...ow light board Peripheral You can view the status of the RS 485 card reader Temperature You can view the pedestal temperature Movement You can view the working status of motor encoder Sub Lane Status...

Страница 71: ...f the 4 IR beam sensors Input and Output Status You can view the status of the event input alarm output and fire alarm Other Status You can view the status of the barrier and the keyfob receiving modu...

Страница 72: ...ails area The certificate will be saved automatically 6 Download the certificate and save it to an asking file in the local computer 7 Send the asking file to a certification authority for signature 8...

Страница 73: ...to Maintenance and Security Security Certificate Management 2 Create an ID in the Import CA Certificate area Note The input certificate ID cannot be the same as the existing ones 3 Upload a certifica...

Страница 74: ...et the iVMS 4200 client software installation package 7 1 Configuration Flow of Client Software Follow the flow diagram below to configure on the client software Figure 7 1 Flow Diagram of Configurati...

Страница 75: ...ces to the client by specifying the IP address or domain name user name password etc Steps 1 Enter Device Management module 2 Click Device tab on the top of the right panel The added devices are displ...

Страница 76: ...exported from the device to this default directory to strengthen the security See for details about enabling certificate verification You can log into the device to get the certificate file by web br...

Страница 77: ...ower case letters numbers and special characters in order to increase the security of your product And we recommend you change your password regularly especially in the high security system changing t...

Страница 78: ...e recommend you change your password regularly especially in the high security system changing the password monthly or weekly can better protect your product Proper configuration of all passwords and...

Страница 79: ...vices after managing the resources by groups 7 3 1 Add Group You can add group to organize the added device for convenient management Steps 1 Enter the Device Management module 2 Click Device Manageme...

Страница 80: ...t person information to the organization for effective management of the persons You can also add a surbodinate organization for the added one Steps 1 Enter Person module 2 Select a parent organizatio...

Страница 81: ...ter the person information in the downloaded template Note If the person has multiple cards separate the card No with semicolon Items with asterisk are required By default the Hire Date is the current...

Страница 82: ...nd result will be displayed Export Person Information You can export the added persons information to local PC as a CSV Excel file Before You Start Make sure you have added persons to an organization...

Страница 83: ...face 7 4 3 Get Person Information from Access Control Device If the access control device has been configured with person information including person details fingerprint and issued card information y...

Страница 84: ...way to issue cards to multiple persons in a batch Steps 1 Enter Person module 2 Click Batch Issue Cards All the added persons with no card issued will be displayed in the right panel 3 Optional Enter...

Страница 85: ...t station is available connect it to the PC running the client by USB interface or COM and place the card on the card enrollment to read the card number If not you can also swipe the card on the card...

Страница 86: ...can adopt the configured template to access groups when setting the access groups so that the access group will take effect in the time durations of the template Note For access group settings refer t...

Страница 87: ...l Click in the Operation column to delete this added holiday period from the holiday list 6 Click Save 7 5 2 Add Template Template includes week schedule and holiday You can set week schedule and assi...

Страница 88: ...tional Click Add to add a new holiday Note For details about adding a holiday refer to Add Holiday 4 Optional Select a selected holiday in the right list and click to remove the selected one or click...

Страница 89: ...t of the Select Person field select person s to assign access authority 6 In the left list of the Select Access Point field select door s door station s or floor s for the selected persons to access 7...

Страница 90: ...The selected persons in the applied access groups will have the authorization to enter exit the selected doors door stations with their linked card s or fingerprints 9 Optional Click to edit the acces...

Страница 91: ...cture uploading pictures after capturing saving captured pictures etc Before You Start Add access control device to the client Steps 1 Click Access Control Advanced Function Device Parameter Note If y...

Страница 92: ...he surrounding communication devices MAC address and upload the MAC address to the system If the MAC address match the specified MAC address the system can trigger some linkage actions 3G 4G If you en...

Страница 93: ...the door starts working Extended Open Duration The door contact can be enabled with appropriate delay after person with extended accesss needs swipes her his card Door Left Open Timeout Alarm The ala...

Страница 94: ...the device list on the left click to expand the door select a card reader and you can edit the card reader s parameters on the right 3 Edit the card reader basic parameters in the Basic Information p...

Страница 95: ...int Recognition Level Select the fingerprint recognition level in the drop down list Default Card Reader Authentication Mode View the default card reader authentication mode Fingerprint Capacity View...

Страница 96: ...ction the system will lock the user s face for 5 minutes if the live face detection is failed for more than the configured attempts The same user cannot authenticate via the fake face within 5 minutes...

Страница 97: ...roller s DIP Settings the device will follow the lane controller s DIP settings to control the barrier The settings on the software will be invalid If you select According to Main Controller s Setting...

Страница 98: ...device in the device list and click Face Recognition Terminal 4 Set the parameters Note These parameters displayed vary according to different device models COM Select a COM port for configuration COM...

Страница 99: ...he drop down list to set the RS 485 parameters 5 Set the baud rate data bit the stop bit parity type communication mode working mode and connection mode in the drop down list Note When the connection...

Страница 100: ...tion bar on the left enter Advanced Function More Parameters 3 Select an access control device in the device list and click M1 Card Encryption to enter the M1 Card Encryption page 4 Set the switch to...

Страница 101: ...ick a door icon to select a door or press Ctrl and select multiple doors Note For Remain All Unlocked and Remain All Locked ignore this step 4 Click the following buttons to control the door Unlock Wh...

Страница 102: ...t including card swiping records face recognition records skin surface temperature information etc Also you can view the person information and view the picture captured during access Before You Start...

Страница 103: ...n surface temperature prompt Note When enabled if there is abnormal temperature information an Abnormal Temperature window pops up when you enter Monitoring module displaying person s picture skin sur...

Страница 104: ...f A 2 DIP Switch Corresponded Functions Note After setting the DIP switch you should reboot the device or the function cannot take effect The 2 bit DIP switch corresponded functions on the access cont...

Страница 105: ...ring Mode 3 Passing Mode 1 1 Both sides under control 2 Entrance under control exit prohibited 3 Entrance under control exit on inductive mode 4 Both sides on inductive mode 5 Entrance on inductive mo...

Страница 106: ...ce prohibited exit remaining open 15 Entrance prohibited exit on free mode 16 Entrance remaining open exit under control 17 Entrance remaining open exit on inductive mode 18 Entrance remaining open ex...

Страница 107: ...one 1 one to multiple 6 Barrier Opening Speed 5 1 1 2 2 10 10 7 Barrier Closing Speed 5 1 1 2 2 10 10 8 Card Reading on the Alarm Area 2 1 Do not open 2 Open 9 Enter Duration 5 5 5s 6 6s 7 7s 60 60s...

Страница 108: ...ticlockwise Unable to change 20 Motor Type 1 1 Dunker Motor 2 Control Motor Unable to change 21 Volume 2 1 0 2 1 3 2 4 3 5 4 The device will be muted when set to 1 22 Authenticated Passing 1 1 Disable...

Страница 109: ...nable to change 33 Failed Authentication 1 1 Disable 2 Enable Unable to change 34 Expired Certificate 1 1 Disable 2 Enable Unable to change 35 Overstaying Alarm 1 1 Disable 2 Enable 36 Barrier Materia...

Страница 110: ...2 Enable Voice prompt of self check at startup and motor inspection 41 Study Mode Voice Prompt 2 1 Disable 2 Enable Voice prompt of study mode 42 IR Detector Quantity 4 4 4 6 6 8 8 Unable to change 9...

Страница 111: ...assing Visual and Audible Force Accessing None Climb over Barrier Visual and Audible Overstay Visual and Audible Passing Timeout None Intrusion Visual and Audible Free Passing Authentication Failed Vi...

Страница 112: ...dix D Table of Audio Index Related Content Index Content 1 Climbing over the barrier 2 Reverse passing 3 Passing timeout 4 Intrusion 5 Tailgating 6 Overstay DS K3B220X Series Swing Barrier User Manual...

Страница 113: ...ode The First IR Beam Triggered 01 Not Studying 54 The Second IR Beam Triggered 02 Obstruction 55 The Third IR Beam Triggered 03 Exceeding Studying Range 56 The Fourth IR Beam Triggered 04 Encoder Exc...

Страница 114: ...Hikvision access control and video intercom devices Figure F 1 QR Code of Communication Matrix Device Command Scan the following QR code to get the device common serial port commands Note that the co...

Страница 115: ...UD30051B...

Отзывы: