background image

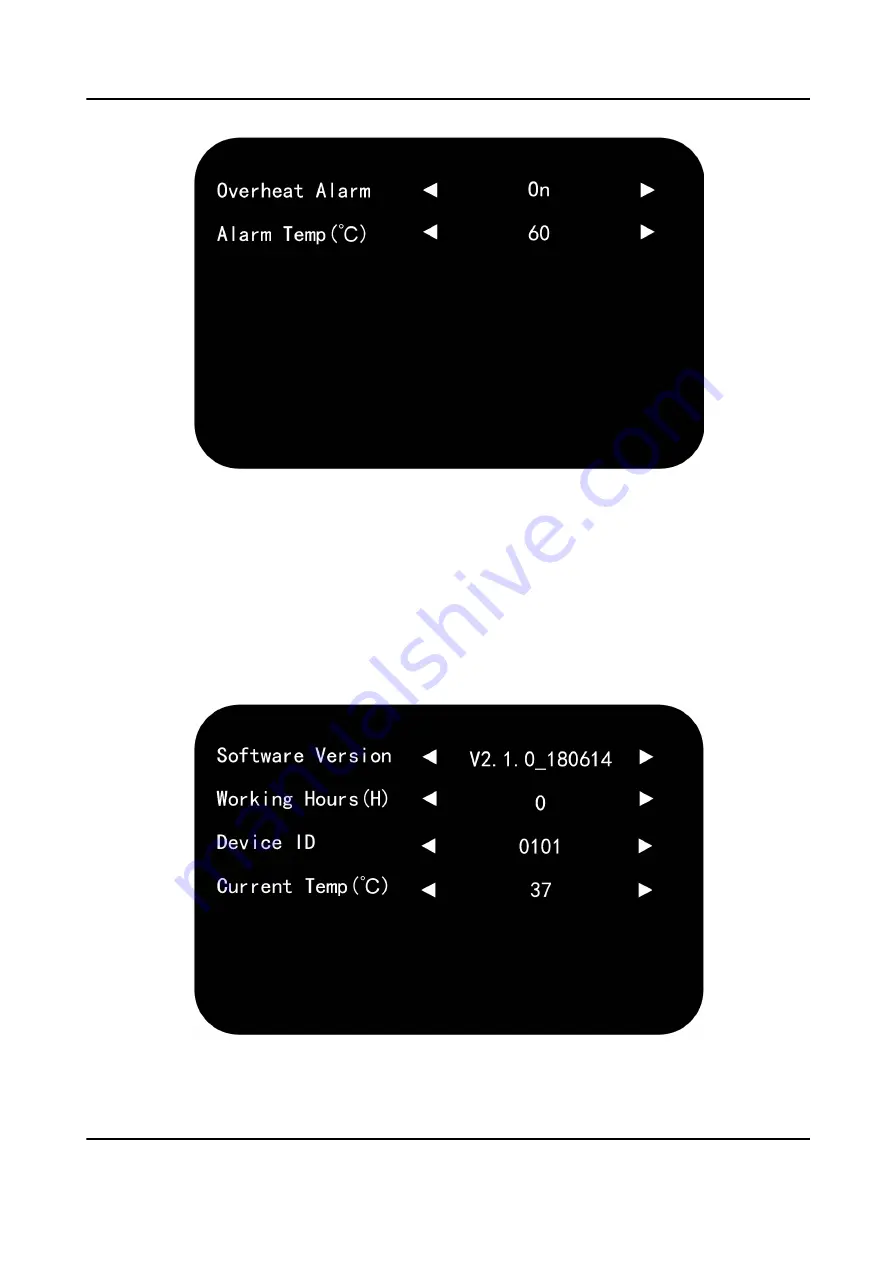
Figure 2-11 Alarm Settings

3. Select Alarm Temp (°C) and press 

 or 

 to adjust the alarm temperature.

4. Press MENU again to complete the settings and back to the main menu interface.

2.6.4 View System Information

View the system information for maintenance.
Enter System Info page: MENU → System Info , and check current software version, working hours,

current temperature, device ID.

Figure 2-12 System Information

LCD Monitor User Manual

14

Содержание DS-D5043FL-B

Страница 1: ...LCD Monitor User Manual ...

Страница 2: ...T LIMITATION THE IMPLIED WARRANTIES OF MERCHANTABILITY AND FITNESS FOR A PARTICULAR PURPOSE REGARDING THIS MANUAL HIKVISION DOES NOT WARRANT GUARANTEE OR MAKE ANY REPRESENTATIONS REGARDING THE USE OF THE MANUAL OR THE CORRECTNESS ACCURACY OR RELIABILITY OF INFORMATION CONTAINED HEREIN YOUR USE OF THIS MANUAL AND ANY RELIANCE ON THIS MANUAL SHALL BE WHOLLY AT YOUR OWN RISK AND RESPONSIBILITY REGARD...

Страница 3: ...ious injury Caution Indicates a potentially hazardous situation which if not avoided could result in equipment damage data loss performance degradation or unexpected results Note Provides additional information to emphasize or supplement important points of the main text Applicable Models This manual is applicable to monitors of the following sizes 22 inch 32 inch 43 inch and 55 inch LCD Monitor U...

Страница 4: ...e Audio Settings 10 2 5 Enable Disable keypad lock 11 2 6 System Maintenance 12 2 6 1 Upgrade the Device 12 2 6 2 Restore the Defaults 12 2 6 3 Configure Temperature Monitoring 13 2 6 4 View System Information 14 2 6 5 Enable Disable Auto Sleep 15 2 6 6 Enable Disable Power Saving Mode 15 2 6 7 Configure Screen Saver 15 2 6 8 Check Energy Diagram 15 Chapter 3 Client Operation 17 3 1 Log in to Clie...

Страница 5: ...3 4 Switch Input Source 18 LCD Monitor User Manual iv ...

Страница 6: ...S 1920 1080 HD display 3D digital comb filter True color OSD and user friendly operating menu Mstar ACE 5 auto color and image enhancement engine improving the image contrast details color of skin and edges etc Programmable 12 bit RGB gamma correction 1 ch HDMI 1 3 input interface supporting HDCP 1 2 Software spread spectrum technology to reduce EMI radiation 3D noise reduction HD JPEG decoding Mu...

Страница 7: ...irm Start up Hold down to shut down MENU Enter main menu SOURCE Enter source menu Move the cursor up down left right 1 4 Interfaces Figure 1 2 Rear Panel of Device Table 1 2 Description of Rear Panel Interface Description BNC IN CVBS input BNC OUT CVBS output LCD Monitor User Manual 2 ...

Страница 8: ...l port input RS232 Out RS 232 serial port output 1 5 Power Supply Connections Insert the 3 pin power plug 100 to 240 VAC 2A into well grounded power socket Note Disconnect the power of the monitor if it will not be used for a long time 1 6 Remote Control Refer to the following table for the remote controller descriptions Figure 1 3 Remote Control LCD Monitor User Manual 3 ...

Страница 9: ... Buttons Key Function Turn on off the monitor Turn on off the sound MENU Enter Exit main menu FREEZE Freeze the image SOURCE Input source selection menu Up down left right direction keys select a submenu or set menu parameters OK Confirm Play Pause Stop Previous Next Repeat Return LCD Monitor User Manual 4 ...

Страница 10: ... VGA CVBS USB Steps 1 Press SOURCE to enter Input Source page Figure 2 1 Input Source 2 Press or to select the input source 3 Press OK to accomplish the input source selection 2 2 Menu Descriptions Menu Operations Note Configuration steps vary depending on the menu you choose LCD Monitor User Manual 5 ...

Страница 11: ... main menu interface OSD Settings You can set the language and OSD duration on the menu Enter Menu Settings page Menu Menu Settings and then set language OSD duration and OSD blending Figure 2 2 OSD Settings Language Supports Chinese English menu switch OSD Duration Refers to the display time of the menu after it is not used Press or to adjust the OSD duration to Always On 5 Sec 15 Sec 30 Sec OSD ...

Страница 12: ...le Suitable for a dark room Dynamic Suitable for a bright room User When you select the User mode press or to set the brightness contrast color or sharpness to adjust display effect Note Adjustable parameters vary depending on the input source you choose If the parameter bar is gray it indicates that the parameter is unadjustable under the current input source Backlight Settings You can adjust the...

Страница 13: ...light Settings VGA Parameter When you select VGA as the input source you can adjust VGA parameters to make the picture show in the correct position Enter VGA Parameter page MENU VGA Parameter and then press or to adjust VGA parameters according to your needs Figure 2 5 VGA Parameter LCD Monitor User Manual 8 ...

Страница 14: ...ess or to disable Overscan You can set Left Edge Right Edge Top Edge and Bottom Edge from 0 to 100 Figure 2 6 Oversan Settings Note The value of overscan is the pixel value of certain edge Aspect You can set the aspect ratio as 16 9 4 3 and P to P to zoom pictures Enter Aspect page MENU Aspect and then press or to set the aspect ratio LCD Monitor User Manual 9 ...

Страница 15: ...freeze is automatically disabled by default Lighting You can set the lighting parameters to adopt different surrounding lighting conditions Enter Lighting page MENU Other Settings Lighting and then press or to switch lighting modes Normal Mode Suitable for normal light conditions Daylight Mode Suitable for daylight conditions Night Mode Suitable for night light conditions 2 4 Configure Audio Setti...

Страница 16: ...nd balance Figure 2 8 Audio Settings 2 5 Enable Disable keypad lock You can disable keypad lock to avoid the misoperation of control panel buttons Enter Lock Keypad page MENU Lock Keypad and then press or to turn on off Lock Keypad Figure 2 9 Lock Keypad LCD Monitor User Manual 11 ...

Страница 17: ...est update package to get all the possible updates Before You Start Insert the USB flash drive with the update package to the device Steps 1 Enter Upgrade USB page MENU Maintenance Upgrade USB 2 Press to to start upgrading 3 Press to continue the upgrading process or to cancel the operation and back to the menu 2 6 2 Restore the Defaults All parameters of the device can be restored to default sett...

Страница 18: ... or to cancel the operation and back to the menu 2 6 3 Configure Temperature Monitoring You can enable Overheat Alarm and once the board temperature is too high an alarm prompt appears on the screen Steps 1 Enter Alarm Settings page MENU Alarm Settings 2 Press or to enable disable Overheat Alarm LCD Monitor User Manual 13 ...

Страница 19: ...n to complete the settings and back to the main menu interface 2 6 4 View System Information View the system information for maintenance Enter System Info page MENU System Info and check current software version working hours current temperature device ID Figure 2 12 System Information LCD Monitor User Manual 14 ...

Страница 20: ...again to complete the settings and back to the main menu interface 2 6 7 Configure Screen Saver The screen saver allows you to set the screen mode when the monitor has no signal input Steps 1 Enter No Signal Screensaver page MENU Other Settings No Signal Screensaver 2 Press or to set Blue or Black or LOGO when there is no signal input 3 Press MENU again to complete the settings and back to the mai...

Страница 21: ...e Power Ratio The ratio of the current power to the maximum power Sum Power The total power accumulated from the factory to the present 4 Optional Turn off Energy Diagram 1 Repeat step 1 and press to disable Energy Diagram 2 Press MENU again to complete the settings and back to the main menu interface LCD Monitor User Manual 16 ...

Страница 22: ...e 3 2 Configure Serial Port The client controls the screen by connecting the serial port Steps 1 Click System Configuration Serial Port Configuration 2 Select Serial Port 3 Set Buad Rate to 9600 4 Click Open to connect the serial port 5 Optional Click Close to disconnect the serial port 3 3 Startup Shutdown You can turn on off the monitors via the client Before You Start Configure the serial port ...

Страница 23: ...nfigure the serial port and see Configure Serial Port for details Steps 1 Open the Screen Control page 2 Hold the mouse to draw a rectangle to select one or multiple virtual screens 3 Right click and select Switch Signal 4 Select the source according to your needs LCD Monitor User Manual 18 ...

Страница 24: ...UD10637B ...

Отзывы: