background image

ATM Digital Video Recorder Quick Start Guide 

24 

3.8 Network Settings 

Purpose: 

Network settings must be properly configured before you operate DVR over network. 

Step 1


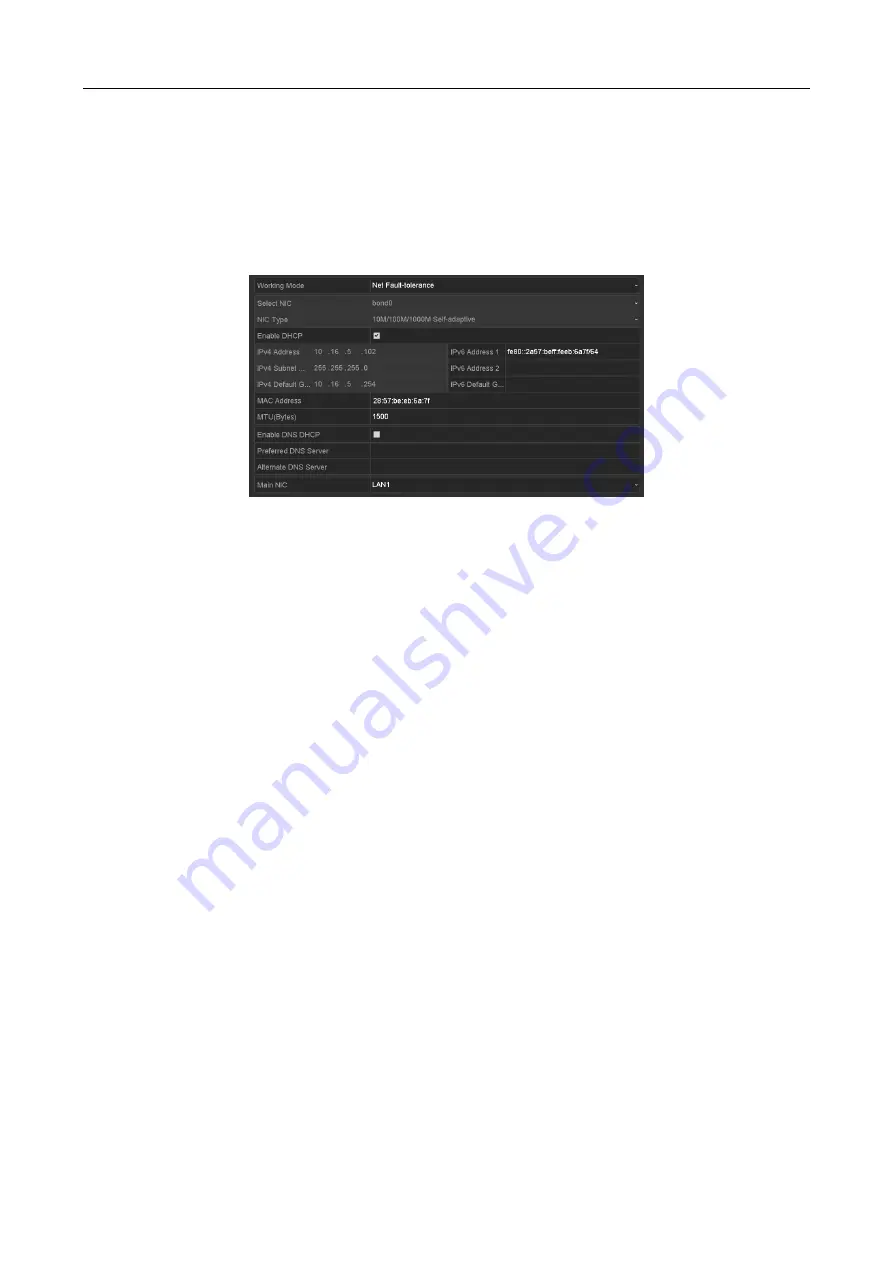
Go to Menu > Configuration > Network > General


Figure 3-17


Network Settings 

Step 2


In the General Settings interface, you can configure the following settings: Working Mode, 
NIC Type, IPv4 Address, IPv4 Gateway, MTU and DNS Server. 

Step 3


If the DHCP server is available, you can check Enable DHCP to automatically obtain an IP 
address and other network settings from that server. 

Step 4


If DHCP is enabled, you can check Enable DNS DHCP or uncheck it and edit Preferred DNS 
Server
 and Alternate DNS Server

Step 5


Click Apply to save the settings.   

3.9 General Settings 

Purpose 

You can configure the output resolution, system time, mouse pointer speed, etc. 

Step 1


Go to Menu > Configuration > General > General

Содержание DS-8104AHQI-K4

Страница 1: ...ATM Digital Video Recorder Quick Start Guide ...

Страница 2: ...on Switch Connection 14 2 4 HDD Storage Calculation Chart 15 Chapter 3 Menu Operation 16 3 1 Menu Structure 16 3 2 Startup and Shutdown 16 3 3 Activating Your Device 17 3 4 Using the Unlock Pattern for Login 18 3 5 Login and Logout 19 3 5 1 User Login 19 3 5 2 User Logout 22 3 6 Using the Setup Wizard 22 3 7 Configuring Signal Input Channel 23 3 8 Network Settings 24 3 9 General Settings 24 3 10 A...

Страница 3: ...nd logos mentioned below are the properties of their respective owners Legal Disclaimer TO THE MAXIMUM EXTENT PERMITTED BY APPLICABLE LAW THE PRODUCT DESCRIBED WITH ITS HARDWARE SOFTWARE AND FIRMWARE IS PROVIDED AS IS WITH ALL FAULTS AND ERRORS AND HIKVISION MAKES NO WARRANTIES EXPRESS OR IMPLIED INCLUDING WITHOUT LIMITATION MERCHANTABILITY SATISFACTORY QUALITY FITNESS FOR A PARTICULAR PURPOSE AND...

Страница 4: ... conditions 1 This device may not cause harmful interference 2 This device must accept any interference received including interference that may cause undesired operation EU Conformity Statement This product and if applicable the supplied accessories too are marked with CE and comply therefore with the applicable harmonized European standards listed under the EMC Directive 2014 30 EU the LVD Direc...

Страница 5: ... that may be found in this document are defined as follows Symbol Description Provides additional information to emphasize or supplement important points of the main text Indicates a potentially hazardous situation which if not avoided could result in equipment damage data loss performance degradation or unexpected results Indicates a hazard with a high level of risk which if not avoided will resu...

Страница 6: ...rom the device turn off the power at once and unplug the power cable and then please contact the service center Preventive and Cautionary Tips Before connecting and operating your device please be advised of the following tips Ensure unit is installed in a well ventilated dust free environment Unit is designed for indoor use only Keep all liquids away from the device Ensure environmental condition...

Страница 7: ...ATM Digital Video Recorder Quick Start Guide 6 Chapter1 Panels Description 1 1 Front Panel Figure 1 1 Front Panel of DS 8104AHQLI K4 ...

Страница 8: ... confirm selection in any of the menu modes It can also be used to tick checkbox fields In Playback mode it can be used to play or pause the video In single frame Playback mode pressing the button will advance the video by a single frame In Auto switch mode it can be used to stop start auto switch 2 MENU Access the main menu interface Switch the channels in PTZ control Select deselect the HDD in H...

Страница 9: ...for additional devices such as USB mouse and USB Hard Disk Drive HDD 7 Tx Rx Tx Rx indictor blinks blue when network connection is functioning properly 8 HDD HDD indicator blinks red when data is being read from or written to HDD normally and stays red when the HDD is abnormal 9 LCD Screen 7 inch LCD touch screen to display local menu and live view 1 2 Rear Panel Figure 1 2 Rear Panel ...

Страница 10: ...t connector 6 VGA DB15 connector for VGA output Display local video output and menu 7 RS 232 Interface Connector for RS 232 devices 8 LAN Interface RJ45 10M 100M 1000M Ethernet interface 9 DC Output 12 VDC output 10 ALARM IN Connector for alarm input 11 RS 485 Interface Connector for RS 485 devices 12 ALARM OUT Connector for alarm output 13 VIDEO OUT BNC connector for analog video output 14 GND Gr...

Страница 11: ...nded Environmental temperature should be within the range of 10 to 55ºC 14 to 131ºF Environmental humidity should be within the range of 10 to 90 2 2 Hard Disk Installation Before you start Before installing a hard disk drive HDD please make sure the power is disconnected from the DVR A factory recommended HDD should be used for this installation Four SATA hard disks can be installed Tools Require...

Страница 12: ...p 4 Tighten the screws on both sides of the bracket and insert it to the chassis Figure 2 3 Install the Bracket Step 5 Tighten the 2 screws on top of the bracket Figure 2 4 Tighten the Screw Step 6 Re install the cover of the DVR and fasten screws Figure 2 5 Re install the Cover ...

Страница 13: ...ut to the device use the following diagram If the alarm input is not an open close relay please connect an external relay between the alarm input and the device Figure 2 6 Wiring of Alarm Input 2 3 2 Wiring of Alarm Output To connect to an alarm output AC or DC load use the following diagram Figure 2 7 DC Load Connection Diagram Figure 2 8 AC Load Connection Diagram ...

Страница 14: ...e If you connect an AC load to the alarm output 3 of the DVR then you must remove the JP3 2 3 3 RS 485 and Controller Connection Typical Connection Figure 2 9 RS 485 Connection To connect PTZ to the DVR Step 1 Disconnect pluggable block from the RS 485 terminal block Step 2 Press and hold the orange part of the pluggable block insert signal cables into slots and release the orange part Ensure sign...

Страница 15: ...Switch Connection To connect the DVR with multiple speed domes the bus topology can be adopted which means the speed domes are connected with each other via the R and R of RS 485 serial interface Due to the impedance of 485 wire the longer the wire is the greater the impedance gets To avoid the signal reduction caused by the great impedance of long distance transmission connect two 120Ω resistors ...

Страница 16: ...Rate Storage Used 96K 42M 128K 56M 160K 70M 192K 84M 224K 98M 256K 112M 320K 140M 384K 168M 448K 196M 512K 225M 640K 281M 768K 337M 896K 393M 1024K 450M 1280K 562M 1536K 675M 1792K 787M 2048K 900M 4096K 1 76G 8192K 3 52G 16384K 7 03G Please note that supplied values for storage space used is just for reference The storage values in the chart are estimated by formulas and may have some deviation fr...

Страница 17: ...w Net Detect Video Tampering Exceptions Video Loss HDD Detect Alarm Normal ATM Event Tag Sub periods External File Continuous Capture Alarm Video Quality Diagnostics User ATM Picture Picture Manual Video Quality Diagnostics System Service Figure 3 1 Menu Structure 3 2 Startup and Shutdown Proper startup and shutdown procedures are crucial to expanding the life of the DVR To start your DVR Step 1 C...

Страница 18: ...ing and recording To shut down the DVR Step 1 Go to Menu Shutdown Figure 3 2 Shutdown Step 2 Click Shutdown Step 3 Click Yes 3 3 Activating Your Device Purpose For the first time access you need to activate the device by setting an admin password No operation is allowed before activation You can also activate the device via Web Browser SADP or client software Step 1 Enter the admin password twice ...

Страница 19: ... Step 4 Click OK to save the password and activate the device For the old version device if you upgrade it to the new version the following dialog box will pop up once the device starts up You can click YES and follow the wizard to set a strong password Figure 3 4 Warning of Weak Password What to do next When you have checked Security Question Configuration continue to set the security questions f...

Страница 20: ...ame pattern again to confirm it When the two patterns match the pattern is configured successfully Step 3 You can use the configured unlock pattern for future login Figure 3 6 Draw the Unlock Pattern 3 5 Login and Logout 3 5 1 User Login Purpose If DVR has logged out you must log in to the device before operating the menu and other functions Step 1 Select User Name in the list ...

Страница 21: ...ong password for 7 times the account will be locked for 60 seconds For the operator if you have entered the wrong password for 5 times the account will be locked for 60 seconds Figure 3 8 User Account Protection for the Admin Figure 3 9 User Account Protection for the Operator Step 4 Optional If you forget the password click Forget Password to pop up the Import GUID interface ...

Страница 22: ...1 Reset Password 2 Input the new password and confirm the password 3 Click OK to save the new password Then the Attention box pops up as shown below Figure 3 12 GUID File Imported 4 Click OK and the Attention box as below pops up to remind you to duplicate the password of the device to IP cameras that are connected with default protocol Click Yes to duplicate the password or No to cancel it ...

Страница 23: ...to log in again Step 1 Go to Menu Shutdown Figure 3 14 Logout Step 2 Click Logout After you have logged out the system menu operation on the screen is invalid It is required to input a user name and password to unlock the system 3 6 Using the Setup Wizard The Setup Wizard can walk you through some important settings of the device By default the Setup Wizard starts once the device has loaded Check ...

Страница 24: ...put Status Figure 3 16 View Signal Input Type Step 2 Check the checkbox to select different signal input types HD CVBS and IP If you select HD CVBS the analog signal inputs can be connected randomly for the selected channel If you select IP IP camera can be connected for the selected channel Step 3 View the Max IP Camera Number Step 4 Click Apply to save the settings Disabling one analog channel w...

Страница 25: ...g Mode NIC Type IPv4 Address IPv4 Gateway MTU and DNS Server Step 3 If the DHCP server is available you can check Enable DHCP to automatically obtain an IP address and other network settings from that server Step 4 If DHCP is enabled you can check Enable DNS DHCP or uncheck it and edit Preferred DNS Server and Alternate DNS Server Step 5 Click Apply to save the settings 3 9 General Settings Purpos...

Страница 26: ...600 The default VGA HDMI resolution is 1024 768 60Hz If you connect the external display to the DVR via the HDMI or VGA interface set the VGA HDMI resolution lower than or equal to 1080p and click Apply the attention box will pop up as shown below Click OK within 15 seconds to change the output resolution Or click Cancel within 15 seconds to cancel the settings Or wait until 15 seconds end and the...

Страница 27: ...es you should add the network cameras to the connection list of the device Before you start Ensure the network connection is valid and correct and the IP camera to add has already been activated Please refer to the User Manual for activating the inactive IP camera You can select one of the following three options to add the IP camera OPTION 1 Step 1 Select the Add IP Camera option from the right c...

Страница 28: ...p 2 Select the detected IP camera and click the Add button to add it directly and you can click Search to refresh the online IP camera manually OPTION 3 You can custom add the IP camera by editing the parameters in the corresponding text field and then click Add to add it 3 11 Configuring Custom Protocols Purpose Custom protocols can be set for the network cameras which are not configured with the...

Страница 29: ...Set the port No for the custom protocol Path Set the resource path for the custom protocol E g ch1 main av_stream Before customizing the protocol for the network camera you have to contact the manufacturer of the network camera to consult the URL uniform resource locator for getting main stream and sub stream Example The format of the URL is Type IP Address of the network camera Port Path E g rtsp...

Страница 30: ...wing the status of the record and alarm in the channel for quick reference Alarm video loss tampering motion detection VCA or sensor alarm Record manual record continuous record motion detection VCA or alarm triggered record Alarm and Record In the live view mode use the mouse to right click on the window to access the following menu Figure 3 23 Right Click Menu ...

Страница 31: ...iguration must be set before using Start Auto switch Start Recording Start all day continuous recording or motion detection recording for all channels Add IP Camera A shortcut to enter the IP camera management interface Playback Play back the video of the selected channel PTZ Control Enter the PTZ control mode Output Mode Output Mode is configurable with Standard Bright Gentle and Vivid options Au...

Страница 32: ...t Protocol which refers to the connection type of the ATM DVR Step 4 Click Setting to enter the settings interface of the input mode you select The following steps give the settings of Serial Port Interception as the example Figure 3 25 Serial Port Interception Step 5 Select the protocol for the input mode you select And if the Network Interception or Serial Port Interception connection type is us...

Страница 33: ...tailed information Purpose You can enable continuous record or motion detection record After rebooting all the manual records enabled are canceled Step 1 On the live view window right click the window and move the cursor to the Start Recording option and select Continuous Record or Motion Detection Record as your demand Figure 3 27 Start Recording from Right click Menu Step 2 Click Yes in the pop ...

Страница 34: ... the specified channel and playback by normal ATM event tag sub periods external file search picture Step 1 Go to Menu Playback Or select Playback from the right click menu Step 2 Check the channel s in the channel list and then double click to select a date on the calendar Step 3 Optional Use the toolbar in the bottom part of Playback interface to control playing progress Figure 3 28 Playback Int...

Страница 35: ... and Google Chrome The supported resolutions include 1024 768 and above Step 1 Open web browser input the IP address of the device and then press Enter Step 2 Login to the device If the device has not been activated you need to activate the device first before login Figure 4 1 Set Admin Password 1 Set the password for the admin user account 2 Click OK to login to the device STRONG PASSWORD RECOMME...

Страница 36: ...Login Step 3 Install the plug in before viewing the live video and managing the camera Please follow the installation prompts to install the plug in You may have to close the web browser to finish the installation of the plug in After login you can perform the operation and configuration of the device including the live view playback log search configuration etc 0305301081130 ...

Страница 37: ...ATM Digital Video Recorder Quick Start Guide 36 UD12535B ...

Отзывы: