


DS-7600 Series NVR User’s Manual
61
4.
If you have a DHCP server running and would like your NVR to automatically obtain an IP
address and other network settings from that server, check the Enable DHCP checkbox.
5.
If you would like to configure your own settings, enter the settings for:
IP Address: IP address you would like to use for your NVR.
Subnet Mask: Subnet Mask of network.
Default Gateway: IP address of your Gateway. Typically the IP address of your router.
MTU: The valid value range of MTU is 500~9676.
6.
DNS Server: The preferred and alternate Domain Name System (DNS) Server to be used with
your NVR.
7.
Internal IPv4 Address: You need to configure the internal NIC address, so that IP addresses are
assigned to the cameras connected to the PoE or built-in switch interfaces.
8.
Click the Apply button to save the settings.
9.
Click the Refresh button to refresh the updated network information after enabling DHCP.
Configuring DDNS
Dynamic DNS allows you to create a hostname and associate it to your IP address, making access to
your NVR over the internet easier. To configure DDNS:
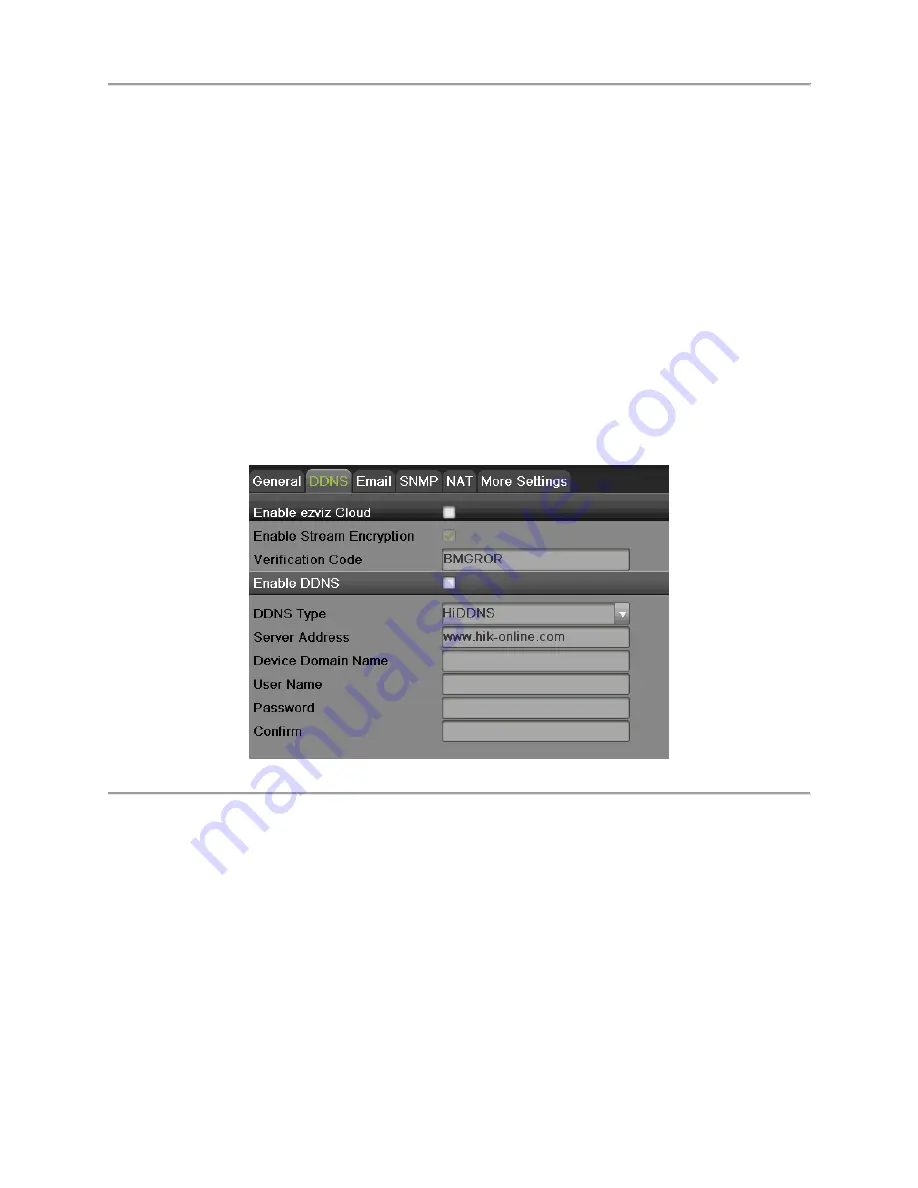
1.
Select the DDNS tab to enter the DDNS settings interface, as shown in Figure 48.
Figure 46 DDNS Settings Menu
2.
Check the Enable DDNS checkbox.
3.
Select a DDNS type from the DDNS Type selection dropdown list. Five different DDNS types
are selectable: IPServer, DynDNS, PeanetHull, NO-IP, HiDDNS.
IPServer
: Enter Server Address for IPServer.
DynDNS
:
1)
Enter Server Address for DynDNS.
2)
Enter the domain obtained from the DynDNS website in the Domain Name textbox.
3)
Enter the User Name and Password registered in the DynDNS website.
PeanutHull
: Enter the User Name and Password obtained from the PeanutHull website.
NO-IP
:
1)
Enter Server Address for NO-IP.
2)
Enter the domain obtained from the DynDNS website (www.no-ip.com) in the Domain
Name textbox.
3)
Enter the User Name and Password registered in the NO-IP website.
Содержание DS-7600NI-SE/P Series
Страница 1: ...1 DS 7604NI E1 4P DS 7608NI E2 8P NVR USER S MANUAL Version 1 0 0 ...
Страница 7: ...DS 7600 Series NVR User s Manual 7 C H A P T E R 1 Introduction ...
Страница 19: ...DS 7600 Series NVR User s Manual 19 C H A P T E R 2 Getting Started ...
Страница 26: ...DS 7600 Series NVR User s Manual 26 Figure 14 HDD Information Menu ...
Страница 27: ...DS 7600 Series NVR User s Manual 27 C H A P T E R 3 Live Feed ...
Страница 39: ...DS 7600 Series NVR User s Manual 39 C H A P T E R 4 Record Settings ...
Страница 48: ...DS 7600 Series NVR User s Manual 48 C H A P T E R 5 Playback ...
Страница 54: ...DS 7600 Series NVR User s Manual 54 C H A P T E R 6 Backup ...
Страница 59: ...DS 7600 Series NVR User s Manual 59 C H A P T E R 7 System Configuration ...
Страница 82: ...DS 7600 Series NVR User s Manual 82 C H A P T E R 8 Camera Management ...
Страница 91: ...DS 7600 Series NVR User s Manual 91 C H A P T E R 9 Disk Management ...
Страница 104: ...DS 7600 Series NVR User s Manual 104 C H A P T E R 1 0 NVR Management ...


