


6
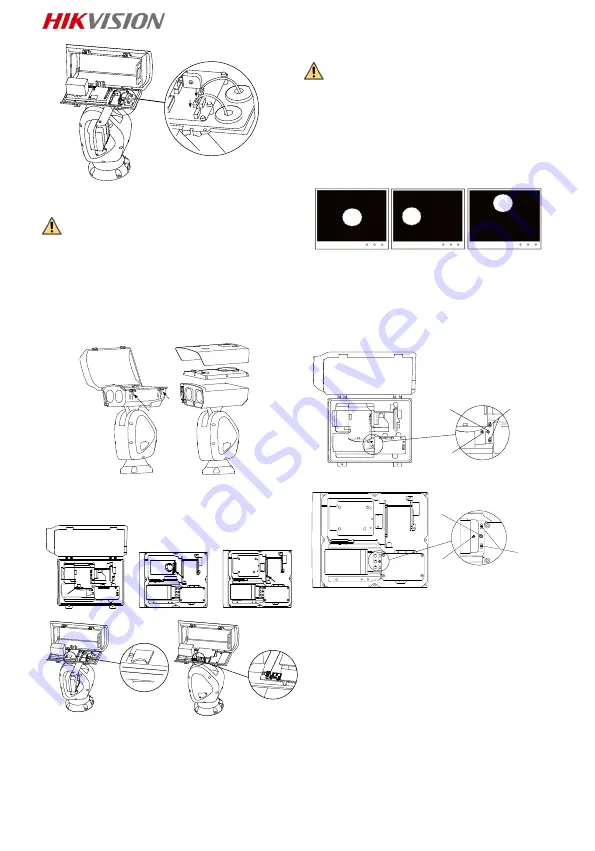
Figure 2-7 Connect the Cables
2.3 Install Memory Card (Optional)
Warning
It is NOT recommended to install memory
card by yourself. Waterproof capability
would be affected if the device cannot be
fully restored.
Steps:
1. Loosen the screws of top cover (and
sunshield).
2. Open or take down the top cover (and
sunshield).
Figure 2-8 Open the Cover (and sunshield)
3. Insert the memory card into the memory
card slot according to the actual situation.
Figure 2-9 Memory Card Slots of Different
Models
4. Restore the housing and tighten the
screws for waterproof.
2.4 Adjust Laser Module (Optional)
Warning
It is NOT recommended to adjust the laser
module by yourself. Waterproof capability
would be affected if the device cannot be
fully restored.
If the spot location is the same as shown in
figure A, you can skip the step of adjusting
the laser. The spot location shown in figure A
is the optimum location; if not, you need to
adjust the laser.
A
B
C
Figure 2-10 Laser Spot Location
Observe the location of laser spot in the
image. Adjust the zoom ratio of the lens to a
large value, the laser supplementary lighting
system will adjust the light according to the
zoom ratio, and then you can see the laser
spot on the live view image.
Slightly adjust the control screws for the
laser according to the actual situation.
②
③
①
Figure 2-11 Adjust the Laser (Type III of DY9
Series)
③
②
①
Figure 2-12 Adjust the Laser (Type IV of DY9
Series)
Notes:
Panning Adjustment: Loosen two
panning fastening screws (
①
), rotate
eccentric wheel (
③
) to adjust the laser
spot in the horizontal direction, and
fasten the screws after adjusting.
Tilt Adjustment: Tighten or loosen
tilting adjustment screw (
②
) to adjust
the position of the laser spot in the
vertical direction.
Содержание DS-2DY9240IX-AT5
Страница 1: ...0 Network Positioning System Quick Start Guide...
Страница 80: ...79 https www hikvision com Hikvision Hikvision Hikvision HIKVISION HIKVISION HIKVISION HIKVISION HIKVISION...
Страница 82: ...81 UPS 2 safeguard...
Страница 83: ...82 Light Supplement...
Страница 84: ...83 IR 200 1 RG1 1 1 1 2 5 3 1 2 4 1 3 5 5 3 1 1 DY7xxx...
Страница 86: ...85 1 4 2 RS 485 5 3 6 1 4 1 6 1 3 1 3 2 DC 4 JQC 3FG 2 2 1 1 5 mm 2 1 2 2 2 IR IR 1 IR M4 10...
Страница 87: ...86 2 2 IR 2 IR IR 2 3 IR 3 IR M4 10 2 4 IR 4 IR 1 2 3 IR 4 5 2 5 5 IR 1 2...
Страница 88: ...87 2 1 3 2 2 2 3 1 2 2 3 3 2 4 4 2 4...
Страница 89: ...88 A A A B C 2 5 2 6 DY9 III 2 7 DY9 IV 2 5 2 8...
Страница 97: ...96 200 1 RG1...
Страница 99: ...98 1 3 2 4 JQC 3FG 2 2 1 1 5 5 1 2 2 2 1 M4 10 5 2 2 5 3 3 M4 10 5 4 4 1 2 3 4 5 5 5 5 1 2...
Страница 100: ...99 5 6 3 5 7 2 3 1 2 5 8 3 5 9 4 2 4 A A B C 5 10 5 11 III DY9...
Страница 103: ...102 200 1 RG1...
Страница 105: ...104 1 5 2 1 2 2 2 1 M4 10 2 2 2 2 3 3 M4 10 2 4 4 1 2 3 4 5 2 5 5 1 2 2 6 3...
Страница 106: ...105 2 7 2 3 1 2 2 8 3 2 9 4 2 4 A A A B C 2 10 2 11 III DY9 2 12 IV DY9 2 5 2 13...
Страница 107: ...106 2 6 2 14 2 7 QR 3 QR Wi Fi...
Страница 108: ...UD21594B A...


