background image

HSL Mini-Matrix Quick Setup Guide 

Table of Contents

SECTIONS

1

2

3

OPERATION

Keyboard shortcut options

29

#

Action Description

Keyboard

1

Reset to factory defaults 

L-Ctrl | L-Ctrl | F11 | R

2

Activate relative mode

L-Ctrl | L-Ctrl | F11 | B

3

Activate absolute mode

L-Ctrl | L-Ctrl | F11 | C

4

Enable preset Fx

(e.g. LCtrl LCtrl F11 F3 - enable 

preset F3)

L-Ctrl | L-Ctrl | F11 | Fx

5

Enable legacy mode

L-Ctrl | R-Ctrl | M

6

Switch to dual-head preset

L-Ctrl | L-Ctrl | F11 | D

7

Switch channels on primary

L-Ctrl | L-Ctrl | 1-8

8

Switch to channel x on the right

(e.g. RCtrl RCtrl 3 - switch to 

channel 3 on the right)

R-Ctrl | R-Ctrl | 1-8

9

Switch kbd/mouse to the left

L-Ctrl | L-Ctrl | [Arrow] left

10

Switch kbd/mouse to the right

L-Ctrl | L-Ctrl | [Arrow] right

11

Switch sound to the left

(press second time to lock, press 

third time to unlock)

R-Ctrl | R-Ctrl | [Arrow] left

12

Switch sound to the right

(press second time to lock, press 

third time to unlock)

R-Ctrl | R-Ctrl | [Arrow] right

13

Switch DPP to the left

(press second time to lock, press 

third time to unlock)

R-Ctrl | R-Ctrl | [Arrow] up

#

Action Description

Keyboard

14

Switch DPP to the right

(press second time to lock, press 

third time to unlock)

R-Ctrl | R-Ctrl | [Arrow] down

15

Lock both directions

(in and out) on all channels 

(require to hold CTRL while 

switching)

L-Ctrl | L-Ctrl | F11 | L

16

Unlock both directions (in and 

out) on specified channels (e.g. 

LCtrl LCtrl A 3 1 2 4 

unlock three 

channels: 1, 2 and 4)

L-Ctrl | L-Ctrl | F11 | A | N | N1 .. NN

17

Unlock one direction (in) on 

specified channels (e.g. LCtrl LCtrl 

I 3 1 2 4 

unlock three channels: 

1, 2 and 4)

L-Ctrl | L-Ctrl | F11 | I | N | N1 .. NN

18

Unlock one direction (out) on 

specified channels (e.g. LCtrl LCtrl 

O 3 1 2 4 

unlock three channels: 

1, 2 and 4)

L-Ctrl | L-Ctrl | F11 | O | N | N1 .. NN

19

Enter the switch to loading state

L-Ctrl | R-Ctrl | L

20

Switch to custom preset

[external loading]

L-Ctrl | L-Ctrl | F11 | F12

21

Temporarily switch to relative 

mouse mode

L Ctrl + Shift [press and hold]

22

Enable / disable shortcut 

forwarding

L Ctrl | R Ctrl | End

23

Send string #OSDon to RS232

R Shift | R Shift 

24

Send string #BEG 0 .. 9 END# to 

RS232

L Alt | L Alt | 0 .. 9 | Enter

Содержание Mini-Matrix SX42DU-3

Страница 1: ...e of Contents SECTIONS 1 2 3 HDC12275 Rev 1 4 Models SX42xU 3 Secure 4P to 2P DVI I HDMI DP Video KVM Mini Matrix w fUSB PP 3 0 SX82xU 3 Secure 8P DP to 2P DP DVI I Video KVM Mini Matrix w fUSB SECURE MINI MATRIX SWITCHES QUICK SETUP GUIDE ...

Страница 2: ...L Secure Mini Matrix 3 Package Contents 4 Before Installation 5 Tamper Evident Labels 6 Active Anti Tampering System 7 Installation 8 Installing the Mini Matrix 8 Initial Setup 12 Operation 11 Operating the Mini Matrix 11 4 Port Presets 14 8 Port Presets 22 Advanced Presets 27 Keyboard Shortcut Options 29 ...

Страница 3: ... where users are required to view and interact with several computers while maintaining the highest isolation between computers and peripherals Prevents the need for purchasing and installing dedicated per computer peripheral sets This guide refers to the following models SX42DU 3 Secure 4P to 2P DVI I Video KVM Mini Matrix w fUSB PP 3 0 SX42HU 3 Secure 4P to 2P HDMI Video KVM Mini Matrix w fUSB P...

Страница 4: ...ION Package Contents Inside the product packaging is the following 4 Model Description Qty SX42xU 3 Secure 4P to 2P DVI I HDMI DP Video KVM Mini Matrix w fUSB PP 3 0 1 Power cable 1 SX82xU 3 Secure 8P to 2P DP to DP Video KVM Mini Matrix w fUSB 1 Rack mount kit 1 Power cable 1 ...

Страница 5: ... packaging seal looks suspicious contact the HSL support team and do not use the product After seal removal inspect the packaging content to verify that the required components are included See the packaging content list on page 4 above After the Mini Matrix KVM Switch is removed from its packaging materials carefully inspect the tampering evident label to assure that product is properly sealed If...

Страница 6: ... case of enclosure intrusion attempts These labels indicate white dots or the text VOID once removed When opening the product s packaging inspect the tampering evident label If for any reason one or more tamper evident labels are missing appear disrupted or look different than the example shown here please call HSL Technical Support and avoid using that product 6 HSL Holographic Tamper Evident Lab...

Страница 7: ...Mini Matrix KVM Switch is equipped with an always on active antitampering system If mechanical intrusion is detected by this system the switch is permanently disabled and the LED blinks continuously If the product indicates a tampered state all LEDs blinking call HSL Technical Support and avoid using the product 7 ...

Страница 8: ...uthentication across multiple isolated sources 2 Connect the computer source channel ports For each source connect the video keyboard mouse fUSB and audio cables to the Mini Matrix source ports 3 To receive dual screen support Download and install HSL s multi display driver on source computers that have multiple screens currently available only for Windows http highseclabs com dl php fid 446 Note ...

Страница 9: ...wer supply and power ON the Mini Matrix approximate boot time is 10 seconds The Mini Matrix boots in to duplicate mode where the source number 1 is presented on both displays 9 Note In case no picture is presented after powering ON switch between the primary and secondary displays or connect an alternate display or perform a reset to factory default ...

Страница 10: ... Type the L Ctrl L Ctrl F11 r key combination Complete reset Clears all device settings and resets to factory defaults From the Terminal menu select the Reset to Factory Defaults option refer to terminal mode guide 10 Important Notes 1 Always use the left control key Ctrl unless otherwise specified 2 Keyboard shortcut keys are to be pressed sequentially 3 Do not use the numeric keypad for toggling...

Страница 11: ... on the secondary panel the selected sources are presented accordingly A source can be duplicated by selecting its number on both panels By default mouse keyboard audio and fUSB peripherals follow the display association Independently switch the video usb audio keyboard and mouse ports between computers Use the front panel push buttons to independently switch the video usb audio keyboard and mouse...

Страница 12: ...With cursor navigation the user can move from one highly isolated computer system to another by simply moving the mouse cursor across display borders Once the cursor crosses the display border the keyboard mouse audio and USB mapping switches to the computer that is connected to that display No need to push any buttons 12 How to define the mouse state Use the key combination L Ctrl L Ctrl F11 c to...

Страница 13: ...ed on the physical display positioning and the respective number of displays associated with each source Presets enable cursor navigation switching that enables switching control between PCs by moving the mouse cursor across display boarders How to switch between presets Use the key combination L Ctrl L Ctrl F11 F1 to F10 to toggle between presets 13 To enable absolute mouse prior to working with ...

Страница 14: ... computer port Connect peripherals to the console ports Connect two displays keyboard mouse and speaker headphone to the console ports To use Choose which computer to display on each screen using the source selection panels The left panel controls which computer to display on the primary display The right panel controls the secondary display Seamlessly switch between computers by moving the mouse ...

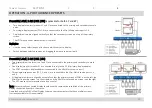
Страница 15: ...Two displays monitors monitors 1 and 2 are connected to the primary and secondary console ports One display monitor monitor 3 is connected directly to the PC 1 primary display adapter The PC 1 secondary display adapter is connected to the Mini Matrix source port 1 Three single display sources PC 2 3 and 4 are connected to the Mini Matrix source ports 2 3 and 4 All displays monitors are aligned hor...

Страница 16: ...ame native resolution of the primary display connected directly to the matrix Preset 5 L Ctrl L Ctrl F11 F5 Combines preset 3 with preset 4 as follows Two displays monitors monitor 1 and 2 are connected to the primary and secondary console ports Two displays monitors monitor 3 and 4 are connected directly as primary displays to PCs 1 and 4 respectively PCs 1 and 4 secondary display adapters are co...

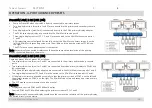
Страница 17: ...s monitors are aligned vertically so that the secondary screen is on top of the primary screen The VDT mouse cursor movement axis is vertical Highlights Use the source selection panel to choose which sources to display View and control any monitor combination such as PC 1 primary and secondary screens PC 2 primary and secondary screens PC 1 and 2 primary screens PC 1 and 2 secondary screens PC 1 p...

Страница 18: ...itors are aligned horizontally so that the secondary screen is on the right of the primary screen The VDT mouse cursor movement axis is horizontal Highlights Use the source selection panel to choose which sources to display View and control any monitor combination such as PC 1 primary and secondary screens PC 2 primary and secondary screens PC 1 and 2 primary screens PC 1 and 2 secondary screens P...

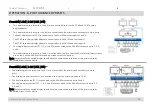
Страница 19: ...1 4 Displays monitors are aligned horizontally so that the secondary screen is on the right of the primary screen The VDT mouse cursor movement axis is horizontal Highlights Use the source selection panel to choose which sources to display View and control any monitor combination such as PC 1 and 2 primary screens PC 1 and 2 secondary screens PC 1 primary and PC 2 secondary PC 2 primary and PC 1 s...

Страница 20: ... 4 The displays monitors are aligned horizontally so that the secondary screen is on the right of the primary screen The VDT mouse cursor movement axis is horizontal Highlights Use the source selection panel to choose which sources to display View and control any monitor combination such as PC 2 and 3 primary screens PC 2 and 3 secondary screens PC 2 primary and PC 3 secondary PC 3 primary and PC ...

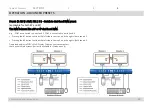
Страница 21: ...play sources PC 2 3 and 4 are connected to the Mini Matrix source ports 2 3 and 4 All displays monitors are aligned horizontally so that the primary screen of PC 1 is on the left and the Mini Matrix primary screen is on the right The right side of the Mini Matrix is cancelled The VDT mouse cursor movement axis is horizontal Note Any externally connected display should have the same native resoluti...

Страница 22: ...mputer port Connect peripherals to the console ports Connect two displays keyboard mouse and speaker headphone to the console ports To use Choose which computer to display on each screen using the source selection panels The left panel controls which computer to display on the primary display while the right panel controls the secondary display Seamlessly switch between computers by moving the mou...

Страница 23: ...ce selection panel to choose which sources to display Switch between selected sources by dragging the mouse cursor vertically Preset 3 L Ctrl L Ctrl F11 F3 Two displays monitors monitors 1 and 2 are connected to the primary and secondary console ports The dual display source PC 1 is connected to the Mini Matrix source ports 1 and 2 Single display sources PC 2 7 are connected to the Mini Matrix sou...

Страница 24: ... source ports 3 4 5 and 6 Two display monitors monitors 1 and 2 are aligned vertically so that the Mini Matrix primary screens are on top and the Mini Matrix secondary screens are at the bottom Note Any externally connected display should have the same native resolution of the primary display connected directly to the matrix Preset 5 L Ctrl L Ctrl F11 F5 Two displays monitors monitors 1 and 2 are ...

Страница 25: ...gle display sources PCs 2 8 are connected to the Mini Matrix source ports 2 8 All display monitors are aligned horizontally so that the primary screen of PC 1 is on the left and the Mini Matrix primary screen is on the right The right side of the Mini Matrix is disabled The VDT mouse cursor movement axis is horizontal Note Any externally connected display should have the same native resolution of ...

Страница 26: ...ter is connected to the Mini Matrix source port 1 Eight single display sources PCs 2 8 are connected to the Mini Matrix source ports 2 8 All displays monitors are aligned horizontally so that the primary screen of PC 1 is on the left and the Mini Matrix primary screen is on the right The VDT mouse cursor movement axis is horizontal Note Any externally connected display should have the same native ...

Страница 27: ...plicable for both 4P and 8P One display monitor is connected to the primary console ports Eight single display sources PCs 1 8 are connected to the Mini Matrix source ports 1 8 The right side of the Mini Matrix is disabled Download and install HSL s Multi Display Driver on source computers that have multiple screens currently available for Windows only ...

Страница 28: ...e a 2P or 4P dual head KVM e g PC 1 is connected to ports1and 2 PC 2 is connected to ports 3 and 4 Pressing the 1 button switches the left side to source 1 and the right side to source 2 Pressing the 3 button switches the left side to source 3 and the right side to source 4 Download and install HSL s Multi Display Driver on source computers that have multiple screens currently available for Window...

Страница 29: ...ight 13 Switch DPP to the left press second time to lock press third time to unlock R Ctrl R Ctrl Arrow up Action Description Keyboard 14 Switch DPP to the right press second time to lock press third time to unlock R Ctrl R Ctrl Arrow down 15 Lock both directions in and out on all channels require to hold CTRL while switching L Ctrl L Ctrl F11 L 16 Unlock both directions in and out on specified ch...

Страница 30: ...eir respective owners Images for demonstration purposes only This document may contain confidential and or proprietary information of HSL Corporation and its receipt or possession does not convey any right to reproduce disclose its contents or to manufacture or sell anything that it may describe Reproduction disclosure or use without specific authorization from HSL Corporation is strictly prohibit...

Отзывы: