background image

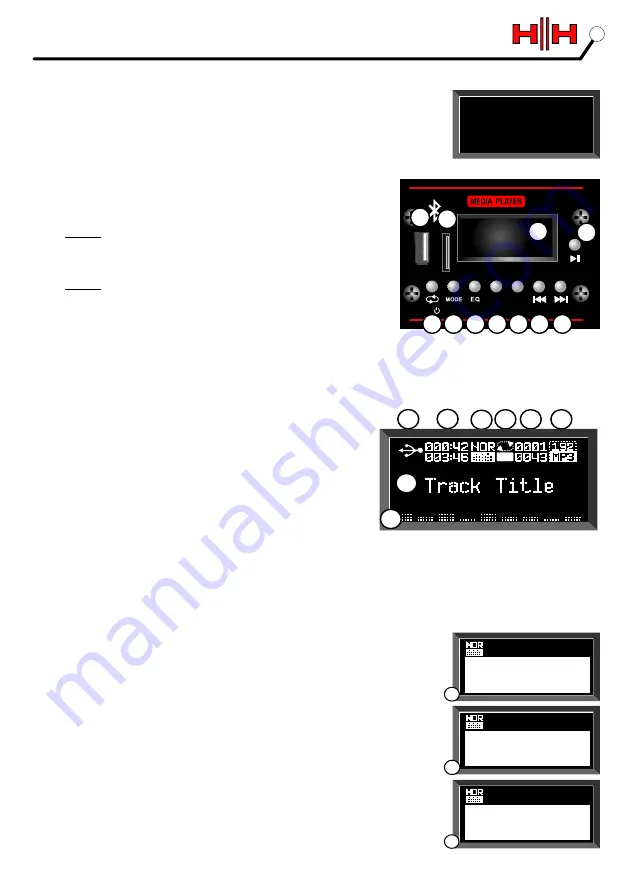
MEDIA PLAYER CONTROLS

11

Use the onboard player for playing back MP3/ WMA encoded audio tracks from Micro SD 

card/USB Stick or Bluetooth device.  The media player is automatically powered up 
when the amplifier is switched on and displays the S2-210 welcome screen 
opposite.

1. SD CARD SLOT:

 Insert your Micro SD card here. 

(Automatically detected on insertion, or if removed & reinserted uses smart 

technology to resume play from the previous point).

2. MEMORY STICK SLOT:

 Connect your USB memory stick here. 

(Automatically detected on insertion, or if removed & reinserted uses 
smart technology to resume play from the previous point).

NOTE.  The Media Player will play the music tracks on a USB 
Stick/Micro SD Card : 

in the order that they were created on the device. i.e from oldest 
to newest

NOTE.  The USB socket is for the playback of recorded tracks 
only, not for charging a USB device.

3. LOOP:

 Gives 5 different options when playing tracks from an SD card or 

a USB Stick :

1

 - Repeat Single Track.

- Intro.

N

 - One Track & then stop.

R

 - Random.

A

 - Play all in order.

4. MODE:  

From the welcome screen, select - Bluetooth

Hold the button in to power the player ON/OFF.
Micro SD card, USB Stick


- auto detected upon insertion - if a 

Micro SD Card & USB stick are inserted at the same time, use 
Mode button to select either. 

5. EQ: 

Cycle through: Normal, Pop, Rock, Jazz, Classical, Soft, DBB.

6. FD-:  

Folder navigate down. (Remembers the last played) not applicable 

in Bluetooth mode

7. FD+:

 Folder navigate up. (Remembers the last played) not applicable in 

Bluetooth mode

8. PREVIOUS

: Press to skip to the preceding track.

9. NEXT: 

Press to skip to the next track.

10. PLAY/PAUSE: 

Use this control to play or pause your music.

11. DISPLAY SCREEN: 

Displays track information.

12. 

Device symbol dependant on what is playing.

13. 

Time into the track/length of the track.

14. 

Normal EQ setting chosen with button (5)

15. 

Shows the option selected via the LOOP button (3), either 

1

, N, R, I or A

16. 

Number of the track playing on the top line, number of tracks on the device on 

the bottom line.

17. 

Bit Rate of the track currently playing - (Information only)

18. 

Track title.

19. 

EQ Bargraph display

CONNECT  TO AN EXTERNAL BLUETOOTH  DEVICE:
a. 

Select Bluetoooth via the MODE button (4), 

screen shows status i.e. no BT device linked yet. 

b.

 On your Bluetooth capable device, make sure Bluetooth is enabled. Scan down the list 

of available devices - search for: 

HH S2-210

 and select. (No password required), 

screen shows status i.e. Connecting... 

c. 

 Your S2-210 is now connected to your Bluetooth device which can be controlled 

using the 

PLAY/PAUSE, PREVIOUS, NEXT & EQ BUTTONS, 

screen 

shows status i.e. Play Music... 

Only one S2-210 can be paired to your Bluetooth capable device at once, so 

remember to de-select if you plan to use a different S2-210 device next time.

USB

MICROSD 

CARD

FD+

FD-

8

7

6

5

4

3

9

10

11

1

2

12

13

14 15 16

HH S2-210

A

17

18

19

Connecting...

BT Not Linked

Play Music...

HH S2-210

HH S2-210

HH S2-210

HH S2-210

a

b

c

Содержание SYSTEM 2 S2-210

Страница 1: ...SYSTEM 2 FULL RANGE ENCLOSURES WITH A DETACHABLE MIXER ...

Страница 2: ......

Страница 3: ...chtige Sicherheitshinweise Deusch 7 Instrucciones Importantes Para Su Seguridad Español 8 Important Safety Instructions Pt 2 9 Foreword 10 Introduction 11 Setting Up 12 Panel Controls 13 Media Player 14 15 Application Diagrams 16 Block Diagram Connector Wiring 17 Specifications 18 Useful Hints and Tips 19 Legal 3 ...

Страница 4: ...ratus has been damaged in any way such as when power supply cord or plug is damaged liquid has been spilled or objects have fallen into the apparatus the apparatus has been exposed to rain or moisture does not operate normally or has been dropped 15 Never break off the ground pin Connect only to a power supply of the type marked on the unit adjacent to the power supply cord 16 If this product is t...

Страница 5: ...Durée par Jour heures 8 6 4 3 2 1 1 ou inférieur INSTRUCTIONS IMPORTANTES DE SECURITE FRANÇAIS Niveau sonore moyen dBA 90 92 95 97 100 102 105 110 115 5 ...

Страница 6: ...Dauer pro Tag in Stunden 8 6 4 3 2 1 1 oder weniger GeräuschpegelldBA langsame Reaktion 90 92 95 97 100 102 105 110 115 WICHTIGE SICHERHEITSHINWEISE DEUTSCH 6 ...

Страница 7: ...Duración por Día en Horas 8 6 4 3 2 1 1 o menos Nivel de Sonido dBA Respuesta Lenta 90 92 95 97 100 102 105 110 115 INSTRUCCIONES IMPORTANTES PARA SU SEGURIDAD ESPAÑOL 7 ...

Страница 8: ...g Before plugging into the power supply ensure you are connecting to a grounded earth outlet If you should wish to change the factory fitted plug yourself ensure that the wiring convention applicable to the country where the amplifier is to be used is strictly conformed to As an example in the United Kingdom the cable colour code for connections are shown opposite EARTH or GROUND GREEN YELLOW NEUT...

Страница 9: ...y using your product as much as we enjoyed creating it By choosing HH you are joining a brand with heritage dating back to 1968 a brand that helped define the techniques and principles for sound reinforcement and backline that still inform us today HH products and users dating from this time are nothing short of legendary a history we are proud of and constantly inspired by Today we look forward r...

Страница 10: ...s Its sleek detachable mixer module offers a wide selection of inputs outputs including a Bluetooth equipped media player The pair of speaker leads and power cord that are supplied are all housed in their own neat clip off module Both enclosures include handles and 35mm pole sockets The HH System S2 210 Clarity Convenience This manual contains important information regarding correct and safe opera...

Страница 11: ...essory Modules Slide the catch to the left as indicated Gently tilt the mixer accessory box then unhook from the cab Power and speaker connections The mains inlet power switch and fuse are located to the right of the mixer Mixer Storage modules ...

Страница 12: ... use a stereo cable for this The level can be adjusted using Level control 12 14 PHANTOM POWER Turns on Phantom Power to all Mic channels should it be needed eg condenser mic s 15 MASTER ECHO Control the overall level of the feed from the onboard FX processor If you want to apply Echo to a mono channel first set the Master control to 5 Slowly increase the Input Echo send control until the desired ...

Страница 13: ...vigate down Remembers the last played not applicable in Bluetooth mode 7 FD Folder navigate up Remembers the last played not applicable in Bluetooth mode 8 PREVIOUS Press to skip to the preceding track 9 NEXT Press to skip to the next track 10 PLAY PAUSE Use this control to play or pause your music 11 DISPLAY SCREEN Displays track information 12 Device symbol dependant on what is playing 13 Time i...

Страница 14: ... PEAK TREBLE LEVEL LEVEL L L R R MEDIA PLAYER 5 4 3 2 1 0 10 9 8 7 6 5 5 4 4 3 3 2 2 1 1 0 AUX IN LEVEL LEVEL MONITOR OUTPUTS CH4 MP3 5 4 3 2 1 0 10 9 8 7 6 5 4 3 2 1 0 10 9 8 7 6 5 4 3 2 1 0 10 9 8 7 6 5 5 4 4 3 3 2 2 1 1 0 5 5 4 4 3 3 2 2 1 1 0 5 5 4 4 3 3 2 2 1 1 0 BASS BASS TREBLE LINE LINE LINE MIC MIC MIC PEAK PEAK PEAK TREBLE TREBLE CH1 5 4 3 2 1 0 10 9 8 7 6 5 4 3 2 1 0 10 9 8 7 6 5 4 3 2 ...

Страница 15: ...6 5 4 3 2 1 0 10 9 8 7 6 5 4 3 2 1 0 10 9 8 7 6 5 4 3 2 1 0 10 9 8 7 6 MASTER ECHO BASS BASS BASS PHANTOM POWER LIMIT POWER TREBLE LINE LINE LINE LINE MIC MIC MIC MIC PEAK PEAK PEAK PEAK TREBLE TREBLE TREBLE LEVEL LEVEL L L R R CH1 MEDIA PLAYER 5 4 3 2 1 0 10 9 8 7 6 5 4 3 2 1 0 10 9 8 7 6 5 4 3 2 1 0 10 9 8 7 6 5 4 3 2 1 0 10 9 8 7 6 5 5 4 4 3 3 2 2 1 1 0 5 5 4 4 3 3 2 2 1 1 0 5 5 4 4 3 3 2 2 1 1...

Страница 16: ...BLOCK DIAGRAM 16 1 2 2 1 GND GND GND 6 35mm Unbalanced Jack 3 5mm Stereo Jack HOT LEFT RIGHT 3 Balanced XLR 1 GROUND 2 HOT 3 COLD CONNECTOR WIRING ...

Страница 17: ...lobal switchable Phantom Power 20Hz 20KHz Balanced 2K2 Ohm 33dBu 15mV Unbalanced 10K Ohm 0dBu 0 75V Nominal Operating voltage Range Mains Fuse Power Consumption Amplifier Power Woofer Multi Input Stereo Tweeter Frequency Range Mic Input Mic Sensitivity Line Input Line Senditivity 4 Mono Inputs Left Right 6 35 Jack Monitor Outputs Master Outputs Dimensions mm Kg Unbalanced Line Input 6 35mm Jack Ac...

Страница 18: ...t breakers Ÿ Start with EQ settings flat and gains low Ÿ Master volumes should be at zero for switch on and off Ÿ Use the minimum cut or boost in EQ If all bands are boosted or cut flatten EQ re adjust gain and start again Ÿ Use input gain to set maximum signal level without distortion useVU meters bar graphs or peak lights Amps should have peak or clip lights illuminating only on signal peaks not...

Страница 19: ...uipment into an outlet on a circuit different from that to which the receiver is connected Consult the dealer or an experienced radio TV technician for help This product conforms to the requirements of the following European Regulations Directives Rules CE Mark 93 68 EEC Low Voltage 2006 95 EC EMC 2004 108 EEC RoHS 2011 65 EU RED 2014 30 EU ErP 2009 125 EU SIMPLIFIED EU DECLARATION OF CONFORMITY H...

Страница 20: ......

Отзывы: