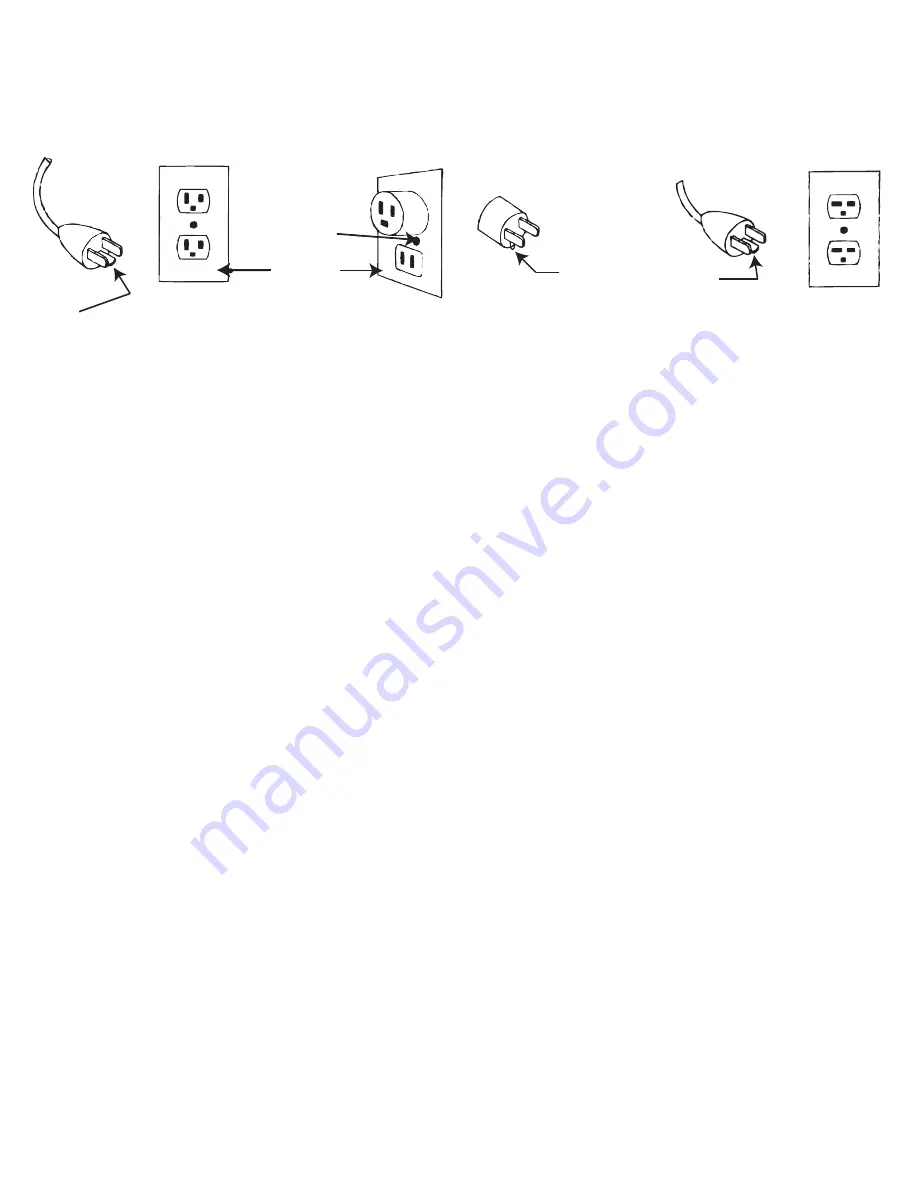
GROUNDING INSTRUCTIONS
This heater is for use on 120 volts. The cord has a plug as shown at A in Figure below. An adapter as shown at C is
available for connecting three-blade grounding-type plugs to two-slot receptacles. The green grounding lug
extending from the adapter must be connected to a permanent ground such as a properly grounded outlet box. The
adapter should not be used if a three-slot grounded receptacle is available.
VENTAMATIC, LTD. LIMITED WARRANTY
This warranty is underwritten by Falco Insurance Company and is extended to the original retail purchaser of this
model or, if this unit is purchased and requires installation by a building contractor, to the original owner of the home.
No subsequent purchaser of the unit or of a home in which it is installed is entitled to any of the benefits of this warranty.
This product is warranted against defects in materials and workmanship for a period of one (1) year from the date of
original retail purchase. No other parts or components are warranted. There is no warranty for defects caused by abuse,
faulty installation or the like.
Repairs or replacement parts supplied under this warranty are warranted only for the period of this warranty; that is,
one (1) year from the date of the original retail purchase of the unit. In the event of a defect or malfunction, we will
replace or repair the defective part or component only and return the new or repaired part to you freight prepaid.
You must bear all other expenses incurred in obtaining repairs, including labor required for field repair or replacement and
the cost of shipping the defective part to us. You must also bear the cost of repair to or replacement of any part or
component and the shipping charges incurred for the repair or replacement and return to you of any part or component
not covered by this warranty, including parts or components damaged by you.
The company reserves the right to demand and receive written evidence of the date of purchase before undertaking its
obligations under this warranty. The right to demand and receive written evidence of date of purchase extends to all
licensed dealers of Ventamatic, Ltd. products.
You should, therefore, retain your sales slip and attach a copy of it to the warranty claim.
To start a warranty claim you must:
Contact Ventamatic, Ltd.
An RGA (Returned Goods Authorization) form is required for returns to the factory to ensure your return can
be processed efficiently and quickly. Please contact Ventamatic, Ltd. toll-free at 800-433-1626 or via web at
www.MYMAXXAIR.com to obtain an RGA and follow the instructions given.
There is no informal dispute settling mechanism available in the event of a controversy involving this warranty.
Any and all implied warranties which may exist terminate upon the expiration of this warranty one (1) year from the
date of the original retail purchase. Some states do not allow limitations on how long an implied warranty lasts, so this
limitation may not apply to you.
Ventamatic, Ltd. is not liable to you for incidental or consequential damages arising out of defect or malfunction of a
unit or its installation or out of any alleged breach of this warranty. Some states do not allow the exclusion or limitation of
incidental or consequential damages, so this limitation may not apply to you.
This warranty gives you specific legal rights and you may also have other rights which may vary from state to state.
rev. 04/19
GROUNDING
PIN
(A)
METAL SCREW
COVER OF GROUNDED
OUTLET BOX
(B)
(C)
ADAPTER
(D)
GROUNDING
MEANS
GROUNDING
PIN


