background image

©2018 Hestan Commercial Corporation

8

EN


Disconnect power before servicing the product. 
Failure to do so could result in death or 
electrical shock . 

General information 

The models may be powered at 240V or 
208V. 


This cooktop does not require a neutral connection. If 
the cooktop is to be completely enclosed in a cabinet, 
feed the cooktop cable through the opening in the 
cabinet. Make the electrical connection following the 
appropriate steps for your installation. 
Your cooktop must be connected to the proper 
electrical voltage and frequency as specified in the 
table on the right. 


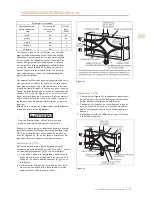
Figure 12.  Location of serial tag 


SERIAL 

TAG


National Fire Protection Association 

Batter/march Park Quincy, Massachusetts 02269


A three-wire, single phase, 240 Volt 60 cycle electrical 
system (properly circuit protected to meet Local 
Codes of NFPA No.70) must be provided. Unit must 
be properly grounded in accordance with local wiring 
code. The chart below recommends the minimum 
circuit protector and wire size if the appliance is the 
only unit on the circuit. If smaller sizes of wire are 
used, the unit efficiency will be reduced and a fire 
hazard may be created. It is advisable that the 
electrical wiring and hookup be accomplished by a 
competent electrician. 


This touch control works using optical light sensing 
technology.  When first connecting electrically or 
after a power failure, any direct strong light over the 
sensor area may affect the touch control functionality. 
When powering on the unit make sure that no strong 
light  is  shining  directly  over  the  touch  control  zone, 
it  can  compromise  the  start-up  sensor  calibration 

resulting in an unresponsive touch control.

The flexible conduit (supplied) 3 feet long (100 cm) 
located at the right rear of the cooktop bottom box 
should be connected directly to junction box. Do not 
cut the conduit. A U.L - or CSA - listed conduit 

connector must be provided at each end of the power 
supply cable (at the cooktop and at the junction box.) 
A time delay fuse or circuit breaker is recommended. 
Do not ground to a gas pipe. Do not have a fuse in the 
grounding or neutral circuit. 
Fuse both supply (phase) lines. 

Improper connection  of aluminum house 

wiring can result in a fire or shock hazard.   

Use only connectors designed and certified 

for connecting to aluminum wire, and 

installed by a qualified electrician.

Model

240 V 60 Hz   208 V 60 Hz

A

6

.

5

2

W

k

3

3

.

5

A

6

.

9

2

W

k

1

.

7

0

3

A

8

.

5

3

W

k

3

4

.

7

A

3

.

1

4

W

k

9

.

9

6

3

KEC 30**

KEC 36**

Power Supply

ELECTRICAL CONNECTIONS

Содержание KEC 30

Страница 1: ...INDOOR COOKING Radiant Cooktop KEC Installation Manual ...

Страница 2: ...store or use gasoline or other flammable vapors and liquids in the vicinity of this or any other appliance Installation and service must be performed by a qualified installer or service agency DO NOT REPAIR REPLACE OR REMOVE ANY PART OF THE APPLIANCE UNLESS SPECIFICALLY RECOMMENDED IN THE MANUAL IMPROPER INSTALLATION SERVICE OR MAINTENANCE CAN CAUSE INJURY OR PROPERTY DAMAGE REFER TO THIS MANUAL F...

Страница 3: ...N ELECTRICAL SHOCK HAZARD Disconnect power before installing or servicing appliance Failure to do so can result in death or electrical shock ELECTRICAL GROUNDING This appliance must be grounded Grounding reduces the risk of electric shock in the event of a short circuit Read the ELECTRICAL CONNECTIONS section of the Installation manual for complete instructions DO NOT ground to a gas pipe DO NOT u...

Страница 4: ... DESCRIPTION CIRCUIT BREAKER REQ D KEC 30 30 Radiant Cooktop 40 Amp KEC 30 30 Radiant Cooktop 50 Amp REGULATORY CODE REQUIREMENTS Installation of this cooking appliance must be made in accordance with local codes In the absence of local codes this unit should be installed in accordance with the National Electrical Code and local codes This appliance must be electrically grounded in accordance with...

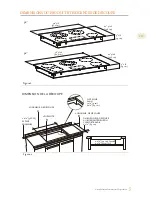
Страница 5: ... 21 3 16 53 8 cm 3 1 8 7 9 cm 30 36 A B SEE NOTE R CUTOUT DIMENSION Figure 2 SLOT FOR CABLE ROUTING 3 1 2 9 cm 2 1 2 6 5 cm LENGTH OF CUT FROM EDGE OF CUTOUT AND FRONT EDGE OF COUNTERTOP 2 1 2 6 5 cm 1 1 4 3 2 cm Canadian 2 1 4 5 7cm US LENGTH OF CUT 1 1 2 3 8CM MIN CLEARANCE CUTOUT DIMENSIONS AND REQUIREMENTS ...

Страница 6: ... file to insure smooth edges and prevent corner cracking Recommend 1 4 or 3 8 diameter drill in each corner 3 Rough edges inside corners which have not been rounded and forced fits can contribute to cracking of the countertop laminate This cooktop has been designed with wide tolerances of cut out for when another brand is being replaced with a Hestan unit For new installations we recommend holding...

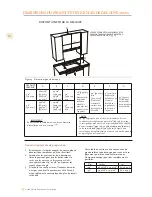
Страница 7: ...nd level and ensure no structural members interfere with space requirements Prepare the cut out according to the instructions see cut out dimensions Make sure the wall coverings countertop and cabinets around the cooktop can withstand heat up to 200 F 93 C Figure 4 Tools you will need Step 1 Remove packaging materials and literature package from the cooktop before beginning installation Remove Ins...

Страница 8: ... cooktop glass Use tape around the entire glass perimeter Cut off excess where tape ends meet Figure 7 Step 4 Insert the cooktop centered into the cutout opening Make sure the front edge of the counter top is parallel to the cooktop Make final check that all required clearences are met Figure 8 Step 5 Four clamp brackets are provided to clamp the cooktop to the countertop Tighten screws just enoug...

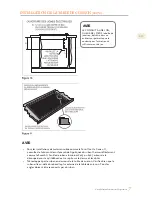
Страница 9: ...NET RIGHT SIDE COOKTOP INSTALLATION CONT For solid surface material installations such as Surel and Corian consult with solid surface manufacturer Apply heat reflective tape such as Scotch Aluminum Foil Tape 425 or 427 around the cutout so that it folds over on the top and sides Do not wrap the tape underneath the cooktop Be sure the tape extends beyond the outermost flange of the cooktop All corn...

Страница 10: ...created It is advisable that the electrical wiring and hookup be accomplished by a competent electrician This touch control works using optical light sensing technology When first connecting electrically or after a power failure any direct strong light over the sensorareamayaffectthetouchcontrolfunctionality When powering on the unit make sure that no strong light is shining directly over the touc...

Страница 11: ...our local codes and ordinances of course take precedence over these instructions Complete electrical connections according to local codes and ordinances Risk of Electric Shock frame grounded to neutral of appliance through a link Grounding through the neutral conductor is prohibited for new branch circuit installations 1996 NEC mobile homes and recreational vehicles or in an area where local codes...

Страница 12: ...the LOCK key for a few seconds See that the LOCK led is on and turns off after a few seconds 2 Touch the main ON OFF key to enable the single zones for selection All the displays show power level 0 If you don t touch anything else the control shuts down again after about 10 seconds 3 Select a zone and set power Touch the ON key 2 for the desired zone the HOT SURFACE 3 indication starts flashing wa...

Страница 13: ...e agent in your zone contact your Hestan dealer local representative or the manufacturer Before you call please have the model number and serial number information ready Hestan Commercial Corporation 3375 E La Palma Avenue Anaheim CA 92806 888 905 7463 PARTS LIST Please visit the Hestan website to access the parts list for your Hestan Indoor product www hestanhome com ...

Страница 14: ... DES PIÈCES DE I APPAREIL À MOINS QUE CELA NE SOIT EXPRESSÉMENT RECOMMANDÉ DANS LE MANUEL TOUTE INSTALLATION RÉPARATION OU MAINTENANCE INADÉQUATE PEUT ENTRAÎNER DES BLESSURES OU DES DOMMAGES MATÉRIELS CONSULTER CE MANUEL POUR OBTENIR DES CONSEILS SUR LA FAÇON DE PROCÉDER TOUS LES TRAVAUX D ENTRETIEN DOIVENT ÊTRE CONFIÉS À UN TECHNICIEN QUALIFIÉ L INOBSERVATION DES INFORMATIONS DONNÉES DANS CE MANU...

Страница 15: ... Débranchez l alimentation avant d installer ou d entretenir l appareil Avant de le mettre sous tension assurez vous que toutes les commandes sont en position OFF Ne pas le faire peut entraîner la mort ou un choc électrique MISE À LA TERRE ÉLECTRIQUE Cet appareil doit être mis à la terre La mise à la terre réduit le risque de choc électrique en cas de court circuit Lisez la section BRANCHEMENTS ÉL...

Страница 16: ...UR PLAQUE SIGNALÉTIQUE SERIAL TAG MODÈLES DES TABLE DE CUISSON MODEL NO DESCRIPTION DISJONCTEUR REQUIS KEC 30 Table De Cuisson Électrique 30 po 40 Ampères KEC 36 Table De Cuisson Électrique 36 po 50 Ampères L installation de cet appareil de cuisson doit être effectuée conformément aux codes locaux En l absence de tels codes installer cet appareil conformément au National Electrical Code et les cod...

Страница 17: ... DU PLAN DE TRAVAIL 2 1 2 6 5 cm LONGUEUR DE DÉCOUPE 1 1 4 3 2 cm Canada 2 1 4 5 7cm US 36 3 16 30 3 8 77 1 cm 91 9 cm 36 21 3 16 53 8 cm 3 1 8 7 9 cm 21 3 16 53 8 cm 30 Figure 1 3 1 8 7 9 cm LONGUEUR DE DÉCOUPE 1 1 2 3 8CM ESPACE MINIMUM VOIR NOTE DIMENSION DE LA DÉCOUPE Figure 2 DIMENSIONS DU PRODUIT ET EXIGENCES DE DÉCOUPE ...

Страница 18: ...cm 34 5 16 19 1 4 49 0 cm 19 5 8 36 19 1 4 49 0 cm 19 5 8 49 8 cm 30 76 2 cm min 18 45 7 cm min Hauteur min du plan de travail au meuble le plus près des deux cotés de l appareil 30 76 2 cm min voir note Du plan de travail à la surface non protégée à la verticale 2 5 cm min Espace min de la découpe à la paroi latérale sur la gauche et la droite de l appareil 13 33 cm Profondeur des meubles non pro...

Страница 19: ...ez vous qu aucun élément de structure n interfère avec les exigences d espace Préparez la découpe selon les instructions voir dimensions découpe Bien vérifier que les éléments suspendus le plan de travail et les meubles autour de la table de cuisson résistent à la chaleur jusqu à 200 F 93 C Figure 4 Les outils dont vous aurez besoin Étape 1 Enlevez les matériaux d emballage et les manuels d explic...

Страница 20: ...ez un ruban tout autour du périmètre du verre Coupez le ruban en trop Figure 7 Étape 4 Insérez la table de cuisson au centre de l ouverture de la découpe Assurez vous que le bord avant du comptoir est parallèle à la surface de cuisson Faire une dernière vérification pour s assurer que toutes les distances de dégagement requises sont respectées Figure 8 Étape 5 Quatre supports de fixation sont four...

Страница 21: ... consultez le fabricant de surface solide Appliquez du ruban thermo réfléchissant comme le Scotch feuille de ruban aluminium 425 ou 427 autour de la découpe de sorte qu il déborde et se replie sur le dessus et les côtés N enveloppez pas le ruban en dessous de la ta ble de cuisson Vérifiez bien que le ruban aille au delà du rebord le plus externe de la table de cuis son Tous les angles doivent être...

Страница 22: ...anchez pas à un tuyau à gaz Ne placez de fusible dans le branchement ou de circuit neutre Raccordez les deux lignes d alimentation phase National Fire Protection Association Batter march Park Quincy Massachusetts 02269 Il faut avoir une prise à trois fils courant monophasé système électrique de 240 volt 60 cycles circuit pro tégé correctement pour être conforme aux codes lo caux de NFPA No 70 L ap...

Страница 23: ...r ces ins tructions Effectuez les connexions électriques conformément aux codes locaux et les règlements Risque d électrocution cadre à la masse à une position neutre d un appareil par une liaison Mettre à la masse par un conducteur neutre est interdit pour les nouvelles installations de circuit électrique 1996 NEC les mobile homes et les véhicules de parc ou dans les régions où les codes locaux i...

Страница 24: ...Voir que le témoin LOCK est allumé et s éteint après quelques secondes 2 Appuyez sur la touche ON OFF principale pour activer les zones individuelles à sélectionner Tous les affichages indiquent le niveau de puissance 0 Si vous ne touchez rien d autre le contrôle se ferme à nouveau après environ 10 secondes 3 Sélectionnez une zone et réglez la puissance Appuyez sur la touche ON 2 pour la zone dési...

Страница 25: ...lifié Pour localiser un réparateur agréé dans la région s adresser au concessionnaire Hestan au représentant local ou à l usine Avant d appeler veiller à avoir les numéros de modèle et de série à portée de la main Hestan Commercial Products 3375 E La Palma Avenue Anaheim CA 92806 888 905 7463 Visiter le site Web Hestan pour consulter la liste des pièces de ce produit www hestanhome com ...

Страница 26: ...Cette page a été intentionnellement laissée vierge ...

Страница 27: ......

Страница 28: ...stan Commercial Corporation P N 020969 REV A RETAIN THIS MANUAL FOR FUTURE REFERENCE CONSERVEZ CE MANUEL POUR UNE RÉFÉRENCE FUTURE Hestan Commercial Corporation 3375 E La Palma Ave Anaheim CA 92806 888 905 7463 ...

Отзывы: