background image

Fase 4

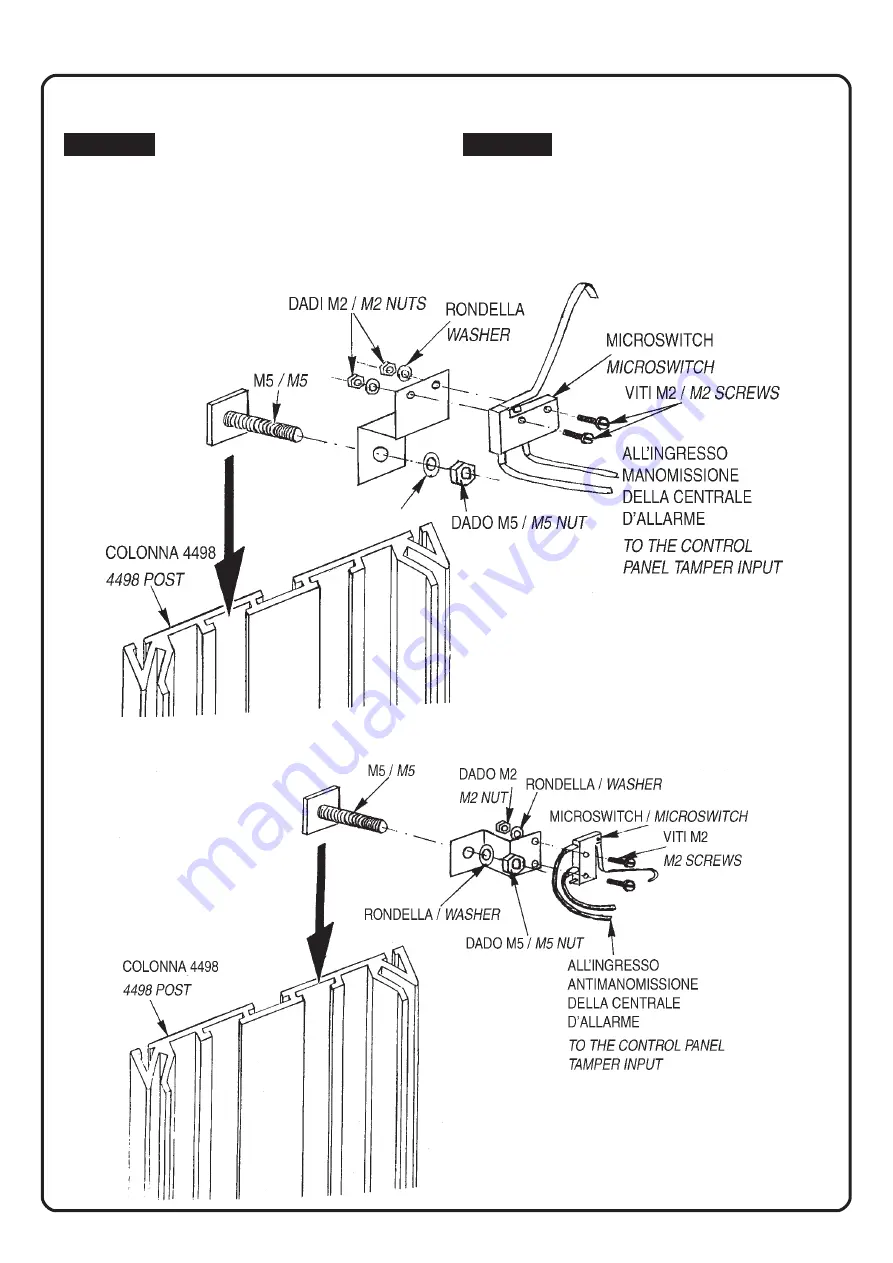
Inserire il Kit 4498A per l’antiapertura (vedi
Fig. 5) e per l’eventuale antimanomissione
dello schermo nero di perspex secondo
quanto illustrato in Fig. 6.

Step 4

Insert the 4498A Kit for anti-opening circuit
(see Fig. 5) or/and for black screen remo-
val (see Fig. 6).

6

Fig. 5

Fig. 6

Содержание 4498

Страница 1: ...lle apparecchiature contenute Il coperchio in alluminio è provvisto di fessure di aerazione per evitare condensa di vapore acqueo ed è studiato per compensare la dila tazione dello schermo nero in presenza di temperature elevate Description The 4498 Post for outdoor active infrared barriers is suitable for installing various transmitting and receiving optical units Its semi cylindrical shape allow...

Страница 2: ...a non è più alta di m 1 5 o per installa zioni in zone esenti da venti Installation Procedure Please refer to the following step by step procedure to perform the installation of the 4498 Post Depending on the specific in stallation site you should select the proper mounting procedure Wall mounting The installation should be performed by using two or more SC 4400 plates mounted on the back of the P...

Страница 3: ...00 2 750 mm 1 070 1 220 mm 760 920 di mm 610 oltre mm 2 750 min mm 1 220 min mm 920 min mm 920 If A is B must be C must be D must be 1 150 1 900 mm 920 1 070 mm 610 760 mm of 450 mm 1 900 2 750 mm 1 070 1 220 mm 760 920 mm of 610 mm over 2 750 mm 1 220 mm min 920 mm min min 920 mm Fig 2 Esempio di fissaggio Mounting example ...

Страница 4: ... cm 5 dal terreno Fase 2 Inserire nella colonna il Kit 4498T di co mando termostatico delle resistenze di riscaldamento Fig 3 Step 1 Mount the Post onto the selected support wall I beam BC 4498 Base in such a way that the bottom cover with the conduit hole is at least 5 cm above the ground Step 2 Insert the Thermostatic Heating Driver 4498T Kit inside the Post Fig 3 4 Fig 3 ...

Страница 5: ...re il coperchio delle barriere onde evitare fenomeni di rifrazione o di eccessiva attenuazione Step 3 Insert all the requested Transmitter and Receiver units by using the proper faste ning plate see Fig 4 for MK mounting When the WONDEREX infrared beams AX100ALPHA AX200 ALPHA AX 350MKII and AX 650MKII are inserted in the 4498 post it is suggested to remove the devices cover in order to avoid scatt...

Страница 6: ...iapertura vedi Fig 5 e per l eventuale antimanomissione dello schermo nero di perspex secondo quanto illustrato in Fig 6 Step 4 Insert the 4498A Kit for anti opening circuit see Fig 5 or and for black screen remo val see Fig 6 6 Fig 5 Fig 6 ...

Страница 7: ...provvedere ad una costan te pulizia del filtro nero di acrilico per evitare che i depositi di polvere ed altro materiale possano attenuare l emissione infrarossa Step 5 Connect the units by using the outcoming cables from the conduit Align the optical units following the instructions in the Opti cal Units Installation Manuals NOTE If a 4418 Transformer or other devi ces powered by 230 VAC are inse...

Страница 8: ...8 DT00464HE0703R01 ...

Отзывы: