background image

14

2.3.6 ZONE AUDIO

Select ZONE AUDIO to adjust the standard staging and equalizer settings for each zone. As a 

shortcut to access the ZONE AUDIO menu, press and hold the PLAY/PAUSE 

key on the 

front panel for 3 seconds.


1.

  Turn the MFD to outline the desired zone 

    audio EQ to adjust. Zone1 will be the 

    default zone selected.

 2. 

Press the MFD to select the desired 

    zone audio EQ to adjust.

 3.

 Turn the MFD to scroll and outline the 

    available EQ settings for the zone.

ZONE1 Equalizer Settings

 EQ 

- Select EQ to choose one of the available preset EQs for Zone 1.


1.

 Turn the MFD to view the name of the available preset EQ.


2.

 Press the MFD to confirm the preset EQ to set for Zone 1.

  See EQ pg. 7 for more details about the preset & custom EQ’s.

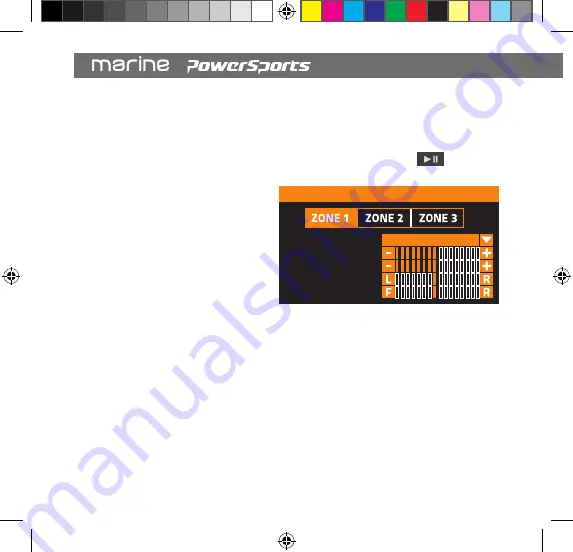
 BASS

 - Select BASS to adjust the level of lower octave frequencies for Zone 1.

  1. 

Turn the MFD to increase/boost or decrease/cut the level of lower octave frequencies. 

      The meter at right will change simultaneously with the MFD, giving a visual representation 

      of the low octave frequency levels. The meter pictured above represents a normal low 

      frequency level; or flat.

  2. 

Press the MFD to confirm the bass level and return to the list of EQ settings.

BLACKLIGHT 

HIGHT

EQ 

CUSTOM

BEEP 

ON

LED COLOR 

BLUE

ZONE LEVEL 

>

11.9V 

GENERAL SETTINGS

SXM2 

CH2

SiriusXM Hits 1

Pop

Kelly Clarkson

Love So Soft

Playlists 

>

Artist 

>

Albums 

>

Genres 

>

Songs 

>


USB SETTINGS

CLASSIC 

>

63  160  400  1k  2.5k  4k  10k  16k

11.9V 

EQ SETTINGS

ZONE 1  ZONE 2  ZONE 3

12.1V 

ZONE SELECT

12.1V 

RADIO

87.50

90.10

87.50

MHz

FM1

98.10

106.10

107.90

87.50

12.1V 

BLUETOOTH

Don’t hold T...

Justin Timbe...

The 20/20 ...

03/12

00:03

12.1V 

USB

Let The Gr...

Justin Timb...

The 20/20 ...

08/12

02:34

12.4V 

AUX

EQ

BASS

TREBLE

BALANCE

FADER

12.1V 

ZONE AUDIO

CUSTOM

marine_Owners manual HMR3.indd   14

04/04/18   15:55

Содержание Marine PowerSports HMR-3

Страница 1: ...S MANUAL Marine Grade Audio Entertainment System HMR 3 SiriusXM and all related marks and logos are trademarks of Sirius XM Radio Inc All rights reserved SOURCE 12 1V R E A D Y Rev 0 1 marine_Owners manual HMR3 indd 1 04 04 18 15 55 ...

Страница 2: ...marine_Owners manual HMR3 indd 2 04 04 18 15 55 ...

Страница 3: ...t 12 2 3 2 EQ 12 2 3 3 Beep 13 2 3 4 Led Color 13 2 3 5 Zone Level 13 2 3 6 Zone Audio 14 2 3 7 Version 17 2 3 8 Factory Reset 17 3 Radio Tuner 3 1 Radio Tuner Interface 18 3 2 Tuning a Station 18 3 2 1 Tuning a Station Manually 18 3 2 2 Tuning a Preset Station 19 3 3 Radio Tuner Settings 19 3 3 1 Presets 19 3 3 2 Save Presets 19 Index marine_Owners manual HMR3 indd 3 04 04 18 15 55 ...

Страница 4: ...g your Device 23 4 3 Playback Control 23 5 iOS Device Playback via USB 5 1 iOS Device Interface 24 5 2 iOS Device Browser 25 6 USB Media Playback 6 1 USB Mode interface 26 6 2 Media Browser 27 6 3 Repeat Tracks 27 6 4 Shuffle Tracks 28 6 5 Standard Playback 28 7 AUX Audio Input 7 1 Aux operation 29 8 APP Remote Function 29 marine_Owners manual HMR3 indd 4 04 04 18 15 55 ...

Страница 5: ...XM Brands Channel Numbeer 32 10 2 2Channel Name 32 10 2 3Channel Category 32 10 2 4Artist Name 32 10 2 5Songs Title 32 10 2 6Content Info 32 10 3 SiriusXM Key Function 33 10 3 1Direct Tuning 34 10 4 SXM Settings 34 10 4 1Category List 34 10 4 2Selecting Preset 35 10 4 3Saving Presets 35 10 4 4Lock Mature Channels 35 10 4 5Manage Lock Code 36 10 4 6SXM Factory Default 37 10 5 Siriusxm Satellite Rad...

Страница 6: ...aulic lines vacuum lines or electrical wiring when working on any vehicle 7 Never run wires underneath the vehicle Running the wires inside the vehicle provides the best protection 8 Avoid running wires over or through sharp edges Use rubber or plastic grommets to protect any wires routed through metal especially firewalls 9 ALWAYS protect the battery and electrical system from damage with proper ...

Страница 7: ...the tuner 3 Attach two provided U bracket studs to their respective locations on the back of the HMR 3 chassis Hand tighten the studs with an adjustable wrench or pliers 4 Route the power ground audio signal SiriusXM Radio Tuner cables etc thru the hole 5 Insert the chassis of HMR 3 and wiring through the hole 6 From the backside of the mounting surface slide the U bracket over the two studs on th...

Страница 8: ...Speaker 3 Red ACC 12V 4 White LF Speaker 5 White Black LF Speaker 6 7 Gray RF Speaker 8 Gray Black RF Speaker 9 Blue Power AMP Remote 10 Violet RR Speaker 11 Violet Black RR Speaker 12 Black Ground 12 11 10 9 8 7 6 5 4 3 2 1 A A A A FUSE marine_Owners manual HMR3 indd 8 04 04 18 15 55 ...

Страница 9: ...Sold Separately Rch Red Rch Red Rch Red Rch Red Lch White Sub Green Lch White Lch White Lch White Wired Remote Control Sold Separately BLACK BLACK BLACK BLACK GREEN Zone 1 Front RCA Out BROWN Zone 2 RCA Out GRAY Zone 3 RCA Out BLACK Aux IN RCA GREEN marine_Owners manual HMR3 indd 9 04 04 18 15 55 ...

Страница 10: ... hold to change the LCD brightness Press PLAY PAUSE to start pause or resume playback Press hold to access the Zoone Audio Settings menu Press TRACK or to advance or go back a track or ch Press hold for rapid change Press MENU to access the current mode settings menus or return to the previous screen Press hold to access the GENERAL SETTINGS menu Turn the Multi Function Dial MFD to increase and de...

Страница 11: ...esired setting then press the MFD to view the available options for the setting 2 2MAIN MENU Press the SRC key at any time to access the source main menu Press hold the MENU key to access the GENERAL SETTINGS menu BLACKLIGHT HIGHT EQ CUSTOM BEEP ON LED COLOR BLUE ZONE LEVEL 11 9V GENERAL SETTINGS 11 9V EQ SETTINGS 12 1V RADIO 1 2 87 50 MHz FM1 3 4 5 6 12 1V BLUETOOTH Don t hold T 2 2 1 LOW VOLTAGE...

Страница 12: ...eset audio EQ 1 Turn the MFD to scroll the EQ presets 2 Press the MFD to confirm a preset EQ Select adjust the custom EQ 1 Turn the MFD to scroll the EQ presets to find CUSTOM 2 Press the MFD to select the first frequency band 3 Turn the MFD to increase boost or decrease cut the level of the frequency band 4 Press the MFD to confirm the frequency band boost or cut proceeding to the next 5 Repeat s...

Страница 13: ...til reaching the desired color 2 3 5 ZONE LEVEL Select ZONE LEVEL to adjust the audio levels for the three independent zones Zone1 Zone2 Zone3 Refer to wiring diagram pg 5 for each zone s wiring connections 1 Press the MFD to toggle between the three zones until the desired zone to adjust becomes white 2 Turn the MFD to increase or decrease the selected zone level in relation to the other zones 3 ...

Страница 14: ...rn the MFD to view the name of the available preset EQ 2 Press the MFD to confirm the preset EQ to set for Zone 1 See EQ pg 7 for more details about the preset custom EQ s BASS Select BASS to adjust the level of lower octave frequencies for Zone 1 1 Turn the MFD to increase boost or decrease cut the level of lower octave frequencies The meter at right will change simultaneously with the MFD giving...

Страница 15: ...o adjust the audio levels of the front rear channels of Zone 1 1 Turn the MFD to the left counter clockwise to increase the front channel FL ch 1 FR ch 2 levels or to the right clockwise to increase the rear channel RL ch 3 RR ch 4 levels The meter at right will change simultaneously with the MFD giving a visual representation of the front rear channel levels 2 Press the MFD to confirm the fader l...

Страница 16: ...EQ settings TREBLE Select TREBLE to adjust the level of higher octave frequencies for Zone 1 1 Turn the MFD to increase boost or decrease cut the level of higher octave frequencies The meter at right will change simultaneously with the MFD giving a visual representation of the higher octave frequency levels The meter pictured above represents normal high frequency level or flat 2 Press the MFD to ...

Страница 17: ...ERSION Select VERSION by pressing the MFD to view software version information 2 3 8 FACTORY RESET Select FACTORY RESET to reset all settings presets etc to the original default settings 1 Turn the MFD to highlight YES to reset all settings or NO to cancel settings reset 2 Press the MFD to confirm YES to reset all settings or NO and return to GENERAL SETTINGS marine_Owners manual HMR3 indd 17 04 0...

Страница 18: ...ll appear adjacent to a corresponding preset number For more information about saving recalling presets see RADIO TUNER SETTINGS below 3 CURRENT STATION The frequency of the currently tuned radio station will appear below the frequency band preset group 3 2 1 TUNE A STATION MANUALLY 1 Pressing the MFD repeatedly to toggle between frequency bands FM1 FM2 FM3 AM1 AM2 or WB to select the frequency ba...

Страница 19: ...3 3 1 PRESETS Select PRESETS to choose a preset station of the current preset group 1 Turn the MFD to scroll the current preset group s presets 2 Highlight the desired preset station 3 Press the MFD to tune the preset station 3 3 2 SAVE PRESETS Select SAVE RPESETS to save the currently tunes radio station as a preset in the currently selected preset group 1 Turn the MFD to scroll the current prese...

Страница 20: ...g is the default Distance Tuning enables tuning of any available stations even more distant stations with weak or poor broadcast reception 1 Turn the MFD to highlight ON or OFF 2 Press the MFD to confirm turn Localized Tuning only on or off 3 3 5 FM BAND Select FM BAND to change between preset groups while managing preset within a group 1 Turn the MFD to scroll the list of preset groups 2 Highligh...

Страница 21: ...dio tuner may receive only one channel of the original stereo signal or a mixed mono signal In mono mode the tuner tunes only the stronger channel of the stereo signal 1 Turn the MFD to highlight ON or OFF 2 Select ON to activate stereo reception mode select OFF to deactivate stereo reception mode activate Mono Reception Mode marine_Owners manual HMR3 indd 21 04 04 18 15 55 ...

Страница 22: ...ber is shown as reference to the total number of all tracks in the folder album or playlist 3 ELAPSED TIME The track time will appear below the track number 4 PLAYBACK STATUSES The status of playback will appear adjacent to the track time The status icon will indicate playing status or paused status LIGHT HIGHT CUSTOM ON LOR BLUE EVEL GENERAL SETTINGS S S P Playlists USB SETTINGS CLASSIC 60 400 1k...

Страница 23: ...avorite music player or streaming internet radio app and enjoy Note To keep 0 current draw conditions mobile devices will not automatically re pair after initial pairing Follow the above steps to pair a mobile device after each power cycle 4 3PLAYBACK CONTROL While enjoying audio playback from your favorite music player or streaming internet app select track playback control functions may be avail...

Страница 24: ...UMBER The track number of the currently playing track will appear below the track metadata The track number is shown as reference to the total number of all tracks in the folder album or playlist 3 ELAPSED TIME The track time will appear below the track number 4 PLAYBACK STATUSES 5 REPEAT SHUFFLE The status of playback will appear adjacent to the track time The status icon will indicate playing st...

Страница 25: ...ENRES COMPOSERS ARTISTS SONGS AUDIOBOOKS ALBUMS 2 Press the MFD to view the audio tracks associated with the category 3 Turn the MFD scrolling to highlight the desired track 4 Press the MFD to confirm and begin playback of the desired track Playlists Artist Albums Genres Songs USB SETTINGS 12 1V USB Let The Gr Justin Timb The 20 20 08 12 02 34 marine_Owners manual HMR3 indd 25 04 04 18 15 55 ...

Страница 26: ... and album name 2 TRACK NUMBER The track number of the currently playing track will appear below the track metadata The track number is shown as reference to the total number of all tracks in the folder album or playlist 3 ELAPSED TIME The track time will appear below the track number 4 PLAYBACK STATUSES 5 REPEAT SHUFFLE The status of playback will appear adjacent to the track time The status icon...

Страница 27: ...MFD to select 1 Turn the MFD to highlight REPEAT then press the MFD to select 4 To deactivate or change the active repeat function press the MENU key to view USB SETTINGS 5 Repeat steps 1 3 to select a different repeat function or deactivate the repeat function 3 Highlight the desired repeat function then press the MFD to confirm 2 Turn the MFD to scroll the USB root file library including folders...

Страница 28: ...ed press and hold the TRACK or TRACK again to select x4 x8 or x16 Press the PLAY PAUSE key to resume normal playback X2 x4 x8 or x16 will show on the interface to indicate the current fast forward or rewind speed 6 4SHUFFLE TRACKS Shuffle will playback tracks within the current tracks folder or root file list at random To activate the SHUFFLE function press the MENU key to view USB SETTINGS 1 Turn...

Страница 29: ... selection PLAY PAUSE and track skip FWD REV Another way to control the unit instead of using the front panel or remote control you can use your phone You will need to install the HERTZ app onto your mobile device The app will need to be downloaded from Google Play Android phone or App Store iPhone Do a search for HERTZ app and proceed to download Install per the app instructions Open the BT funct...

Страница 30: ...Bluetooth module Ensure the music device is located near the Bluetooth module To prevent interruption to audio streaming over Bluetooth it is recommended that the discoverable feature is turned off after paring your device to the unit USB device is not recognized Note Audio playback from Android devices is not supported The USB device is damaged Disconnect USB device and reconnect If the device is...

Страница 31: ...nd the Radio ID of your tuner In addition the Radio ID is located on the bottom of the SiriusXM Connect Vehicle Tuner and its packaging You will need this number to activate your subscription Write the number down for reference Note the SiriusXM Radio ID does not include the letters I O S or F In the USA you can activate online or by calling SiriusXM Listener care Visit www siriusxm com activateno...

Страница 32: ...jacent to the SiriusXM band 10 2 2 CHANNEL NAME The currently playing channel name will appear below the SiriusXM band channel number 10 2 3 CHANNEL CATEGORY The category associated with the current channel will appear below the channel number 10 2 4 ARTIST NAME The name of the artist of the currently playing song will appear below the category name 10 2 5 SONG TITLE The currently playing song tit...

Страница 33: ...to change the LCD brightness Press PLAY PAUSE to start pause or resume playback Press hold to access the audio EQ menu Press TRACK or to advance or go back a track or ch Press hold for rapid change Press MENU to access the SXM SETTINGS menus or return to the previous screen See SXM SETTINGS pg 20 Press hold to access the GENERAL SETTINGS menu See GENERAL SETTINGS pg 7 Turn the MFD to increase and ...

Страница 34: ...ENU button to view the list of settings options Turn the MFD scrolling to highlight the desired setting then press the MFD to view the available options for the setting 10 4 1CATEGORY LIST Select CATEGORY LIST to choose a content category and view the channels that broadcast content related to the category To browse content categories 1 Press the MENU key to access SXM Settings 2 Turn the MFD scro...

Страница 35: ...VE PRESETS 3 Press the MFD to access the preset list 4 Turn the MFD to scroll the preset list and highlight the desired preset location 1 6 5 Press the MFD to confirm and save the channel in the desired preset location Saving a new channel in a preset location will replace a previously saved channel 10 4 4 LOCK MATURE CHANNELS The parental Control Lockout limits access to SiriusXM Satellite Radio ...

Страница 36: ...arental Control Mature Channels 10 4 5 MANAGE LOCK CODE Select MANAGE LOCK CODE to change the default or current Parental Control Lock code 1 Press the MENU key to access SXM SETTINGS 2 Turn the MFD scrolling to and highlight MANAGE LOCK CODE 3 Press the MFD to access the ability to change the default or current Parental Control Lock code Entering a new Parental Control Lock code The default Lock ...

Страница 37: ...ault Defaulted settings include Presets Parental Lockout Code Locked Channels etc 1 Press the MENU key to access SXM SETTINGS 2 Turn the MFD scrolling to and highlight SXM FACTORY DEFAULT 3 Press the MFD to access the ability to reset all SiriusXM settings to factory default Defaulted settings include Presets Parental Control Locked Channels and Parental Control Lock Code ...

Страница 38: ...e SiriusXM Connect Vehicle Tuner is having difficulty receiving the SiriusXM satellite signal Verify that your vehicle is outdoors with a clear view of the sky Verify the SiriusXM magnetic mount antenna is mounted on a metal surface on the outside of the vehicle Move the SiriusXM antenna away from any obstructions Inspect the antenna cable for damage and kinks Consult the SiriusXM Connect Vehicle ...

Страница 39: ...it www siriusxm ca or call 1 877 438 9677 SiriusXM advisory message Channel Unsubscribed The channel that you have requested is not included in your SiriusXM Subscription package or the channel that you were listening to is no longer included in your SiriusXM Subscription package In the U S A visit www siriusxm com or call 1 866 635 2349 If you have questions about your subscription In Canada visi...

Страница 40: ...irements 10 5 16V DC Negative Ground Chassis Dimensions 123 W x 134 D x 116 H Maximum Output Power 4 x 40 W 4 Ohms Z1 only Fuse Rating 15 A Audio Preamp Output Stereo Pair RCA each zone Subwoofer Preamp Output Stereo Pair RCA Preamp Output Voltage 4V 1kHz Frequency Response 20Hz 20KHz TFT Display 3 00 960 240 11 SPECIFICATIONS ...

Отзывы: