background image

9

Operation

Function selection

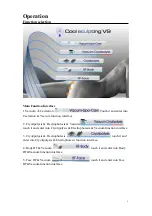
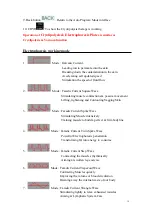
Main Function Interface

1.Vacuum

Cavitation

:Touch it and enter into

Cavitation & Vaccum function interface

2. Cryolipolysis & Electrophoresis & Vacuum

:

touch it and enter into Cryolipolysis & Electrophoresis & Vacuum function interface.

3. Cryolipolysis & Electrophoresis

: touch it and

enter into Cryolipolysis & Electrophoresis function interface.

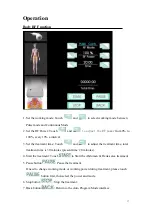
4. Body RF & Vacuum

: touch it and enter into Body

RF&Vacuum function interface.

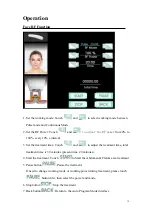
5. Face RF & Vacuum

: touch it and enter into Face

RF&Vacuum function interface.

Содержание Cool Sculpting V9

Страница 1: ...nary solution for Body and Face Care Cool Sculpting V9 User Guide Thanks for choosing our product Please read through the manual before using If any changes our company reserves the right of final Interpretation ...

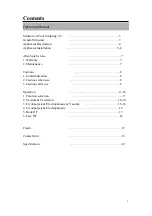
Страница 2: ...ter Sale Service 7 1 Warranty 7 2 Maintenance 7 Cautions 8 1 Contraindication 8 2 Cautions when use 8 3 Cautions after use 8 Operation 9 18 1 Function selection 9 2 Vacuum Cavitaiton 10 14 3 Cryolipolysis Electrophoresis Vacuum 15 16 4 Cryolipolysis Electrophoresis 16 5 Body RF 17 6 Face RF 18 Finish 19 Contact Info 19 Specification 19 ...

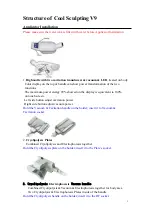
Страница 3: ...3 Structure of Cool Sculpting V9 General Structure ...

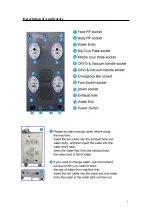
Страница 4: ...4 Description of Applicators ...

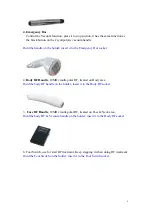
Страница 5: ...touch screen Left side button adjust cavitation power Right side button adjust vacuum power Hold the Vacuum Cavitation handle on the holder insert it to Vacuum Cavitation socket 2 Cryolipolysis Plates Combined Cryolipolysis and Electrophoresis together Hold the Cryolipolysis plate on the holder insert it to the Plate s socket 3 Cryolipolysis Electrophoresis Vacuum handle Combined Cryolipolysis Vac...

Страница 6: ... Body RF Handle 10MHz multi polar RF treated on Body area Hold the body RF handle on the holder insert it to the Body RF socket 5 Face RF Handle 10MHz multi polar RF treated on Face Neck area Hold the body RF Vacuum handle on the holder insert it to the Body RF socket 6 Foot Switch use for start RF treatment Keep stepping it when doing RF treatment Hold the Foot Switch on the holder insert it to t...
Страница 7: ...ear any responsibility for any damage caused by misapplication of the user or repair of disapproval Out of Warranty z A product that has no SERIES Number z Applicators dropping or any shock z Applicator acrylic rack Maintenance Advantage z Easy to check and confirm the problem z Simple to find out the solution z Quick to replace Function Module Maintenance Policy z Must provide the photo even the ...

Страница 8: ... fat tissue z In case of resting during treatment please PAUSE and then STOP to avoid over output of the machine z After one client treatment or 2 hours usage please allow about 20 minutes resting of system it can prolong the lifetime of cavitation applicator Radio Frequency Function z Apply sufficient amount of gel z Keep the applicator in full contact with treatment area then step the foot switc...

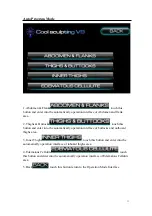
Страница 9: ...ectrophoresis Vacuum touch it and enter into Cryolipolysis Electrophoresis Vacuum function interface 3 Cryolipolysis Electrophoresis touch it and enter into Cryolipolysis Electrophoresis function interface 4 Body RF Vacuum touch it and enter into Body RF Vacuum function interface 5 Face RF Vacuum touch it and enter into Face RF Vacuum function interface ...

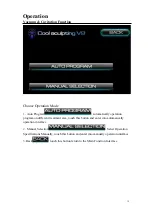
Страница 10: ...eration program on different treatment area touch this button and enter into automatically operation interface 2 Manual Selection Select Operation Specifications Manually touch this button and enter into manually operation interface 3 Back touch this button return to the Main Function Interface ...

Страница 11: ...nter into the automatically operation interface of buttocks and outboard thighs area 3 Inner Thighs touch this button and enter into the automatically operation interface of inboard thighs area 4 Edematous Cellulite touch this button and enter into the automatically operation interface of Edematous Cellulite area 5 Back touch this button return to the Operation Mode Interface ...

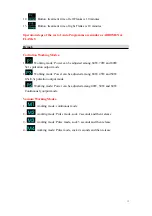
Страница 12: ...ough Default mode is 4 Start the treatment Touch to Start the Abdomen Flanks area treatment 5 Pause button Pause the treatment If need to change working mode or working power during treatment please touch button first then select the power and mode 6 Stop button Stop the treatment 7 Back button Return to the Auto Program Mode interface 8 Button the total treatment time is 40 mins 10 Button treatme...

Страница 13: ...ted among 60W 70W and 80W 5s 1s pulsation output mode 2 Working mode Power can be adjusted among 80W 45W and 50W 0 5s 0 5s pulsation output mode 3 Working mode Power can be adjusted among 40W 50W and 60W Continuously output mode Vacuum Working Modes 1 working mode continuous mode 2 working mode Pulse mode suck 2 seconds and then release 3 working mode Pulse mode suck 3 seconds and then release 4 w...

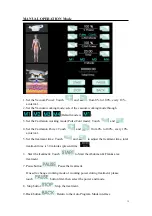
Страница 14: ...ch and from 0 to 100 every 10 a interval 5 Set the treatment time Touch and to adjust the treatment time total treatment time is 30 minutes present time 6 Start the treatment Touch to Start the Abdomen Flanks area treatment 7 Pause button Pause the treatment If need to change working mode or working power during treatment please touch button first then select the power and mode 8 Stop button Stop ...

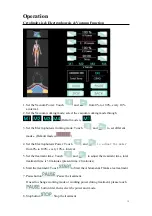
Страница 15: ...lt mode is 4 Set the Electrophoresis Power Touch and to adjust the power from 0 to 100 every 10 a interval 5 Set the treatment time Touch and to adjust the treatment time total treatment time is 30 minutes present time 20 minutes 6 Start the treatment Touch to Start the Abdomen Flanks area treatment 7 Pause button Pause the treatment If need to change working mode or working power during treatment...

Страница 16: ...ctions passive movement Lifting tightening and Contouring Sagging Skin 3 Mode Faradic Current Spike Wave Stimulating Muscle intensively Training muscle to build a perfect firm bodyline 4 Mode Faradic Current Twin Spike Wave Powerful Electrophoresis penetration Transforming fat into energy to consume 5 Mode Faradic Current Step Wave Contracting the muscles rhythmically Aiming at swollen leg exercis...

Страница 17: ...atment time Touch and to adjust the treatment time total treatment time is 30 minutes present time 20 minutes 4 Start the treatment Touch to Start the Abdomen Flanks area treatment 5 Pause button Pause the treatment If need to change working mode or working power during treatment please touch button first then select the power and mode 6 Stop button Stop the treatment 7 Back button Return to the A...

Страница 18: ...atment time Touch and to adjust the treatment time total treatment time is 30 minutes present time 20 minutes 4 Start the treatment Touch to Start the Abdomen Flanks area treatment 5 Pause button Pause the treatment If need to change working mode or working power during treatment please touch button first then select the power and mode 6 Stop button Stop the treatment 7 Back button Return to the A...

Страница 19: ...nufacturer Following address Guangzhou HERMES Technology Co Ltd No 38 Songboliji Ex Shijing Town Baiyun District Guangzhou City Guangdong China Hotline 400 633 1980 Tel 86 20 61163310 61163051 Fax 86 20 61163317 E mail Helios 188 com Specification Display 11 inch Color touch screen Power Supply 110V 120V 220V 240V 50 60Hz Time Setting 5 to 30 minutes Cavitation power 82W Cavitation Frequency 32 KH...

Отзывы: