background image


Hercules ePlug 200 Mini 

4.4.1.


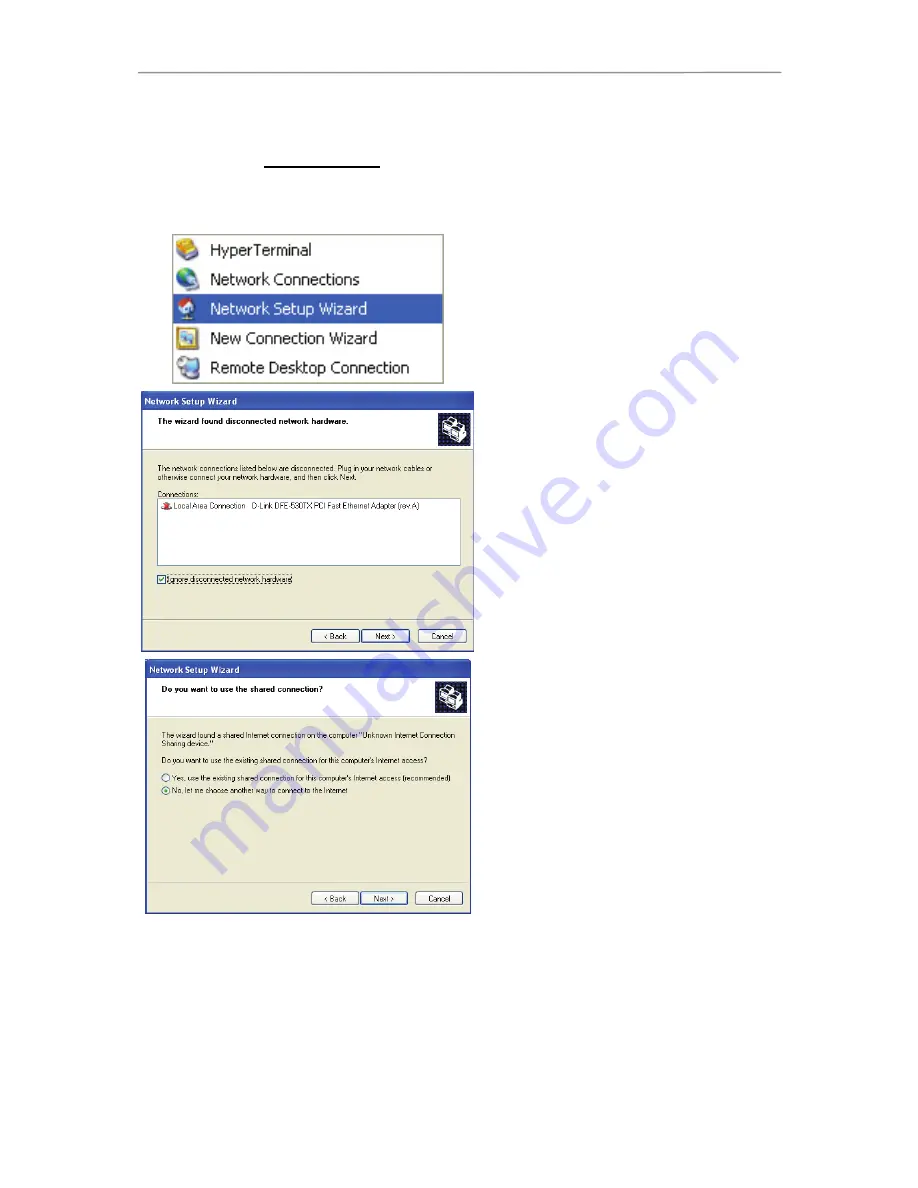
Windows XP: Using the Network Setup Wizard in an 

Infrastructure network 

Proceed as follows for each computer: 


1. Click 

Start/All Programs/Accessories/ 

Communications/ Network Setup Wizard

The Network Setup Wizard is launched. 

2. Click 

Next 

twice. 

The window opposite may appear if 

The Wizard 

found disconnected network hardware

3. If your Ethernet network connection is not 

displayed in the list, tick the 

Ignore 

disconnected network hardware 

box, then 

click 

Next

.  Otherwise, exit the Wizard by 

clicking 

Cancel 

and establish the connection 

from your network device to your router (for 
more information, please refer to your router's 
manual). 


The window opposite may appear if 

The Wizard 

found


a shared Internet connection on the 

computer

4. Select 

No, let me choose another way to 

connect to the Internet

, then click 

Next

User Manual – 45/59 

Содержание ePlug 200 Mini

Страница 1: ...Internet box to a Digital Terrestrial Television decoder in a HomePlug network 9 2 3 You haven t yet created a HomePlug network initial installation of Hercules ePlug 200 Mini Duo 10 2 4 You have alre...

Страница 2: ...ngsharedfolders 40 4 3 6 WindowsVista Sharingaprinter 40 4 3 7 ComputersrunningWindowsVista Accessingthesharedprinter 43 4 4 Computers running Windows XP Sharing folders a printer or an ADSL connectio...

Страница 3: ...et you can connect your modem or your Internet box to a Hercules ePlug adapter plugged into the nearest electrical outlet and connect your computer to another Hercules ePlug adapter plugged into anoth...

Страница 4: ...nly plug in the Hercules ePlug 200 Mini adapter in a sufficiently ventilated room Only connect the Hercules ePlug 200 Mini adapter using the included Ethernet cable Unplug the Hercules ePlug 200 adapt...

Страница 5: ...the following elements are present in the box Depending on the pack Hercules ePlug 200 Mini Solo 1 adapter Hercules ePlug 200 Mini Duo 2 adapters Quick Start Guide in English Ethernet cable 1 per adap...

Страница 6: ...enerate a new network password by way of a medium press from 8 to 12 seconds the adapter restarts when you release the button restore factory default settings by way of a long press of more than 15 se...

Страница 7: ...ug 200 Mini Duo which sets out step by step the installation procedure for your Hercules ePlug 200 Finally if you have already created a HomePlug network and wish to add a new adapter please refer to...

Страница 8: ...a computer or any other piece of network equipment connected via WiFi to communicate with another piece of equipment connected via the HomePlug network to the modem router In chapters 2 2 1 to 2 2 3 y...

Страница 9: ...Hercules ePlug 200 Mini 2 2 3 Connecting an Internet box to a Digital Terrestrial Television decoder in a HomePlug network User Manual 9 59...

Страница 10: ...if you have already installed a HomePlug network in the HomePlug 1 0 standard for example with Hercules ePlug 85 adapters you cannot add Hercules ePlug 200 adapters to that network However you are pe...

Страница 11: ...example a modem router 4 Connect the Ethernet cable to the Ethernet plug on your second adapter 5 Plug the adapter into an electrical outlet located near the device to be connected to the network In o...

Страница 12: ...e connected the LED connection status lights up and indicates that the network is functioning properly The signal quality is also indicated by a color code explained in chapter 1 5 LEDs overview Your...

Страница 13: ...r more new Hercules ePlug 200 Mini adapters in order to expand your network and be able to connect new devices printer modem router game console 1 Ethernet connection and electrical connection of your...

Страница 14: ...computer 4 Press for 2 to 4 seconds on the Connect button on one of the adapters already connected to the network You now have 2 minutes to pair the new adapter 5 Press for 2 to 4 seconds on the Conn...

Страница 15: ...as the security button by some manufacturers on the adapter which is already part of your existing network Make the connection by pressing for between 2 to 4 seconds on the Connect button on your Her...

Страница 16: ...ger be part of the network Press for between 8 to 12 seconds on the Connect button on the adapter whose password you want to change Wait until the adapter restarts Connect the other adapters by pressi...

Страница 17: ...website select the version corresponding to your product follow the procedure and save the installer file to your hard disk drive 3 2 Installing Hercules ePlug Station Double click the ePlugStation_Se...

Страница 18: ...Hercules ePlug 200 Mini Click the Install Hercules ePlug Station button The welcome screen for the ePlug Station InstallShield Wizard is displayed Click Next 18 59 User Manual...

Страница 19: ...rms of the License Agreement then click Next Select the installation location for ePlug Station then click Next Click Install to confirm your choice and launch the installation ePlug Station is instal...

Страница 20: ...n is now available on your desktop and step 1 of the Hercules ePlug Installation Assistant is launched The objective is now to help ePlug Station to identify the adapters in your network via each adap...

Страница 21: ...Assistant Afterwards you will be able to directly access Hercules ePlug Station In step 2 verify that the PLC adapter is connected to your computer or your modem router Click Next In step 3 select in...

Страница 22: ...adapter to make a note of its MAC address When you have plugged the adapter back in the adapter will still be part of the network you won t have to pair it again Click Add and repeat this procedure f...

Страница 23: ...ew adapter according to the instructions displayed onscreen Click Next In step 6 verify that your adapters are connected to the same network the LED should light up If this is not the case follow the...

Страница 24: ...om in which the adapter is located the adapter s MAC address the network status and bitrate The You are connected to information corresponds to the adapter to which the computer running ePlug Station...

Страница 25: ...to add to the monitoring list and make a note of its MAC address Next enter the MAC address in the corresponding field and select in the drop down list the room in which the PLC adapter in question is...

Страница 26: ...ged an adapter to plug it in in another room in your home you can change the location information in ePlug Station to update the general configuration of your network In the General tab click the icon...

Страница 27: ...ules website http ts hercules com and verify whether new firmware is available for your ePlug adapters Follow the instructions and save the file to your hard disk drive In the Tools tab click the butt...

Страница 28: ...ation This procedure will restore the factory default settings of the adapter connected to the PC only If you have previously modified the network password this adapter will no longer be part of the n...

Страница 29: ...ePlug adapter which is itself plugged into an electrical outlet everything must be powered on and your Internet line must be active 4 2 Identifying your HomePlug network type Infrastructure or Ad hoc...

Страница 30: ...nnected your computer to a private network as opposed to a public network Therefore the discovery options namely the ability to view outside devices and computers and to be seen by other networks are...

Страница 31: ...ction 1 Access the Network and Sharing Center To do so click the network icon on the Windows taskbar then click the Network and Sharing Center link 2 Click the View status link 3 In the Network Status...

Страница 32: ...operties 7 In the Internet Protocol Version 4 TCP IPv4 Properties window select Obtain an IP address automatically and Obtain DNS server address automatically 8 Click OK to validate 9 Do the same for...

Страница 33: ...mputers are directly connected to one another without an access point or router via the HomePlug network In order for Connection point B to be able to access the ADSL connection at Connection point A...

Страница 34: ...Hercules ePlug 200 Mini 3 Right click Internet and select the Properties option 34 59 User Manual...

Страница 35: ...to enable the Internet connection on the computer connected to the modem in the event that there is no connection when another computer tries to connect to the Internet You can now access the Interne...

Страница 36: ...file sharing radio button Click Apply In the Windows Vista confirmation window click Continue Enabling public folder sharing Note A public folder is a folder which can be shared by other users of the...

Страница 37: ...ws Vista confirmation window click Continue Enabling printer sharing Note To enable printer sharing you must first have installed a printer In the Sharing and Discovery zone click the Off link or the...

Страница 38: ...Windows Vista there are two types of folders personal or local folders and public folders A personal folder is a folder belonging to a specific user created on the computer whereas a public folder is...

Страница 39: ...t Share 3 In the File Sharing window select the user s who will be able to access this folder then click Add Note You can provide access to all users with no restrictions Everyone option or select spe...

Страница 40: ...Computer double click Network You access the list of the computers on the same network Use the path indicated by Windows when setting up sharing for example PC Users My documents Shared Pictures Fold...

Страница 41: ...ter connected to the printer 1 Click Start Control Panel 2 Under the Hardware and Sound heading click the Printer link The list of installed printers is displayed 3 Right click the printer and select...

Страница 42: ...lick the Change sharing options button 5 In the Windows Vista confirmation window click Continue 6 Tick the Share this printer box 7 Select the name of the printer which will be displayed on the netwo...

Страница 43: ...ta Accessingthesharedprinter On the computers that will use the shared printer 1 Click Start Control Panel 2 Under the Hardware and Sound heading click the Printer link 3 Click the Add a printer butto...

Страница 44: ...n click Next 9 Click Finish to close the assistant 4 4 Computers running Windows XP Sharing folders a printer or an ADSL connection A simple solution for sharing folders a printer or an ADSL connectio...

Страница 45: ...nnected network hardware 3 If your Ethernet network connection is not displayed in the list tick the Ignore disconnected network hardware box then click Next Otherwise exit the Wizard by clicking Canc...

Страница 46: ...t directly or through a network hub then click Next 7 If the window opposite appears select the connection to your local area network your Ethernet network card then click Next 8 When this warning scr...

Страница 47: ...ctive making it easy to recognize on your network my computer HomePlug computer or julie for example 12 Click Next 13 Enter the workgroup name HOME OFFICE or HERCULES for example and a description if...

Страница 48: ...ard 17 Click Finish to exit the Wizard Once the procedure is finished Windows XP may prompt you to restart your computer The procedures described in this chapter are specific to Windows XP For all oth...

Страница 49: ...mation please refer to your router s manual The window opposite may appear if The Wizard found a shared Internet connection on the computer 4 Select No let me choose another way to connect to the Inte...

Страница 50: ...en click Next 8 Among the connections displayed leave the box corresponding to the connection to your local area network ticked and deselect the others then click Next On the computers that will use t...

Страница 51: ...is unique and sufficiently distinctive making it easy to recognize on the network my computer HomePlug computer or julie for example 10 Click Next 11 Enter the workgroup name HOME OFFICE or HERCULES...

Страница 52: ...ave selected a medium for saving the Wizard 16 Click Finish to exit the Wizard Once the procedure is finished Windows XP may prompt you to restart your computer You can now access the Internet simply...

Страница 53: ...to change my files box In this case the user will be able to read files and save any changes If this box is not ticked the shared files can only be read and not changed The Shared folder name Properti...

Страница 54: ...are it with all computers in the house equipped with a Hercules ePlug adapter To access a printer on the network the printer must be set up for sharing on the computer where it is connected and instal...

Страница 55: ...computer option then click Next 4 In the window that appears click Next to launch the search for shared printers 5 In the list displayed double click the computer connected to the printer 6 Select the...

Страница 56: ...wish to link together in a network 6 A Windows message indicates that the task has been carried out successfully and that you must restart the computer 7 Repeat this procedure for each computer 4 5 Co...

Страница 57: ...to 5pm and 6pm to 11pm Saturday from 9am to 1pm and 2pm to 8pm Sunday from 10am to 1pm and 2pm to 5pm English Finland 0800 913060 Free Monday to Friday from 2pm to 6pm and 7pm to Midnight Saturday fr...

Страница 58: ...C DoC ePlug200Mini DoC eng_ePlug 200Mini pdf Hercules is a division of Guillemot Corporation Federal Communication Commission Interference Statement This equipment has been tested and found to comply...

Страница 59: ...y third party Software documentation and related material included in the Software package Guillemot Corporation S A reserves the right to terminate this license in the event of failure to comply with...

Отзывы: