background image


Table of Contents 

1


Please Observe The Following ............................................................................................. 3


1.1


Emphasized Sections ..................................................................................................... 3


1.2


For Your Safety .............................................................................................................. 3


1.3


Unpacking and Inspection .............................................................................................. 4


1.4


Items supplied ................................................................................................................ 4


1.5


Features ......................................................................................................................... 4


1.6


Usage ............................................................................................................................. 4


2


Description ............................................................................................................................ 5


3


Specifications ........................................................................................................................ 5


4


Installation ............................................................................................................................. 6


5


Operation .............................................................................................................................. 7


6


Application Hints ................................................................................................................... 7


7


Troubleshooting .................................................................................................................... 8


8


Care and Maintenance .......................................................................................................... 9


9


Accessories and Spare Parts .............................................................................................. 11


10


Diagrams ............................................................................................................................. 12


11


Warranty .............................................................................................................................. 15


Содержание 2084141

Страница 1: ...1 EQ VA20 Volumetric Valve 2084141 Operating Manual ...

Страница 2: ...Your Safety 3 1 3 Unpacking and Inspection 4 1 4 Items supplied 4 1 5 Features 4 1 6 Usage 4 2 Description 5 3 Specifications 5 4 Installation 6 5 Operation 7 6 Application Hints 7 7 Troubleshooting 8 8 Care and Maintenance 9 9 Accessories and Spare Parts 11 10 Diagrams 12 11 Warranty 15 ...

Страница 3: ...he unit read these instructions completely If the instructions are not observed the manufacturer can assume no responsibility Do not expose the connecting plastic lines to heat oil or sharp edges Make sure the Unit stands stable and secure Use only original equipment replacement parts Always disconnect the power supply before servicing the unit Always disconnect the pneumatic supply before servici...

Страница 4: ...s Air Line 4mm OD yellow 2 meters Needle Sample Kit 1 5 Features Volumetric displacement Dosing range 1 5 12 microliters Cycle rate 180 minute Patent Pending priming system Innovative Rod and Seal design Slim design Fluid inlet fitting barbed stainless steel Field Repairable 1 6 Usage The Loctite EQ VA20 Volumetric Valve is a positive displacement metering valve which dispenses a precise drop of a...

Страница 5: ... Adhesives with precise dosing in the range of 1 5 to 12 microliters The Loctite EQ VA20 Volumetric Valve has a diameter of 19mm 0 748 and an overall length of 15 3 cm 6 0 This compact dispense valve is stackable at 19mm centers The fluid body is made of 316 stainless steel and the actuator is anodized aluminum The actuator is a double acting cylinder with a hardened rod and a Delrin piston for lo...

Страница 6: ...itting located on the fluid body of the Loctite EQ VA20 Volumetric Valve Use the supplied 6 4 mm OD tubing insert the tube over the barbed fitting than insert the flange locking sleeve over the tube Secure the tubing to the reservoir with a compression fitting which allows the tubing to pass through the fitting into the adhesive container Supply clean dry regulated air to the reservoir and set the...

Страница 7: ...e clamping screws and rotating the stroke adjuster clockwise to decrease the stroke The maximum stroke is approximately 9 5 mm 0 374 inch and the minimum stroke is approximately 1 mm 0 039 inch 3 To prime the Loctite EQ VA20 Volumetric Valve rotate the Luer Check Valve counterclockwise 2 1 4 rotations When a steady flow of adhesive is observed rotate the Luer Check Valve clockwise and tighten 4 Th...

Страница 8: ...oduct to extrude out the dispense tip until the air reaches atmospheric pressure Prime the Loctite EQ VA20 Volumetric Valve by rotating the Luer Check Valve counterclockwise 2 1 4 rotations When a steady flow of adhesive is observed rotate the Luer Check Valve clockwise and tighten Liquid drips at a steady rate after the valve closes A steady drip can be caused by excessive reservoir pressure The ...

Страница 9: ...leaning 1 Vent air pressure from product reservoir 2 Use Equipment Flushing Solvent item 12121 or Isopropyl Alcohol IPA to clean parts 3 Remove luer check valve and submerge parts in cleaning solvent 4 Use a cotton tip applicator and cleaning solvent to clean the Displacement Chamber surface 5 Remove luer check valve body spring and ball seat from cleaning solvent and insure that parts are clean A...

Страница 10: ...id and tighten all wing nuts so the lid is secure 5 Adjust the air pressure regulator to 5 psi 6 Place a beaker or similar container under the dispense valve 7 Rotate the Luer Check Valve counterclockwise 2 rotations and allow the Equipment Flushing Solvent to flow into the container 8 Note this may take a few moments or minutes depending upon the viscosity of the adhesive in the feed line 9 While...

Страница 11: ...om the feed line and valve the process is complete 18 Rotate the Luer Check Valve clockwise until tight NOTE the operator must wear Safety glasses and proper gloves while this procedure is being performed 9 Accessories and Spare Parts Optional Accessories and System Components sold separately Dispensing From a Reservoir Loctite Dual Channel Integrated Semi Automatic Control Dispenser PN 1390321 13...

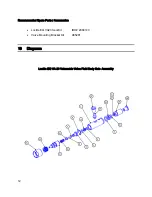
Страница 12: ...12 Recommended Spare Parts Accessories Loctite EQ VA20 Seal Kit IDH 2084140 Valve Mounting Bracket Kit 985281 10 Diagrams Loctite EQ VA 20 Volumetric Valve Fluid Body Sub Assembly ...

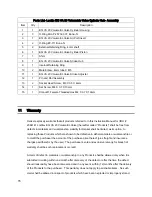
Страница 13: ... 1 Displacement Chamber 7 1 O ring AS568A 006 Viton EPT 8 1 Internal Retaining Ring 9 1 Ball 0 125 PTFE 10 1 Ball Seat 11 1 Luer Check Valve 12 1 Tip Retainer Nut 13 1 Compression Spring 14 1 Barbed Fitting Mem Co Fitting Inc PN B4 0 316 Viton 15 1 Flanged Locking Sleeve Mem Co Fitting Inc PN S 14 16 1 Coupling 17 1 Seal 18 1 Bearing 19 1 Seal Gland 20 1 Seal Gland Front 21 1 O ring AS568A 010 Vit...

Страница 14: ...14 Loctite EQ VA 20 Volumetric Valve Cylinder Sub Assembly ...

Страница 15: ... VA 20 Volumetric Valve hereafter called Products shall be free from defects in materials and workmanship Liability for Henkel shall be limited as its option to replacing those Products which are shown to be defective in either materials or workmanship or to credit the purchaser the amount of the purchase price thereof plus freight and insurance charges paid therefor by the user The purchaser s so...

Страница 16: ... SECTION HENKEL MAKES NO WARRANTY OF ANY KIND WHATSOEVER EXPRESS OR IMPLIED WITH RESPECT TO THE PRODUCTS ALL WARRANTIES OF MERCHANTABILITY FITNESS FOR A PARTICULAR PURPOSE AND OTHER WARRANTIES OF WHATEVER KIND INCLUDING AGAINST PATENT OR TRADEMARK INFRINGEMENT ARE HEREBY DISCLAIMED BY HENKEL AND WAIVED BY THE PURCHASER THIS SECTION SETS FORTH EXCLUSIVELY ALL OF LIABILITY FOR HENKEL TO THE PURCHASE...

Страница 17: ...centre SINGAPORE 149598 Henkel China Company Ltd No 928 Zhang Heng Road Zhangjiang Hi Tech Park Pudong Shanghai China 201203 Henkel Loctite Korea 8F Mapo Tower 418 Mapo dong Mapo gu Seoul 121 734 KOREA Henkel Japan Ltd 27 7 Shin Isogo cho Isogo ku Yokohama 235 0017 JAPAN Henkel AG Co KGaA Standort München Gutenbergstraße 3 85748 Garching b München Deutchland www equipment loctite com and designate...

Отзывы: