


2
4
5
6
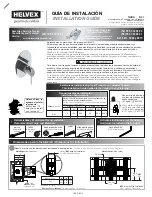
Instalación General
/ General Installation
3
Enrosque los conectores (no incluidos) con tubería (no incluida) a las conexiones de la caja. /
Screw the connectors (not included) with the tube (not included) to the box connections.
2
nivel
level
Desenrosque los tornillos para retirar la cubierta de plástico, desenrosque el
chapetón esférico y la tuerca para retirar el cartucho, purgue la instalación. Vuelva a
ensamblar.
/ Unscrew the screws to remove the plastic cover and unscrew the
cartridge cap and the nut to remove the cartridge, purge the installation.
Reassemble.
burbuja
bubble
VISTA FRONTAL
FRONT VIEW
Coloque teflón en las
conexiones roscadas.
/
Apply plumber’s tape around
the threaded connections.
*1,90 cm
74,8”
cámara
de aire
air chamber
*20-30 cm
7,8"-11,8"
max.
Medidas Recomendadas /
Recommended Dimensions
2
30 cm
max
.
11,8”
*70 cm
27,5” min.
tapón
plug
tubo Ø ½”
(no incluído)
Ø ½” tube
(not included)
NPT
FFL
120 m
(47,2")
1/2" - 14 NPT
(color negro)
salida a la *regadera
(black color)
*shower head outlet
1/2" - 14 NPT
(color azul)
entrada de agua fría
(blue color)
cold water inlet
1/2" - 14 NPT
(color rojo)
entrada de agua
caliente
(red color)
hot water inlet
1/2" - 14 NPT
(color negro)
*salida a la tina o a la *regadera manual
(black color)
*tub spout or *hand shower outlet
codo roscado
(no incluido)
threaded elbow
(not included)
Inserte la caja armada dentro del ranurado de la
pared, nivele y fije la instalación.
/ Insert the assembly
box within the slotted wall, level and fix the installation.
Se considera que la caja está nivelada en el plano horizontal y
vertical, cuando la burbuja está en el centro.
/
The box is considered to be level in the horizontal and vertical
plane, when the bubble is in the center.
Nota:
Asegúrese de que el acabado final se instalará dentro del
Rango de Instalación (
RI
).
/
Note:
Make sure that the finished wall
will be installed within the Installation Range (
IR
).
tuerca
nut
chapetón esférico
cartridge cap
cubierta de plástico
plastic cover
tornillo
screw
cartucho
cartridge
Mantenga hermética la instalación y genere una prueba
de fuga a la presión de operación
(1,0 - 6 kg/cm²)
. /
Keep
the installation airtight and generate a leak test at the
operating pressure (14,22 - 85,3 PSI).
Nota:
Asegúrese de que no exista ninguna fuga en la instalación.
/
Note:
Make sure that there is no leakage in the installation.
tapón (no incluido)
cap (not included)
kg/cm²
PSI
7
Instale la pared con acabado final.
/
Install the finished wall.
pared con
acabado final
finished wall
8
Desenrosque los tornillos y retire la
cubierta de plástico.
/ Unscrew the
screws and remove the plastic cover.
tornillo
screw
(*) No incluido
(*) Not included


