


2
Instalación General
/ General Installation
2
4
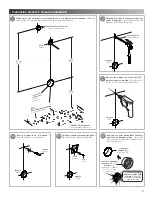
Ubique el centro de la ranura y marque con
un punto de golpe.
/
Locate the center of the
slot and mark with one hit point.
*75 cm
*43 cm
tubería del
desagüe ø2”
tubing
drain ø 2 "
NPT
Nivel de piso terminado
Finished floor level
*Medidas Recomendadas
* Recommended Measures
ancla
anchor
alimentación para fluxómetro
supply for flowmeter
90°
Marque el centro de la ranura, colocando la ancla, a la distancia recomendada. /
Mark the
center of the slot, placing the anchor, to the recommended distance.
Barrene las marcas con broca de ø5/16”
para concreto (no incluida). /
Drill with drill
marks ø 5/16 "concrete (not included).
punto de golpe
about to blow
desagüe
drain
3
Inserte el taquete en el barreno. /
Insert the anchors into the holes.
desagüe
drain
taquete
anchor
5
Coloque el ancla y enrosque las pijas. /
Place the anchor and screw the lags.
ancla
anchors
pija
lag
desagüe
drain
6
1
desagüe
drain
*29,52"
*16,92"
conector ó adaptador
para tubo Ø 1 ½”-2”
(incluido)
/ trap
connector or adapter
for Ø 1 ½”-2 "pipe
(included)
El tubo del desagüe
debe estar rígido y fijo
al muro.
/ The drain
pipe must be rigid and
fixed to the wall.
tubería del
desagüe Ø 2” /
drain pipe Ø 2 "
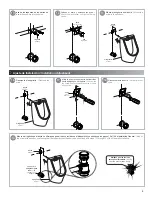
Inserte el conector ó adaptador (incluido),
en el tubo de desagüe a tope.
/ Insert the
trap connector or adapter (included) into
the drain pipe butt.
*43 cm
*16,92"


