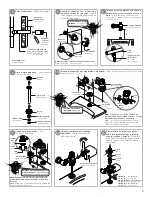


3
9
11
12
13
Arme el niple para spud.
/
Assemble the
nipple to the spud.
rondana
washer
niple recto
straight nipple
tuerca
nut
tuerca mingitorio
urinal nut
rondana fibra
fiber washer
empaque mingitorio
urinal gasket
10
Coloque el chapetón y el cuerpo armado, sin apretar.
/ Place the escutcheon and screw the body
assembly loosely.
Verifique el apriete
del spud
/
Check the
tightness of the spud.
cuerpo armado
body assembly
spud
(no incluido)
spud
(not included)
chapetón
escutcheon
Coloque el cuerpo armado y verifique la
distancia (B) y si es necesario recorte el
niple.
/
Place the body assembly and
check the distance (B) and if necessary
cut the nipple.
niple
nipple
B
Solde el adaptador.
/
Weld the adapter.
pared con
acabado final
finish wall
Utilice teflón en el niple
roscado.
/
Use plumber
tape threaded nipple.
Nota:
La instalación puede ser izquierda o derecha.
Note:
Installation can be left or right.
A
chapetón
escutcheon
adaptador
(incuido)
adapter
(incuded)
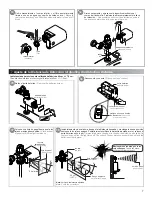
6
7
8
botón
accionador
override
button
tapón
cap
Coloque el niple armado.
/
Place
the nipple assembly.
Nota:
Enrosque el niple armado, posteriormente
apriete firmemente el cuerpo armado a la llave de
retención.
Note:
Screw nipple assembly, then firmly tighten the
body assembly to stop valve.
Verifique que las rondanas estén
bien colocadas.
/
Check that the
washers are properly installed.
rondana
tuerca
washer
nut
tuerca
nut
niple
nipple
niple armado
nipple assembly
Coloque y enrosque el dispositivo
electrónico.
/
Place and screw the
electronic device.
dispositivo electrónico
electronic device
Cierre la llave de retención y abra el
suministro general del agua, retire la
cúpula, rondana y émbolo. /
Close the
stop valve and open the general water
supply, remove the dome, the washer
and piston.
cúpula
dome
rondana
whaser
émbolo
piston
Nota:
Si requiere el cambio de posición del
cuerpo armado, desenrosque el tapón y el botón
accionador e inviértalos en su posición.
Note:
If you require repositioning of the body
assembly, unscrew the cap and the override
button and toogle their positions.
llave de retención
stop valve
camisa
cover tube
tubería de alimentación
Ø 25 mm
(1”)
(no incluida)
supply pipe Ø 25 mm (1 ")
(not included)
cuerpo armado
body assembly
cortador de tubo
(no incluido)
pipe cutter
(not included)
A:
Longitud final.
A: Final Length
Inserte el chapetón con la camisa y
enrosque la llave de retención.
/ Insert
the escutcheon with the cover tube and
screw the stop valve.
FB-185-19
Émbolo (rojo)
FB-185-19
Piston (red)
FB-185-19-0,5
Émbolo (verde claro)
FB-185-19-0,5
Piston (ligth green)
FB-185-19-1
Émbolo (gris)
FB-185-19-1
Piston (gray)