


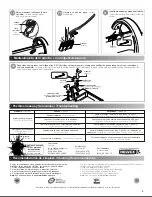

Inserte la salida en el lavabo y
verifique que se coloque el
empaque.
/ Place the spout in the
sink and check that the gasket is in
place.
Coloque el separador, la rondana y
enrosque la tuerca con la llave (incluida)
para apretar la salida. Enrosque la tuerca
conector con el empaque.
/
Place the shank
gasket, washer and tighten the nut with the
wrench (included) to hold the spout. Screw
the shank adapter with its gasket.
2
3
Instalación Salida /
4
2
Faucet Installation
Desenrosque el opresor
el
de
maneral.
/ Unscrew the set screw
of each handle.
5
Enrosque el conector tipo “Y” a la tuerca
conector, posteriormente enrosque las
mangueras (incluidas) al cuerpo central y a
los cuerpos laterales.
/ Screw the “Y”
connector to shank, then thigten the hose
(included) to the lateral valve output.
Instalación de las Mangueras
/ Installation of Hoses
9
10
líneas de
alimentación
Abra el suministro de agua y purgue la
línea de alimentación.
/
To purge
supply lines, open and close angle
stops.
Enrosque las mangueras (no incluidas) a
los cuerpos laterales y posteriormente a
la línea de alimentación.
/ Connect the
hoses (not included) to the lateral valves
and then to angle stop.
mangueras
(no incluidas)
válvula angular
( no incluida)
hoses
(not included)
8
agua
caliente
hot
water
agua fria
cold
water
½-14 NPSM
separador
rondana de acero inox.
tuerca
empaque
mangueras
hoses
Limpie la superficie.
Clean the surface.
conector “Y”
empaque
Desenrosque el cuerpo central tipo “Y” y
la tuerca conector. Retire el empaque,
desenrosque la tuerca para retirar la
rondana y el separador.
Unscrew the “Y”
connector and the shank adapter.
Remove the gasket and unscrew the nut
to remove the stainless steel washer and
shank gasket.
stainless steel washer
gasket
shank gasket
nut
shank adapter
“Y” connector
gasket
empaque
tuerca conector
gasket
separador
shank gasket
rondana de acero inox.
stainless steel washer
tuerca
nut
gasket
empaque
shank adapter
tuerca conector
opresor
set screw
7
red color
blue color
antifriction
gasket
lock nut
Desenrosque la contra
tuerca y retire el empaque.
/ Remove the lock nut and
gasket.
6
contra tuerca
empaque
opresor
set screw
handle
maneral
handle
maneral
antifricción
lock nut
contra tuerca
gasket
empaque
tuerca
nut
color azul
espaciador
separator
tuerca
nut
color rojo
shank adapter
tuerca conector
conector “Y”
“Y” connector
Por la parte inferior del lavabo o superficie inserte los cuerpos
laterales con su tuerca, rondana y espaciador. Por la parte
superior, inserte el empaque y enrosque la contra tuerca a
tope, para después insertar el antifricción y el maneral.
Enrosque el opresor para fijar. Por la parte inferior enrosque la
tuerca y apriete para fijar.
/
On the bottom of the sink or
surface, insert the side bodies with nut, washer and spacer. On
the top, insert the gasket and screw the lock nut, then insert
the antiriction and the handle. Screw for fixing the set screw.
On the bottom screw and tighten the nut to fix.
rondana
washer
angle stops
angle stop
(not included)
Instalación Cuerpo Lateral y Manerales /
Lateral Valve and Handle Installation


