background image

460 719-07 3003.comp 25.06.2007 15:38 Uhr Seite 31 

Probedruck

C

M

Y

CM

MY

CY CMY

K

31

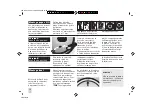
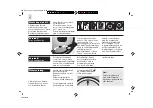
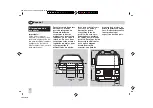
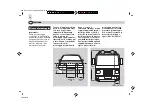
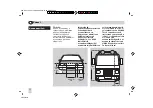
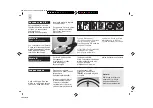
I proiettori non devono
vibrare, sporgere dal cofano
motore e devono essere
montati in modo simmetrico.
Determinare la posizione

di montaggio su una
superficie piana e segnare
i punti di fissaggio.
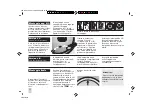
Eseguire un foro con la
punta da 3 mm e allargarlo
con la punta da 11 mm.
Spalmare sulle parti in

metallo forate la protezione
antiruggine.

Montaggio pag. 2/3:

Versione A

senza luci di posizione.

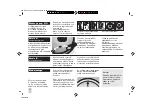
Montaggio finale

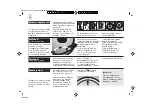
Assemblare l'involucro
esterno. Avvitare il supporto
all'involucro esterno e
disporre correttamente il
cavo.

Avvitare il proiettore al
veicolo (se necessario con
un supporto a due punti).
Allineare il proiettore e
serrare a fondo tutte le viti.
Per garantire una distribuzi-
one della luce ottimale,
assicurarsi durante il
montaggio del gruppo ottico
che la scritta 

"TOP"

 sul

gruppo sia rivolta verso
l'alto.

In aggiunta a quanto
indicato per la versione A,
inserire il cavo di
collegamento (a 3 fili).
Collegare il cavo

supplementare a una
spina piatta completamente
isolata. Estrarre
l'alloggiamento delle luci
di posizione dal riflettore,

inserire la lampadina
nell'alloggiamento
e spingerla nuovamente
nel riflettore.

Se le luci di posizione non
sono richieste: rimuovere
l'alloggiamento per le luci
di posizione e l'anello in
gomma e applicare la
linguetta di chiusura

fornita in dotazione.
Inserire il cavo di
collegamento (a 2 fili)
attraverso la guarnizione
in gomma e introdurlo
nell'involucro. Spelare
il cavo e collegarlo con
due spine piatte. Spina
piatta completamente

isolata per la lampadina H1.
Inserire la guarnizione in
gomma a tenuta d'acqua.
Inserire e bloccare la
lampadina. Inserire le spine
piatte.

Versione B

con luci di posizione.

  Attenzione!

  Non toccare la lampadina
direttamente con le dita!
Utilizzare fazzoletti di carta
o simili.

Содержание Rallye 3003

Страница 1: ...leitung Fernscheinwerfer Mounting Instructions Driving lamps Instructions de montage Projecteurs longue port e Monteringsanvisning Fj rrstr lkastare Montagehandleiding V rstralers Instrucciones de mon...

Страница 2: ...460 719 07 3003 comp 25 06 2007 15 38 Uhr Seite 2 Probedruck C M Y CM MY CY CMY K 2...

Страница 3: ...includes Fourniture Leveransomfattning De levering Volumen del suministro Dotazione di fornitura Osaluettelo 3 5 11 12 mm SW 13 17 Ben tigtes Werkzeug Tools required Outillage n cessaire N dv ndiga v...

Страница 4: ...460 719 07 3003 comp 25 06 2007 15 38 Uhr Seite 4 Probedruck C M Y CM MY CY CMY K A 2 4 optional 5 mm...

Страница 5: ...460 719 07 3003 comp 25 06 2007 15 38 Uhr Seite 5 Probedruck C M Y CM MY CY CMY K 5 B optional 5 mm...

Страница 6: ...460 719 07 3003 comp 25 06 2007 15 38 Uhr Seite 6 Probedruck C M Y CM MY CY CMY K 6 30 87 85 86 31 56a...

Страница 7: ...460 719 07 3003 comp 25 06 2007 15 38 Uhr Seite 7 Probedruck C M Y CM MY CY CMY K 7 58 58 86 56a 12 mm 58 86...

Страница 8: ...510 641 24 V 4RA 003 510 651 12 V 8KA 002 309 811 Zubeh r nicht im Lieferumfang enthalten Accessories not included with kit Accessoires non fournis Tillbeh r ing r ej i leveransen Toebehoren worden ni...

Страница 9: ...n Subject to alteration without notice Sous r serve de modifications techniques Vi reserverar oss f r tekniska ndringar Technische wijzigingen voorbehouden Reservadas modificaciones t cnicas Con riser...

Страница 10: ...siehe Grafik 1 Fahrzeug mit zwei serien m igen und zwei zus tz lichen Fernscheinwerfern auf dem Dach Nur in Deutschland erlaubt 2 Fahrzeug mit vier serien m igen Fernscheinwer fern Nur in Deutschland...

Страница 11: ...iefert eine Aussage ber die maximale Beleuchtungsst rke des Systems Welche Referenz zahl die Scheinwerfer haben ist auf dem Abdeck glas in der N he des Zu lassungszeichens zum Beispiel E1 f r Deutschl...

Страница 12: ...n Anbauma e einzuhalten Sollten diese gesetzlichen Anbauvorschriften nicht eingehalten werden bzw die Benutzung eines zu s tzlichen Paares Positi onsleuchten nicht zul ssig sein CH A darf das Posi tio...

Страница 13: ...arauf dass die TOP Markierung auf dem Scheinwerfereinsatz immer nach oben zeigt Zus tzlich zu Version A Anschlusskabel 3adrig einf hren Zus tzliches Kabel mit vollisoliertem Flachstecker verbinden Fas...

Страница 14: ...estigen Lassen Sie die Fern scheinwerfer in der Fach werkstatt oder bei einer Tankstelle einstellen Nur richtig eingestellte Scheinwerfer sorgen f r optimales Licht Noch ein Tipp Halten Sie die Schein...

Страница 15: ...ving lamps with an integrated position light If these mandatory fitting requirements are not observed or the use of an additional pair of position lights is not permitted e g in CH A the position ligh...

Страница 16: ...pattern make sure that the TOP marking on the headlamp insert is always facing the top In addition to version A insert the connection cable 3 wire Connect the additional cable using fully insulated bl...

Страница 17: ...on lamps are connected and switched on together with the parking light Fasten the supply cables securely in place Have the driving lamps set by a specialist garage or at a service station Only correct...

Страница 18: ...doivent tre respect es en Allemagne Si ces sp cifications de montage l gales ne sont pas respect es ou si l utilisation d une paire suppl mentaire de feux de position n est pas autoris e Suisse Autri...

Страница 19: ...flecteur Si le montage du feu de position n est souhait en aucun cas retirer la douille du feu de position et la bague en caoutchouc Installer le collier joint fourni en exer ant de la pression sur c...

Страница 20: ...rie Fixer les c bles de connexion de fa on s re Faites r gler vos projecteurs longue port e dans un garage sp cialis ou une station service Seuls des projecteurs correctement r gl s garantissent un c...

Страница 21: ...alla extra monteringsm tt i nedanst ende bild f ljas Om dessa lagenliga monteringsf reskrifter inte f ljs eller om anv ndning av extra positionsljus inte r till tet Schweiz sterrike f r positionsljus...

Страница 22: ...ning kontrollera att markeringen TOP p str lkastarinsatsen alltid pekar upp t F rutom beskrivningen i version A ska en extra anslutningskabel tretr dig dras in Anslut extrakabeln med det helisolerade...

Страница 23: ...ositionsljus och kopplas ihop med parkeringsljuset F st anslutna lampor ordentligt L t en fackverkstad st lla in fj rrstr l kastarna Optimalt ljus uppn s endast med korrekt inst llda str lkastare Fler...

Страница 24: ...n de afbeelding aangegeven montagematen worden aangehouden Als deze wettelijke montagevoorschriften niet worden aangehouden of als een extra paar positielichten niet zijn toegestaan CH A mag het posit...

Страница 25: ...lichtverdeling dient u er bij het plaatsen van de schijnwerper op te letten dat de markering TOP altijd naar boven wijst Aanvullend op versie A de aansluitkabel 3 aders naar binnen steken Extra kabel...

Страница 26: ...ingeschakeld Zorg dat de aansluitkabels goed zijn bevestigd Laat de v rstralers in de werkplaats of bij een tankstation instellen Alleen goed afgestelde schijnwerpers geven optimaal licht Nog een tip...

Страница 27: ...ontaje indicadas en los croquis inferiores En caso de no respetarse estas normas legales de montaje o de no estar permitida la utilizaci n de un par de luces de posici n como es el caso de Suiza y Aus...

Страница 28: ...ar el faro asegurarse de que la marca TOP se ala siempre hacia arriba Adicionalmente al proceso descrito en la versi n A introduzca un cable de conexi n trifilar Conecte el cable adicional al conector...

Страница 29: ...postventa de Hella se pondr en contacto con usted Solicite a su distribuidor el prospecto completo de Hella o escr banos a la siguiente direcci n Hella KGaA Hueck Co 59552 Lippstadt Conexi n el ctrica...

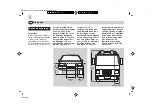
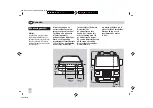
Страница 30: ...isure di montaggio supplementari riportate nello schizzo qui a lato Se non si rispettano le prescrizioni di montaggio previste dalla legge o se non consentito l impiego di una coppia supplementare di...

Страница 31: ...aggio del gruppo ottico che la scritta TOP sul gruppo sia rivolta verso l alto In aggiunta a quanto indicato per la versione A inserire il cavo di collegamento a 3 fili Collegare il cavo supplementare...

Страница 32: ...registra le vostre domande e richieste L Assistenza Clienti Hella vi richiamer Richiedete al vostro concessionario il prospetto generale di Hella oppure scrivete a Hella KG a A Hueck Co 59552 Lippstad...

Страница 33: ...varustettua lis valonheitint asennettaessa on Saksassa noudatettava kaikkia viereisess kuvassa esitettyj lis mittoja Jos n it lakis teisi asennusm r yksi ei noudateta tai ylim r isen seisontavalopari...

Страница 34: ...mioi valonheittimen sis kett asentaessasi ett sis kkeen p ll oleva TOP merkint n ytt yl sp in Version A lis ksi johda liitoskaapeli 3 johtiminen sis n Liit lis kaapeli t yseristetyll laattapistokkeell...

Страница 35: ...kopuolella kysymyksesi ja toivomuksesi ottaa vastaan puhelinvastaaja Hella asiakaspalvelu soittaa Sinulle mielell n takaisin Pyyd kauppiaaltasi Hellan tuoteluettelo tai kirjoita osoitteeseen S hk inen...

Страница 36: ...460 719 07 3003 comp 25 06 2007 15 38 Uhr Seite 36 Probedruck C M Y CM MY CY CMY K Hella KGaA Hueck Co D 59552 Lippstadt 460 719 07 06 07 Printed in Germany...

Отзывы: