14
The HELIX PP20 DSP has to be connected to
the head unit (radio) as follows:
Caution: For carrying out the following steps you
will need special tools and technical knowledge.
In order to avoid connection mistakes and dama-
ges, please ask your dealer for help if you have
any questions and please follow the mandatory
instructions on page 9 of this manual.
1.
After removing the head unit / radio from the
radio slot by using the respective tools, disconnect
the vehicle cable harness from the head unit / ra-
dio. Afterwards, connect the vehicle cable harness
to the ISO terminals of the HELIX cable harness,
compare Fig.3
.
2.
Connect the ISO terminals of the HELIX cable
harness to the head unit/radio,
compare Fig.3 .
According to your vehicle type, you might need
a speci
fi
c adapter. Please check our vehicle-list
(compare the Plug & Play section on www.audio-
tec-
fi
scher.com) for
fi
nding out if you need such an
additional adapter for installing the PP20 DSP.
3.
Connect the HELIX cable harness to the PP20
DSP,
compare Fig.3 .
4.
Concerning the power supply of the PP20
DSP there are two
alternatives
which are descri-
bed in the chapters 4a and 4b.
4a.
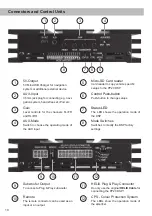
Power supply via vehicle cable harness: De-
pending on the vehicle type, the connectors for
ignition-plus and permanent-plus can be altered.
The PP20 DSP must not be powered via the igni-
tion plus because this might result in a damage of
the vehicle‘s electronic circles. Thus, the assign-
ment ignition-plus and permanent-plus (the batte-
ry has to be connected again) has to be checked
before the
fi
nal start of operation
at the cables
E
(yellow) and
F
(blue) with a voltmeter. Perma-
nent-plus is the cable where you messure a 12V
signal if the ignition of the car is switched off.
After measuring, connect cable
G
to the perma-
nent plus (
compare Fig.4a
). The plus-cable of
the cable harness is normally secured by a fuse
of max. 20A.
If you are not sure with the assignment of igni-
tion-plus and permanent-plus, please ask your
dealer for help.
4b.
Direct power supply via the battery:
If the power supply of the PP20 DSP cannot be
provided via the vehicle cable harness (max. 20 A),
you can connect the PP20 DSP directly to the
car battery. To do so, disconnect the connection
H
(ground) and
I
(+12V). Afterwards, the ground
cable should be connected to a central ground re-
ference point (this is located where the negative
terminal of the battery is grounded at the metal
body of the vehicle), or to a bright bare-metal loca-
tion on the vehicle chassis, i.e. an area which has
been cleaned of all paint residues.
Before you
undergo this step, disconnect the car battery
at the minus pole.
Connect the +12V power ca-
ble to the positive terminal of the battery. The plus
cable from the battery for the complete system
should be provided with a main fuse (20 A) at a
distance of max. 30cm from the battery.
Each
of
the cables
J
which are now out of use has to be
insulated. You can now reconnect the car battery
(
compare Fig.4b
).
Optimizing the volume set up:
In order to set up
the ideal volume, turn the level controls Front an
Rear to the minimum (left stop). Now switch on the
head unit / radio with its maximum volume (right
stop) and turn the fader to front. Afterwards, turn
the level control Front of the PP20 DSP slowly to
the right until you can realize a slight speaker dis-
tortion. Now, turn the level control a little bit back
to the left. Turn the fader of the head unit / radio to
rear and repeat the procedure with the level con-
trol Rear. Finally, turn the fader back to its original
position.
Caution:
Caution
:
The PP20 DSP might have more po-
wer than your head unit / radio. Most factory
system loudspeakers can cope with this ea-
sily. Nevertheless, please be very careful with
the volume control. Excessive volumes can re-
sult in a distorted sound and can damage the
loudspeakers.
Installation
1
2
3


