Helios PD2-6400 High Voltage & High Current Meter
Instruction Manual
12
Wall Mounting Instructions
The meter can be mounted to any wall using the four
provided mounting holes. Note that the bottom
mounting holes are located underneath the lower door
panel. To mount the meter to a wall, follow these
instructions
•
Prepare a section of wall approximately 11" x 13"
(280 mm x 330 mm) for meter mounting by
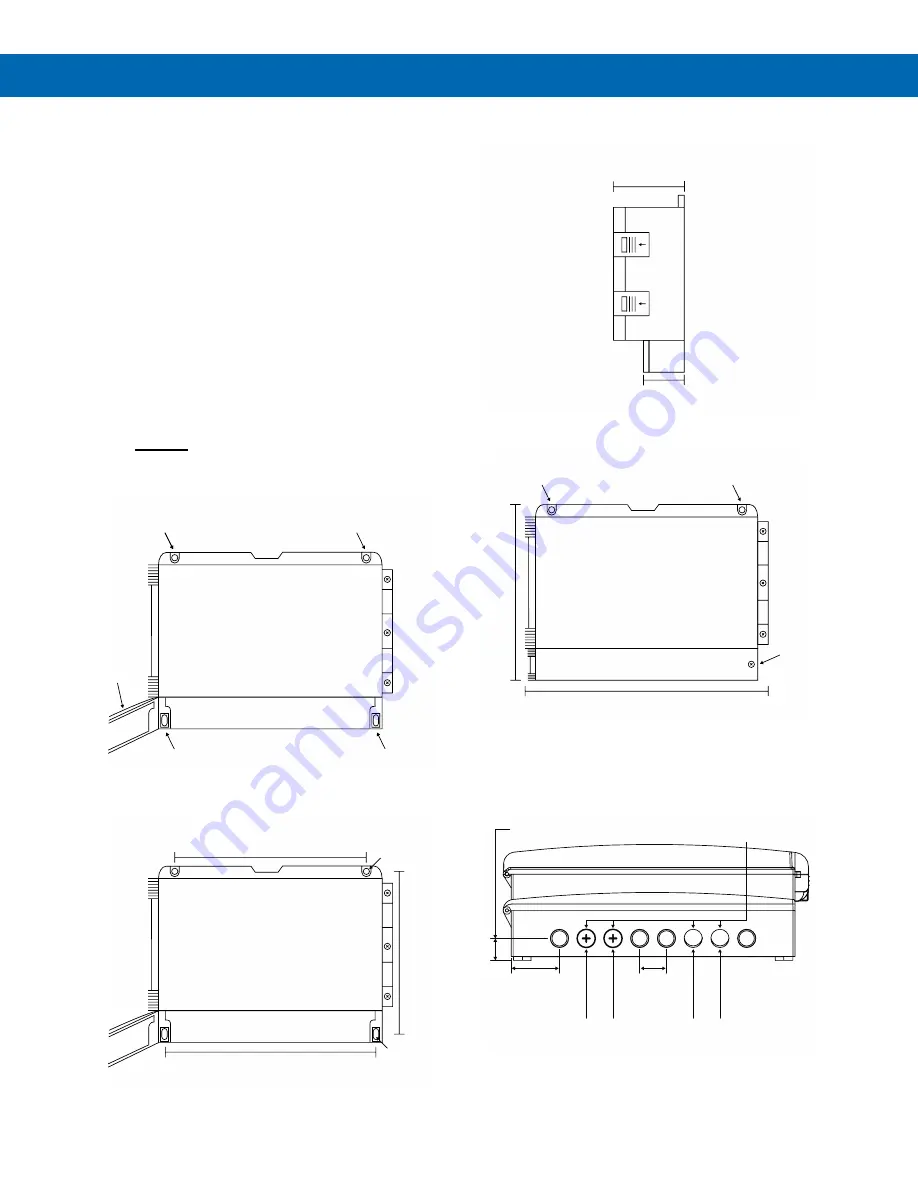
marking with a pencil the mounting holes (shown
in
) on the wall.
•
Select the appropriate mounting screws for the
mounting surface to be used. The mounting holes
diameter is shown on
Note: Mounting screws are not included.
•
Using a drill bit slightly smaller than the girth of
the mounting screws, pre-drill holes at the
mounting locations previously marked.
•
Insert mounting screws into the four mounting
holes and screw them into the pre-drilled holes.
DO NOT
overtighten the mounting screws as it is
possible that the enclosure could crack and
become damaged.
Figure 1. Meter Mounting Holes Location
Figure 2. Meter Mounting Holes Dimensions
Mounting Dimensions
Figure 3. Meter Dimensions
– Side View
Figure 4. Meter Dimensions - Front View
Conduit Holes Location
Figure 5. Conduit Holes Location
– Bottom View
Mounting Hole
Mounting Hole
Mounting Hole
Mounting Hole
Lower
Door
Panel
10.43" (265 mm)
9
.8
" (
2
4
9
m
m
)
11.14" (283 mm)
Dia. 0.2"
(5.5 mm)
Dia. 0.2"
(5.5 mm)
2.63" (67 mm)
4.77"
(121.2 mm)
1
0
.6
3
"
(2
7
0
m
m
)
12.59" (319.7 mm)
Mounting Hole
Mounting Hole
Lower
Door
Panel
Plugged
Holes
Unplugged
Holes
1.1"
(27.9 mm)
1.99"
(50.5 mm)
0.9"
(23 mm)
Ø0.74" (18.9 mm)
Drill or Punch-Out Holes


