Helios 3120HD Series Скачать руководство пользователя страница 18

Using the CohuONVIFDiscovery Software to Discover the Camera

•  Download the software. See Section 4.5. Run the CohuONVIFDiscovery.exe file. Click to start it. 
• 

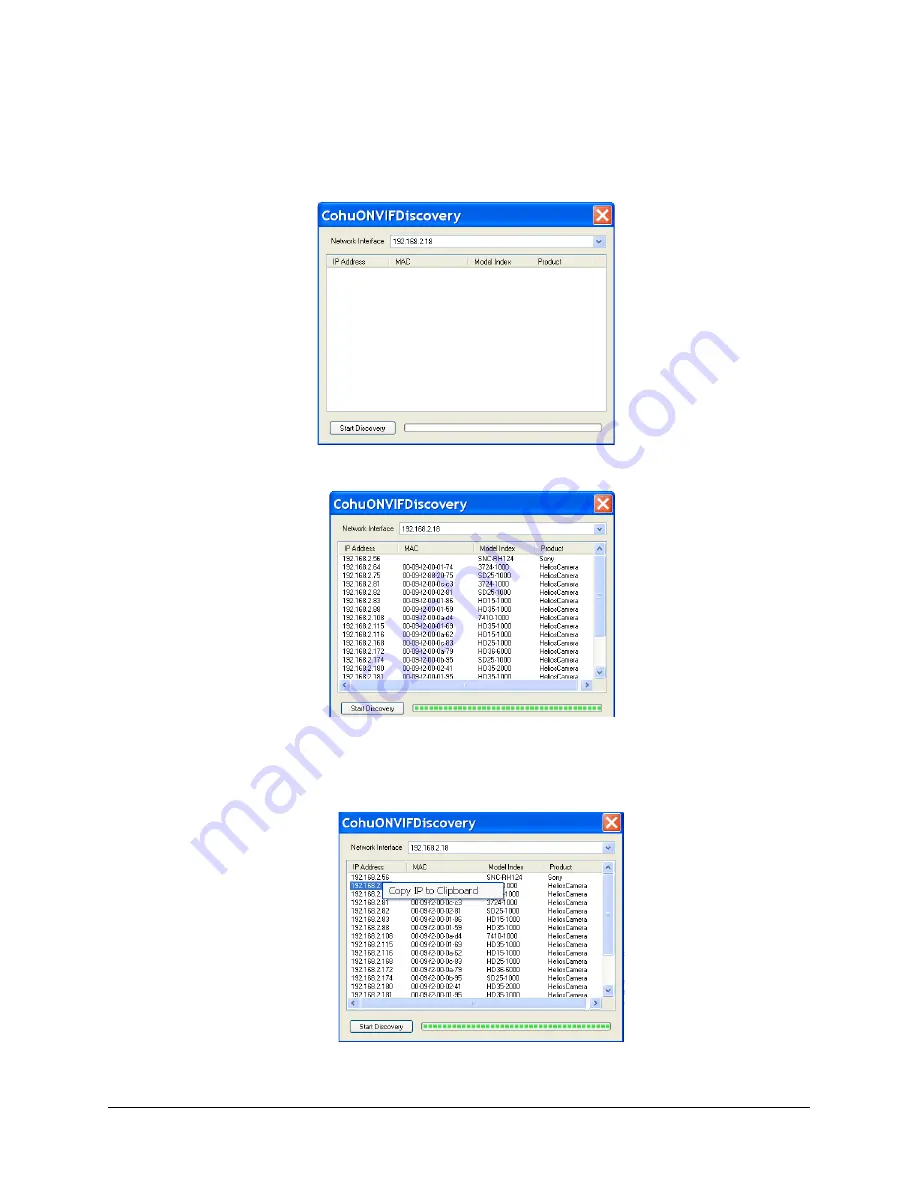
The CohuONVIFDiscovery window will be displayed. 

NOTE: 

Auto discovery feature uses network multicast packets and may not work through network rout-

ers.


• 

Click on the Start Discovery button. A list of cameras will be automatically displayed.

NOTE: 

Use the MAC Address or Model Index to identify CohuHD cameras. “00-09-f2” identifies cameras 

as CohuHD cameras. The MAC address of the camera is on the serial number label.

• 

Right click a camera entry. Click Copy IP to Clipboard.

NOTE:

 The CohuONVIFDiscovery software uses the ONVIF device discovery service. If the ONVIF discov-

ery service is disabled, the CohuONVIFDiscovery software will not find the camera. 

6X-1090J

18

Содержание 3120HD Series

Страница 1: ...HeliosTM Products OPERATION MANUAL Series 3120HD 3720HD 3920HD SD 3930HD 3960HD SD 5970SD 8800HD April 10 2014 Technical Manual 6X 1090J www CohuHD com info CohuHD com...

Страница 2: ...2 2 2 Change Password 30 2 2 3 Properties 31 2 2 3 1 Properties Applies to 3960HD 3960SD 3920HD 3920SD 3930HD 3720HD 3120HD 31 2 2 3 2 Properties Applies to 5970SD 33 2 2 3 3 Properties Applies to 880...

Страница 3: ...9 Manuals are available from the CohuHD website on specific product pages Copyright Intellectual Property Rights statement Copyright 2014 by Cohu Inc Cohu Inc has intellectual property rights to techn...

Страница 4: ...the unit is unpacked a claim for concealed damage must be made Make a mail or phone request to the carrier for inspection immediately upon discovery of the concealed damage Keep all cartons and packin...

Страница 5: ...0 1000BASE T network card installed in your computer Microsoft Internet Explorer version 8 or 9 100 1000BASE T network switch Ethernet CAT5e cable 1 3 Recommended Computer Specifications The following...

Страница 6: ...5 cable directly into the GigE port on your computer This diagram represents a typical installation Each installation site will have its own unique requirements Figure 1 Interconnection Diagram System...

Страница 7: ...Power is applied directly by the switch to the camera system This method requires the deployment of a PoE enabled switch Midspan PoE Power is supplied by an injector placed between an existing non Po...

Страница 8: ...rk Switch Power Router Switch System Cable CAT5e Router non PoE Switch PoE Injector 100 240 Vac WAN LAN Out In Default IP Address 192 168 2 150 Power Cord Grounding Stud Earth Ground Earth Ground 16 A...

Страница 9: ...installation site will have its own unique requirements Network Switch Power Router Switch CAT5e Cable Router Switch WAN LAN System Cable Default IP Address 192 168 2 150 Properly secure the camera sy...

Страница 10: ...non PoE switch NOTE If your PC has a GigE network interface you can bypass the switch and plug the camera system RJ45 cable directly into the GigE port on your computer These diagrams represent typica...

Страница 11: ...dering information The PoE injector selected for use must meet the following requirement Be compatible with the IEEE 802 3at standard For information on PoE injectors refer to the website www ieee li...

Страница 12: ...requirements Network Switch Power Router Switch CAT5e Cable Router Switch WAN LAN System Cable Earth Ground Cable Shield s Default IP Address 192 168 2 150 Properly secure the camera system before the...

Страница 13: ...vileges Set your computer IP address to the same subnet as the camera system IP address Go to Start Control Panel Network connections Local Area Connection 1 Local Area Connection dialog box will appe...

Страница 14: ...Click the OK button to close the Local Area Connections Properties dialog box and click the Close button to close the Local Area Connection dialog box General Tab Select Use the following IP address E...

Страница 15: ...camera system for starting a video stream take the following steps Log in as a local administrator on your computer Start Microsoft Internet Explorer version 8 or 9 NOTE You may need to set security l...

Страница 16: ...defined in the Helios Web Interface to allow different levels of access Those ac counts are Guest User Priv Admin For more information see Sections 2 2 1 6 and 2 2 2 IMPORTANT Upon delivery the first...

Страница 17: ...unication tab The Communications tab is used for performing network configuration of the Camera Changes to this tab can only be made by the Admin account Care must be taken when modifying parameters o...

Страница 18: ...Click on the Start Discovery button A list of cameras will be automatically displayed NOTE Use the MAC Address or Model Index to identify CohuHD cameras 00 09 f2 identifies cameras as CohuHD cameras T...

Страница 19: ...ntrol functions Control area 1 The current user level logged into the camera See Sections 2 2 1 6 and 2 2 2 2 The series number of the camera 3 Logout 4 Camera configuration control panel menu See Sec...

Страница 20: ...enter digital zoom mode Zoom out commands affect optical zoom after digital zoom is at its minimum 2 1 2 Live Video Control 1 Start Pause Live Video Button Starts pauses Live Video stream 2 Stop Vide...

Страница 21: ...gged in as the User you will be able to see two buttons Properties and Change Password If you are logged in as the Guest you will be able to see one button Change Password 2 2 1 Configuration This but...

Страница 22: ...que hostname must be assigned for both DHCP and static configurations Select Use the following IP Address to do static configuration This will allow the following values to be set manually IP Address...

Страница 23: ...and a single re ceiver and if the system does not have multicast capabilities see Note 1 and Note 2 Multicast broadcasting For a large simultaneous number of viewers and for the most efficient usage...

Страница 24: ...er modes of streaming are disabled You will need to disable the M2TS stream to re enable the RTSP media server on the cameras For more information on Constrained and M2TS Modes see Video Streaming Pro...

Страница 25: ...cast capabilities see Note 1 and Note 2 Multicast broadcasting For a large simultaneous number of viewers and for the most efficient us age of bandwidth RTP TCP Use RTSP Interleavced method to travers...

Страница 26: ...p in Large Font To bring larger font letters to the display check the Large Font button Large Font Mode Limitations OSD is available only on Stream 1 Stream 2 does not support OSD in large font Only t...

Страница 27: ...a clock with computer systems Camera Time Cannot be changed The line displays the current Camera time Sync to Two options are available PC Check the PC button to synchronize the time of the camera wit...

Страница 28: ...allowed to view and record video and control basic functions that change the video currently being displayed but cannot make changes to configuration Privileged User Priv The user is allowed to view...

Страница 29: ...ked and used again NOTE Set lockout time to zero to disable lockouts Password Life The amount of time before the password will expire and a new password must be established in order for a user to logi...

Страница 30: ...button from the Home page Click the Change Password button from the drop down list Enter one of use names into the test field Admin Priv User Guest Typer the current password for the user level and th...

Страница 31: ...e inserted into the light path Note 1 When changing from either color or monochrome mode to the auto mode there will be approximately a ten second delay before the automatic mode is en gaged Note 2 Au...

Страница 32: ...n EIS must be off to allow integration slow shutter speed Select 5Hz or 10Hz from the pull down menu Backlight Compensation Alters the automatic exposure control programming to prevent a bright backgr...

Страница 33: ...camera This fundamental cali bration primarily addresses the quality area of the image A supplemental offset calibration produces an additional array of offset coefficients to further correct for the...

Страница 34: ...the video display in Invert mode Invert is used when mounting the camera upside down Revert The normal image is flipped horizontally The pixel on the upper right corner of the detector array is displ...

Страница 35: ...cted from all subsequent images While the External FFC produces the most uniform results it is not always possible to view a uniform blackbody source when the camera is installed Some customers have f...

Страница 36: ...igh level of contrast it will use much less gain than the maximum gain setting The default value is 15 640 x 480 and 8 320 x 240 AGC Adjustment tips Lowering the Plateau Value results in a somewhat da...

Страница 37: ...o will cease and the frozen frame will persist To return the camera to live video select Real Time video mode Settings Save Stores current settings permanently Recall Resets the settings to the previo...

Страница 38: ...es made to one parameter may be automatically compensated for by the other For example in auto iris mode manually changing the shutter speed may not appear to make a difference in the video output fro...

Страница 39: ...k the button to remove flicker in a 50Hz environment 60Hz Check the button to remove flicker in a 60Hz environment 2 2 3 3 5 Imaging Settings Image appearance can be adjusted in the range of 0 100 by...

Страница 40: ...ge The page provides information about the camera current software version and component versions Follow instruc tions on the page to upgrade your firmware and web interface ver sions Download the des...

Страница 41: ...Upgrade button CAUTION Make sure to install the correct file of the firmware dur ing the upgrade process CAUTION The upgrade process takes approximately 12 minutes Do not interrupt it A series of scr...

Страница 42: ...Web Update button CAUTION Make sure to install the correct file of the Web Inter face during the upgrade process CAUTION The upgrade process takes approximately 2 minutes Do not interrupt it A series...

Страница 43: ...anual Focus Allows user to toggle the focus control between automatic and manual The indica tor next to the button shows the reported status of the camera Zoom In Press the In button to zoom until zoo...

Страница 44: ...to set the camera to the max field of view Focus Near Far Press the Near or Far buttons to control focus Iris Open Close Press the Open or Close buttons to adjust the iris Selecting Open places the ir...

Страница 45: ...g on the Delete button Click on the Append or Insert buttons to add the preset positions to the tour Enter the dwell time in seconds for each checked preset For 3120HD and 3720HD the dwell time is the...

Страница 46: ...70SD 3720HD 8800HD 3120HD Privileged User and Administrator are allowed to establish presets Presets are predefined pan tilt zoom focus camera views that are stored in the camera The camera system sup...

Страница 47: ...be active Dwell Time Type time between cycles A cycle is 2 3 wipes The time can be set from 0 to 99 seconds 1 65 minutes Set Times Click the button to send settings to the camera Wiper Check the butt...

Страница 48: ...ined pan position specified to be the zero degree point Azimuth position set as North is normally set to true north Compass display can be enabled or disabled by the user Compass display can be enable...

Страница 49: ...elect the Sector Privacy Zone element from the pull down menu Save or Apply configuration Close the configuration window Click the Sector button from the camera configuration control menu Select the d...

Страница 50: ...he OSD button Select the Sector Privacy Zone element from the pull down menu Save or Apply configuration Close the configuration window Click the Privacy button from the camera configuration control m...

Страница 51: ...e The Back Focus distance for the color day mode is factory calibrated and does not typi cally need to be recalibrated However if it isnecessary the following procedure can be used to calibrate the Ba...

Страница 52: ...widest angle of view of the 8800HD camera which may result in the illu minator producing a bright white circle of light as the lens is zoomed towards the widest position 7 Adjust Back Focus Near and F...

Страница 53: ...vents window with four tabs External I O See Section 2 14 1 FTP and Email See Section 2 14 2 Auxiliary See Section 2 14 3 Event Actions See Section 2 14 4 IMPORTANT In order to bring text overlays on...

Страница 54: ...e camera temporarily Click the Save button to apply the set tings and save in the camera Click on the Event Actions tab to set up the actions that are to be taken if an event occurs See 2 14 4 To set...

Страница 55: ...ate and Time begin the event on a particular date and time On Day of Week begin at the selected time on one or more days of the week To set up Periodic Event Click on the Auxiliary tab Configure the I...

Страница 56: ...actions that will be triggered by the occur rence of a Helios camera event The list of possible events is contained in a tree view and includes external inputs periodic timer events and pressure For...

Страница 57: ...f view FOV See notes below for additional restrictions To edit the privacy mask Choose the desired mask from the pull down menu The camera will move to the mask location Draw a mask in a different loc...

Страница 58: ...mask color codes are Green Editing mode Blue Active mode Privacy masks should be made twice as big as the area to be concealed Setting privacy masks is not possible if the camera tilt angle is below 4...

Страница 59: ...ROI to match the scene being viewed In images A and B the sky consumes a large percentage of the image When the ROI is set for full screen as in image A the AGC automatics respond more to the sky than...

Страница 60: ...nual is revised to add 5970SD remove 3930HD EX update Web Interface F 11 8 12 the manual is revised to add 3720HD update Web Interface include new features 30x zoom EIS defog and 0 005 lux of 720p30 3...

Отзывы: