


GETTING STARTED
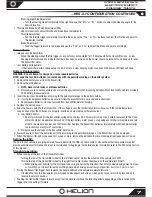
RECOMMENDED TOOLS (NOT INCLUDED)
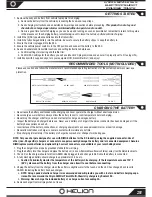
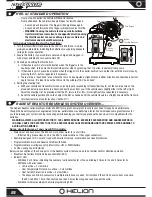
CHARGING THE BATTERY
3
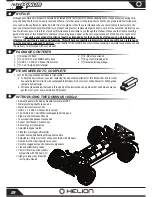
1/10th SCALE 4x4
ELECTRIC SHORT
COURSE TRUCK
Please use caution and follow the manufacturer’s recommended operating instructions for these items and always wear eye
protection.
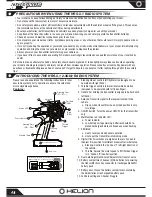
1. Remove the body and battery from vehicle to prepare for charging.
a. Remove the battery from the vehicle by loosening the hook-and-loop straps.
b. Read charging instructions and understand all warnings and cautions before proceeding.
This product is not a toy and
should not be charged, operated, or maintained without supervision of an adult.
c. Now is a good time to start charging so you can be up and running as soon as possible but remember to return to this guide
in the presence of the charging battery,
remembering never to leave the battery unattended while charging
.
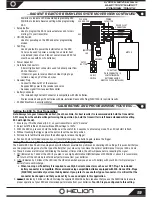
2. Install the [4] AA type alkaline batteries into the transmitter.
3. Install the fully charged battery into the vehicle, be sure to secure the battery straps to keep the battery in.
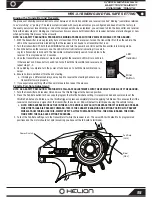
4. Ensure the motor is plugged into the ESC.
5. Ensure the vehicle power switch is in the OFF position and connect the battery to the ESC.
6. Read and understand transmitter cautions and setting instructions before use.
a. Confirm settings for steering and throttle trim.
b. Confirm ESC settings for the battery you will use (check LVC program mode and ensure it is properly set to 2 if using LiPo)
7. Install body with 4 supplied clips; turn your equipment ON (transmitter first!) and enjoy!
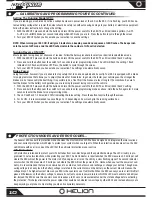
• Never leave the battery unattended while charging and never operate the charger without adult supervision.
• Never charge a warm battery, always allow the battery to cool to room temperature before charging.
• Never drop the charger or battery and do not attempt to charge a damaged battery.
• Inspect the battery and charger before use. Never use a battery or charger if the wire or connector has been damaged or if the
battery has experienced a short.
• Incorrect use of the battery, connections, or charging equipment can cause personal injury or property damage.
• Never allow batteries or charger to come in contact with moisture at any time.
• Stop charging immediately if the battery or charger becomes hot or changes form during use.
NOTE: Only use chargers designed for use with NiMH batteries for the RC industry, using the supplied connector. Use of
other (non-RC specific) chargers or connectors can permanently damage the battery and/or connected equipment. Genuine
NiMH replacement batteries and optional high current connectors are available at your local hobby dealer.
1. Plug the charger into a properly grounded standard AC wall plug.
2. Plug the battery into the charger and place the battery on/in a non-flammable surface/container away from flammable objects.
3. The LED on the charger should turn from GREEN when plugged in and change to RED once the battery is connected.
4. A fully discharged battery should charge in approximately 4-5 hours.
a.
Caution: Periodically monitor the temperature of the battery while charging, if the temperature exceeds 120°F
(49°C), disconnect the battery from the charger and allow it to cool before reconnecting.
5. Unplug the battery from the charger when the battery is slightly warm to the touch, and the LED has changed back to solid
GREEN, indicating the battery has been charged.
a.
NOTE: Using a peak detection charger is recommended and will provide you with a faster and better charging expe-
rience. We recommend the Origin NiMH or Primal Multi-Chemistry chargers by Radient RC.
b.
Warning: Never charge the included battery at a charge current exceeding 3A.
6. Remove charger from wall plug when not in use.
HOBBY KNIFE
METRIC HEX SCREWDRIVER SET
MINI SCREWDRIVERS
CURVED HOBBY SCISSORS
SIDE CUTTING PLIERS
NEEDLE NOSE PLIERS
BODY REAMER
CA GLUE
Содержание Dominius 10SCV2
Страница 24: ...000172 001 REV A HLNA0445 POWERED BY ...