Helion Dominius 10SCV2 Скачать руководство пользователя страница 10

... CALIBRATING AND PROGRAMMING YOUR ESC CONTINUED

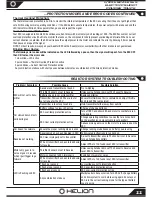
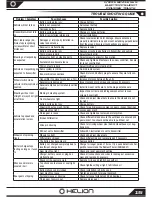
PROTECTION MODES AND ERROR CODES...

10

Setting The Running Mode (LVC):

If you are running your vehicle and notice a sudden decrease in power, look at the LED on the ESC. If it is flashing, your ESC has de-
tected battery voltage that is lower than what should be safely run without causing damage to your battery or electronic equipment. 
Follow the below instructions to change the setting.

1.  With the ESC OFF, press and hold the button and turn ON the power switch to the ESC. The LED will blink a pattern (1=OFF, 

2=LiPo, or 3=NiMH) blinks per second indicating which LVC mode you are in. Press the button to cycle through the values.

2.  Turn your ESC OFF when you have made your selection to save the settings

NOTE: When turning your ESC ON, it will give 2 indicators, a beeping sound and sequence of LED flashes. The beeps indi-
cate the current LVC mode and the LED flashes indicate the number of LiPo cells detected.

Turning Reverse ON/OFF:

Most organized racing does not allow use of reverse. Follow the below procedure to select your desired reverse/brake mode.

1.  With the ESC OFF, press and hold the button and turn ON the power switch to the ESC. The LED will blink the LVC setting.
2.  Press and hold the button near the switch for 3 seconds to enter programming mode. The LED will flash the setting. 1 flash 

indicates ON. 2 flashes indicates OFF. Press the button to cycle through the values.

3.  Turn your ESC OFF when you have made your selection. The settings are automatically saved.

Brake Force:

Going fast is fun, however if you are unable to stop safely, that fun can end quickly and be costly. Your ESC is equipped with a brake 
force program mode that allows you to adjust the amount of brake force. In general, the faster your vehicle goes, the stronger the 
brakes are, not necessarily the best thing. It is possible to do a front flip if the brakes are too strong for the conditions. Be sure to 
test the brakes for the battery configuration you are running to prevent losing control of the vehicle.

1.  With the ESC OFF, press and hold the button and turn ON the power switch to the ESC. The LED will blink the LVC setting.
2.  Press and hold the button near the switch for 3 seconds to enter programming mode as above. Hold the button again for 3 more 

seconds to enter the Brake force programming mode.

3.  The LED will flash 1-4 times (60-100%) indicating the force setting. Press the button to cycle through the values.
4.  For 3s LiPo, it is recommended to use settings 2 or 3 depending on how much grip the running surface has.
5.  Turn your ESC OFF when you have made your selection. The settings are automatically saved.

The Reaktor ESC has built in protection modes besides the most common LVC. We have designed and integrated thermal overload 
and over-current protection which helps to protect your system when you forget to. When the protection modes are active, the ESC 
will indicate with an error code on the LED that the particular protection mode is active.

LVC Protection:

LVC protection is intended to protect your LiPo batteries from over-discharge and thus potential damage. The LVC circuitry is pro-
grammed to serve two functions while protecting your ESC. The first indicator is reported when the ESC measures 3.3 Volts per cell 
where the ESC will cut the power to the motor to 50% and give an error on the LED by a slow flashing signal. The second indicator 
occurs when the ESC measures 3.2 Volts per cell where the ESC will cut the power to 0%. Hence when you feel the power cut sud-
denly, it is recommended that you drive slowly back to a safe area to shut down and recharge or change your battery. Though mea-
suring voltage is an easy task, the battery voltage is related to the current draw on the battery, as the current draw increases, the 
voltage drops. The highest current draw on you ESC is the special case of full throttle. When the ESC senses you are at full throttle it 
gives a little leeway on the battery voltage to ensure its not just a spike in power drain in which the LVC would activate and kill your 
fun. Instead the ESC knows this special case and requires a full 2 second measurement under the stated voltage before activating 
the protection. This helps eliminate the power spikes that could be considered low voltage by other ESC’s and instead allows you to 
keep enjoying your product, only alerting you when its absolutely necessary.

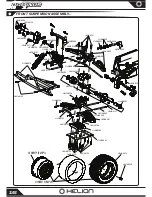
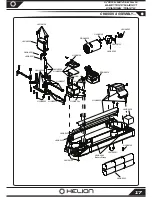
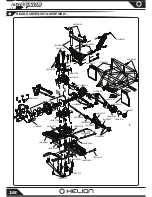
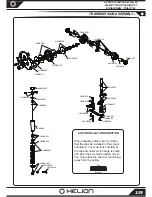
Содержание Dominius 10SCV2

Страница 1: ...ifications are subject to change without notice Due to ongoing development the actual product may vary from images shown This product contains chemicals known to the State of California to cause cancer and birth defects or other reproductive harm This product is not a toy 14 Recommended for ages 14 and up Adult supervision required for ages under 18 years old Contains small parts keep out of reach...

Страница 2: ...ure the information you need to introduce you to this form of product maintenance is available to you though this manual Please see the trouble shooting guide at the back of this manual for assistance in resolving issues either as they are experienced out of the box or as found after regular use Assuming your product functions properly as intended out of the box the best thing you can do is pay cl...

Страница 3: ...he battery and charger before use Never use a battery or charger if the wire or connector has been damaged or if the battery has experienced a short Incorrect use of the battery connections or charging equipment can cause personal injury or property damage Never allow batteries or charger to come in contact with moisture at any time Stop charging immediately if the battery or charger becomes hot o...

Страница 4: ...m careless operation Please consult your local hobby dealer with any questions or troubleshooting issues And of course don t forget to have fun you deserve it after reading through all of these safety tips 1 Steering wheel controls left right motion designed to be operated with right hand 2 Throttle trigger controls forward reverse brake motion designed to be operated with left index finger 3 Hand...

Страница 5: ...iver s LED does not turn solid red turn off both the transmitter and receiver and repeat steps 1 2 5 Once binding is complete turn the power off and back on to both the transmitter and re ceiver 6 Ensure normal operation of throttle and steering a If binding to a different vehicle you may need to reverse the steering channel on your transmitter to work properly 7 If you experience anything other t...

Страница 6: ...ER BEING DISCONNECTED WHILE PERFORMING THIS SETUP PROCEDURE AND THE WHEELS OFF THE GROUND Steering Reverse Turn the steering wheel completely to the left or right and press the REV button for at least 2 seconds to reverse the Steering ST channel The transmitter will beep once for confirmation of Normal and twice for confirmation of Reverse setting Throttle Reverse Pull the throttle trigger complet...

Страница 7: ...e is low the low battery alarm will sound If the low battery alarm sounds check that the batteries are properly inserted and are making sufficient contact a Low Battery Alarm i An alarm will sound if the transmitter voltage drops below 4 5V This alarm is meant as a safety feature only The trans mitter should not be operated below 4 5V If the low battery alarm sounds stop using your model immediate...

Страница 8: ...Reset the vehicle position and re test adjust the trim as needed until the vehicle travels in a straight line while the transmit ter wheel remains at center location hands off The Radient Reaktor series brushless motor and ESC form a great power plant to satisfy your need for speed and performance Though the Reaktor system was engineered for value performance was definitely a factor We ve included...

Страница 9: ...ll start to flash 4 Without touching the trigger press the button to set the neutral position 5 Pull and hold full throttle and press the button again release the trigger 6 Push and hold full brake reverse on your transmitter and press the button again release the trigger Using The Running Modes including Low Voltage Cut Off LVC The Reaktor ESC has 3 built in running modes with different accelerat...

Страница 10: ...e power switch to the ESC The LED will blink the LVC setting 2 Press and hold the button near the switch for 3 seconds to enter programming mode as above Hold the button again for 3 more seconds to enter the Brake force programming mode 3 The LED will flash 1 4 times 60 100 indicating the force setting Press the button to cycle through the values 4 For 3s LiPo it is recommended to use settings 2 o...

Страница 11: ...ies dead in car or transmitter Replace batteries Transmitter Trims and EPA s are too far out of range for the ESC Ensure throttle brake trim is centered and adjust throttle and brake EPA s to maximum Transmitter is too close to vehicle Hold transmitter farther away from vehicle Car slowed down drasti cally during run Battery voltage too low LVC active Charge or change batteries ESC over temp prote...

Страница 12: ...ve shaft as possible yet while providing a minimal amount of backlash Backlash is the rotation one gear has to make before contacting the other Having the gear mesh set too tight will cause excess load on the electrical components and may cause premature failure Having gear mesh set too loose will cause excess wear and possible skipping of teeth during operation thus causing excess wear and premat...

Страница 13: ... should be tightened ii When running on a surface with low traction or when running a slower motor the clutch should be loosened iii If the slipper clutch has been run with a setting that is too loose the slipper pads will experience excessive wear and may need replacement See the spare parts guide at the back of this manual for assistance with locating the parts you need to service your vehicle i...

Страница 14: ...t intended to be user serviceable Please take the time to fully inspect your product for any obvious causes to the issues you are experiencing Below are some of the most common issues experienced Scan the QR code to the right with your smart phone for quick access to the product support page on our website 1 Dead transmitter or vehicle batteries will cause the product to malfunction and not work p...

Страница 15: ...t trim straight always has right or left bias Binding in steering system Inspect and correct any binding components or loosen screws if over tight Front wheels too tight Check and adjust wheel nuts to ensure the wheels are not too tight Vehicle top speed and acceleration is slow Battery voltage too low Charge battery Drivetrain has too much friction Check for debris excessive wear on gears inspect...

Страница 16: ...29 HLNA0127 HLNA0109 HLNA0094 HLNA00287 HLNA0202 HLNA0147 HLNA0415 SILVER HLNA0417 SILVER HLNA0414 BLACK HLNA0416 BLACK HLNA0228 HLNA0418 HLNA0122 HLNA0201 HLNA0285 HLNA0246 HLNA0099 HLNA0146 HLNA0080 HLNA0198 HLNA0111 HLNA0285 HLNA0110 HLNA0300 HLNA0199 HLNA0146 HLNA0137 HLNA0151 HLNA0260 HLNA0281 HLNA0124 HLNA0142 HLNA0124 HLNA0145 HLNA0078 ...

Страница 17: ...0265 HLNA0267 HLNA0265 HLNA0264 HLNA0147 RDNA0019 HLNA0144 HLNA0264 HLNA0393 HLNA0287 HLNA0284 Battery Straps HLNA0122 HLNA0144 HLNA0435 HLNA0434 HLNA0438 HLNA0267 HLNA0139 HLNA0252 HLNA0291 HLNA0128 HLNA0266 HLNA0075 HLNA0433 RDNA0028 HLNA0123 HLNA0148 HLNA0282 HLNA0063 ...

Страница 18: ...94 HLNA0092 HLNA0199 HLNA0295 HLNA0113 HLNA0205 HLNA0117 HLNA0069 HLNA0300 HLNA0285 HLNA0112 HLNA0100 HLNA0096 HLNA0104 HLNA0101 HLNA0201 HLNA0199 HLNA0198 HLNA0146 HLNA0147 HLNA0076 HLNA0140 HLNA0076 HLNA0127 HLNA0095 HLNA0145 HLNA0113 HLNA0144 HLNA0083 HLNA0205 HLNA0082 HLNA0082 HLNA0281 HLNA0137 ...

Страница 19: ...ip and notice which edge is sharp and which has a small rounded corner You must place the sharp corner facing away from the spring Top Bottom HLNA0261 HLNA0085 HLNA0090 HLNA0091 HLNA0089 HLNA0089 HLNA0089 HLNA0088 HLNA0091 HLNA0086 HLNA0087 HLNA0146 HLNA0287 HLNA0100 HLNA0104 HLNA0101 HLNA0265 HLNA0265 HLNA0431 HLNA0115 HLNA0265 HLNA0265 HLNA0265 HLNA0265 HLNA0265 HLNA0115 HLNA0201 HLNA0231 HLNA02...

Страница 20: ...onsible manner can result in damage to the product or other properties Therefore this product is not intended for use or maintenance by children without direct adult supervision Helion RC and your hobby dealer shall not be liable for any loss or damages whether direct indirect special incidental or consequential arising from the use misuse or abuse of this product or any product required to operat...

Страница 21: ...m HLNA0144 Button Head Ph Screws BHPS M3x10mm HLNA0145 Button Head Ph Screws BHPS M3x12mm HLNA0146 Button Head Ph Screws BHPS M3x15mm HLNA0147 Button Head Ph Screws BHPS M3x18mm HLNA0148 Socket Head Cap Screws SHCS M3x8mm HLNA0150 Hinge Pin Brace Set ABCD OR DSC HLNA0198 Bulkhead Set US HLNA0199 Gearbox Set DSC2 TR IMT HLNA0200 Diff Complete 10 34 DSC2 TR IMT HLNA0201 Gear Set Diff 10 34 DSC2 TR I...

Страница 22: ...LNA0445 Owner s Manual And Exploded Views DSC2 RDNA0019 Reaktor 35 BL ESC NS WP R RDNA0028 Reaktor BL Motor NS 3500kV 2PSLS RDNA0027 3s Fan Kit Reaktor 35 HLNA0062 Pinion Gear 14T 32P Brass HLNA0064 Pinion Gear 16T 32P Brass HLNA0077 Tires Mntd SV Wheel 24mm OS SC HLNA0097 Body Dominus 10SC Blue HLNA0098 Body Dominus 10SC Red HLNA0153 Tires Mntd BK Wheel 24mm OS SC HLNA0154 Tires AT2 Mntd SV Wheel...

Страница 23: ...4mm OS SC HLNA0419 Body Volition 10SC Orange HLNA0420 Body Volition 10SC Green HLNA0421 Body Volition 10SC Clear HLNA0432 Spur Gear 54T Center Diff DSC2 IMT HLNA0444 In Out Shafts Center Diff DSC2 TR MT RDNA0001 Primal LED Multi Chemistry AC Peak Detection Balance Charger RDNA0002 Ascend LCD Multi Chemistry AC DC Peak Detection Balance Charger RDNA0003 Primal Ascend 2 3s Universal Balance Board RD...

Страница 24: ...000172 001 REV A HLNA0445 POWERED BY ...

Отзывы: