background image

www.heinner.com 


                                                              8Kg, 220-240V~50Hz


            7 


PROGRAMME PROGRESS


During the Programme 


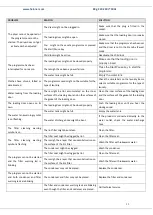
If you open the door when the programme is running, the product will switch to standby 
mode. Once the door has been closed, press the Start/Pause key to resume the 
programme.   

Do not open the loading door when the programme is running. If you have to open the 
door, do not keep it open for a long time.   

Programme End 


Once  the  programme  is  over,  the  warning  LEDs  for  Start/Pause,  water  tank  level,  filter 
cleaning and condenser cleaning will turn on. Additionally, an audible warning will be given 
at the end of the programme. You can remove the laundry to make the machine ready for a 
new load.


IMPORTANT

: Clean the lint filter after every programme. Empty the water tank after every 

programme.


IMPORTANT

: If you do not take out the laundry after the programme has ended, the 1-hour 

Anti  Crease  phase  will  automatically  be  activated.  This  programme  rotates  the  drum  at 
regular intervals to prevent creases.


Selection Stand By 


After  15  minutes  without  user  action  in  selection  mode,  machine  goes  to  energy-saving 
mode due to decrease energy consumption. In this model "- - - " must blink with 0,5 sec ON, 
3 sec OFF during energy-saving mode. At the energy-saving mode "- - - " led luminosity is 
reduced.To restart the machine it will be necessary to move selector to OFF and select again 
the program.


Содержание HCD-V804SB

Страница 1: ...CONDENSER DRYER Model HCD V804SB www heinner ro Condenser dryer Loading capacity 8 kg Energy class B ...

Страница 2: ...eep it for future reference This instruction manual is designed to provide you with all required instructions related to the installation use and maintenance of the appliance In order to operate the unit correctly and safety please read this instruction manual carefully before installation and usage II CONTENT OF YOUR PACKAGE Condenser dryer User manual Warranty card ...

Страница 3: ...ne should only be made by an authorised repair agent The manufacturer cannot be held responsible for damages resulting from un authorised repairs WARNING Never spray or pour water onto the dryer to wash it There is risk of electric shock Leave at least 3 cm of space between the side and rear walls of the product and above if you plan on placing your appliance under a worktop Assembly disassembly f...

Страница 4: ... or adapters to connect the dryer to mains power 1 2 Children s Safety This appliance is not intended for use by persons including children with reduced physical sensory or mental capabilities or lack of experience and knowledge unless they have been given supervision or instruction concerning use of the appliance by a person responsible for their safety This appliance can be used by children aged...

Страница 5: ...should not be put in the dryer The dryer may be damaged if metal reinfoircements come loose ad break off during drying 1 4 Correct Use ATTENTION Never stop a tumble dryer before the end of the drying cycle unless all items are quickly removed and spread out so that the heat is dissipated ATTENTION Make sure that pets do not enter the dryer Check the inside of the dryer before using it ATTENTION Su...

Страница 6: ...hose may cause damage 1 5 Installing On Top Of a Washing Machine ATTENTION A washing machine cannot be placed on the dryer Pay attention to the warnings below when installing the dryer on a washing machine ATTENTION The dryer can only be placed on washing machines that have a same capacity and above To use the dryer on the washing machine a fixing part must be used between the two products The fix...

Страница 7: ... on the plinth of the tumble dryer 7 The appliance must not be installed behind a lockable door a sliding door or a door with a hinge on the opposite side of the tumble dryer in such a way that blocks the full opening of the tumble dryer door 8 Once the dryer has been installed the connections must remain stable When installing the dryer make sure that the rear surface is not leaning on anything e...

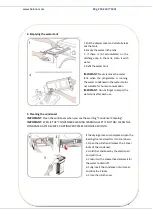
Страница 8: ... removed the hose 3 Fix the other end of the water discharge hose directly to the water outlet or sink ATTENTION The hose must be connected in amanner that it cannot be displaced If the hose comes out during water discharge there might be flooding in your house IMPORTANT The water discharge house must be installed at a height of 80cm maximum IMPORTANT The water discharge hose must not be sent betw...

Страница 9: ...ected must also be 16 amperes Consult a qualified electrician if you do not have such an outlet or fuse 3 Our company cannot be held responsible for damages resulting from usage without earthing IMPORTANT Operating your machine at low voltage values will shorten the service life and decrease the performance of your machine Under counter installation 1 Leave at least 3 cm of space between the side ...

Страница 10: ...m 8Kg 220 240V 50Hz 9 1 Upper tray 2 Control panel 3 Loading door 4 Plinth opening slot 5 Plinth 6 Adjustable feet 7 Plinth cover 8 Type cover 9 Lint filter 10 Drawer cover 11 Ventilation grills V PRODUCT DESCRIPTION ...

Страница 11: ...er than those given in 4 3 Load Capacity Do not dry thin multi layer or thick layer fabrics together as they dry at different levels For this reason dry clothes together that have the same structure and fabric type This way you can get an even drying result If you think that the laundry is still wet you can select a time programme for additional drying Please dry your big like duvets and small siz...

Страница 12: ...dry according to the textile type and drying programme Remove clips and similar metal parts from the clothes Woven goods such as t shirts and knit clothes generally shrink in the first drying Use a protective programme Do not over dry synthetics This will cause creases When washing the laundry to be dried adjust the amount of softener according to the data from the manufacturer of the washing mach...

Страница 13: ... Programme selection knob 2 Electronic indicator and additional functions 1 Programme selection knob Use the programme selection knob to select the desired drying programme 2 Electronic indicator and additional functions VII CONTROL PANEL ...

Страница 14: ...5 800 60 180 Sport 4 800 40 55 Mix 4 1000 60 75 Wool refresh 5 Refresh 10 Express 29 2 1200 50 29 Shirts 12 0 5 1200 50 12 Energy consumption values Programme Load kg Washing machine spin speed Approximate amount of remaining humidity Energy consumption values kWh Cotton cupboard dry 8 1000 60 4 68 Cotton iron dry 8 1000 60 4 1 Synthetiocs cupboard dry 4 800 40 1 58 Power consumption in the off mo...

Страница 15: ... press the button you will hear an audible warning that the option has been cancelled Time drying When knob is positioned to Time Drying programme option can be selected by pressing Time Drying option button and program starts by pressing Start Pause button Long pressing on tme dyring button changes time continuously Child lock There is a child lock option to avoid changes in the programme flow wh...

Страница 16: ...he machine will be damp Delicate This programme dries thin clothes like shirts blouses and silk garments at a low temperature to make them ready to wear Time drying To reach the required drying level at a low temperature you can use the time programmes of 10 min to 180 min Regardless of the drying level the programme stops at the desired time Baby care This programme dries delicate infant clothes ...

Страница 17: ...he end of the programme You can remove the laundry to make the machine ready for a new load IMPORTANT Clean the lint filter after every programme Empty the water tank after every programme IMPORTANT If you do not take out the laundry after the programme has ended the 1 hour Anti Crease phase will automatically be activated This programme rotates the drum at regular intervals to prevent creases Sel...

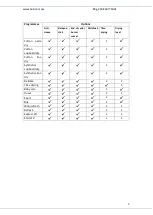
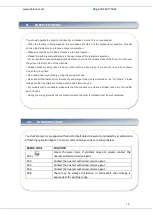
Страница 18: ...of cycle buzzer cancel Child lock Time drying Drying level Cotton extra dry X Cotton cupboard dry X Cotton iron dry X Synthetics cupboard dry X Synthetics iron dry X Delicate X X Time drying X Baby care X Duvet X X Sport X Mix X Wool refresh X X Refresh X X Express 29 X X Shirts 12 x X ...

Страница 19: ...each use To clean the lint filter IX CLEANING AND MAINTENANCE 1 Open the loading door 2 Pull up the lint filter to remove it 3 Use your hands or a soft cloth to clean the lint 4 Close and refit the lint filter After the dryer has been used for a certain period of time if you encounter a layer that will cause obstruction on the filter surface wash the filter with warm water to clean the layer Dry t...

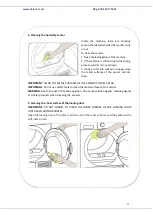
Страница 20: ... cap in the tank clean it with water 4 Refit the water tank IMPORTANT Never remove the water tank when the programme is running The water condensed in the water tank is not suitable for human consumption IMPORTANT Do not forget to empty the water tank after each use If the drying process is completed open the loading door and wait for it to cool down 1 Open the plinth and release the 2 cover locks...

Страница 21: ...ner surface of the loading door IMPORTANT DO NOT FORGET TO CLEAN THE INNER SURFACE OF THE LOADING DOOR AFTER EACH DRYING PROCESS Open the loading door of the dryer and clean all of the inner surfaces and the gasket with a soft damp cloth Inside the machine there are humidity sensors that detect whether the laundry is dry or not To clean the sensors 1 Open the loading door of the machine 2 If the m...

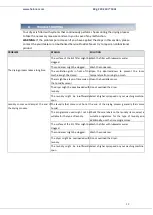
Страница 22: ... too much There might be a layer of limescale on the humidity sensor Clean the humidity sensor The dryer might be poverloaded with laundry Do not overload the dryer The laundry might be insufficiently spun Select a higher spin speed on your washing machine Laundry comes out damp at the end of the drying process The laundry that comes out hot at the end of the drying process generally feels more hu...

Страница 23: ...e inner surfaces of the loading door and the surfaces of the gasket of the loading door The loading door opens on its own The loading door might not be closed properly Push the loading door until you hear the closing sound The water tank warning symbol is on flashing The water tank might be full Empty the water tank The water discharge hose might be bent If the product is connected directly to the...

Страница 24: ...drying process Hairs and lint that detach from the laundry and merge in the air are collected by the Lint Filters Please make sure that the filters are cleaned before and after each use For models with a condenser make sure that the condenser is cleaned at least once a month or after each 15 uses During the drying process the environment where the dryer is installed must be well ventilated Your tu...

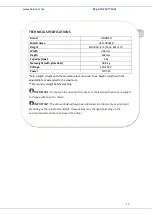
Страница 25: ...eight Height with the adjustable feet not used Max height Height with the adjustable feet extended to the maximum Dry laundry weight before washing IMPORTANT To improve the quality of the dryer technical specifications are subject to change without prior notice IMPORTANT The values declared have been obtained in a laboratory environment according to the relevant standards These values may change d...

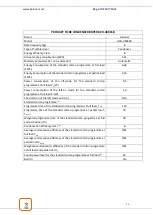
Страница 26: ...the standard cotton programme at full load PL W 1 0 The duration of the left mode on min N A Standard cotton programme 3 Programme time of the standard cotton programme at full load Tdry 129 Programme time of the standard cotton programme at partial load Tdry1 2 76 Weighted programme time of the standard cotton programme at full and partial load Tt 99 Condensation efficiency class 4 B Average cond...

Страница 27: ...ribution SRL Other brands and product names are trademarks or registered trademarks of their respective holders No part of the specifications may be reproduced in any form or by any means or used to make any derivative such as translation transformation or adaptation without permission from NETWORK ONE DISTRIBUTION Copyright 2013 Network One Distibution All rights reserved www heinner com http www...

Отзывы: