background image

28 


Cattle clipper Xperience

6 Operation

6.1 Requirements at the place of use

•  Observe the operating instructions (see chapter 

Specifications

).

•  Outdoor electrical sockets must be fitted with a residual current device (RCD).
•  The work place must have adequate lighting.
•  The electrical socket must be easily accessible so that the device can be quickly 

disconnected from the mains.

•  The cable must not be taut or kinked.
•  Make sure there is adequate ventilation.

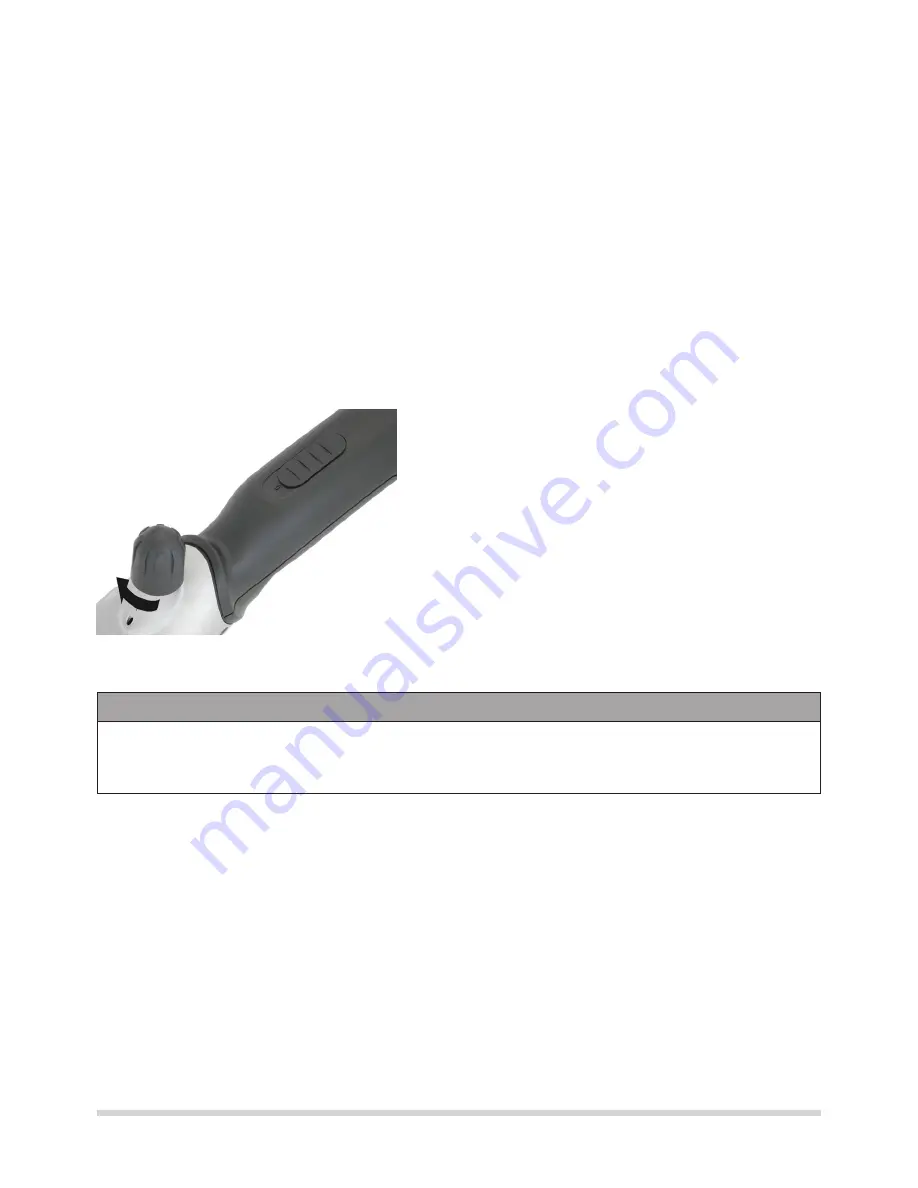
6.2 Adjusting the clipping pressure

Fig. 3 

Set the clipping pressure as follows before you start 

clipping:


‹

Turn the adjusting knob in the direction of the 

arrow until you feel resistance.


‹

Turn the knob another 1/4 turn in the direction 

of the arrow.


‹

If the clipping quality deteriorates, increase the 

clipping pressure by turning the adjusting knob 

another 1/4 turn in the direction of the arrow. 

If this does not produce the desired result, the 

blades must be replaced or sharpened.

NOTE


If the clipping pressure is too low, hair can gather between the clipping blades. This 

results in a poor clipping quality. In this case, clean the clipping blades as described in 

chapter 6.7.

Содержание Xperience/D

Страница 1: ...F Tosatrice Istruzioni per l uso I Esquiladora para ganado Manual de instrucciones E Vee scheermachine Bedieningshandleiding N Kreaturklipper Driftsvejledning D Klippmaskin f r stora djur Bruksanvisn...

Страница 2: ...pecifications 25 4 Design and function 26 4 1 Design 26 4 2 Functional description 26 5 Transport packaging and storage 27 5 1 Box contents 27 5 2 Packaging 27 5 3 Storage 27 6 Operation 28 6 1 Requir...

Страница 3: ...resulting from usage that could be valuable in improving our products 1 3 Limitation of liability All statements and tips in these operating instructions were assembled by taking into consideration ap...

Страница 4: ...damage If the dangerous situation is not avoided it can lead to property damage To avoid the danger follow the instructions shown NOTE This advice designates additional information that simplifies ope...

Страница 5: ...is plugged in Store the clipper out of reach of children 2 2 Personnel requirements This clipper may only be operated by persons who one can expect to carry out their work responsibly Persons whose ab...

Страница 6: ...nt of a damaged power cord Before plugging the clipper in compare the electrical connection data voltage and frequency on the nameplate with that of your electric mains These data must be identical so...

Страница 7: ...blades Do not touch the area around the clipping blade while it is still plugged into a power source even when the device is turned off For work on the clipping blade clipping head always disconnect...

Страница 8: ...t wear rings necklaces or other jewellery Work gloves to protect against injury The acoustic emission while operating the device is typically 70 dB A We recommend that you always wear ear protection w...

Страница 9: ...which is closest to the animal s skin is fixed and attached to the housing The upper blade 3 moves back and forth against the lower blade The upper blade is set in motion with the help of a swivellin...

Страница 10: ...ing The return of the packaging saves raw materials and reduces the volume of waste Dispose of packaging materials that are no longer needed in accordance with locally applicable regulations 5 3 Stora...

Страница 11: ...ng the clipping pressure Fig 3 Set the clipping pressure as follows before you start clipping Turn the adjusting knob in the direction of the arrow until you feel resistance Turn the knob another 1 4...

Страница 12: ...he power plug into the socket Switch the clipper on while you are in the visual range of the animal Observe the animal s behaviour while clipping Switch the clipper off after you have finished clippin...

Страница 13: ...he clipping blade Fig 7 NOTE Make sure the clipping blades are positioned correctly when installing the new or sharpened blades Fig 8 Place the new upper blade onto the guiding tips of the swivelling...

Страница 14: ...Fig 10 To obtain a well clipped animal and to increase the life of the device including the clipping head it is necessary to apply a thin coat of oil between the upper and lower blades All other movin...

Страница 15: ...uitable for cooling the clipping blades Immediately replace damaged or notched blades in order to avoid injuries 6 7 Cleaning Housing of the clipper Clean the housing of the clipper with a dry cloth C...

Страница 16: ...haft worn insufficient lubrication Upper blade does not move Defective gear Notify customer service Adjusting knob is jammed Thread is dirty or rusty Notify customer service Pressure spring is jammed...

Страница 17: ...ressure Clipping head has too much play Notify customer service Clipping blades are not properly aligned Align the clipping blades correctly see Fig 9 Motor unit heats up Air filter clogged Clean or r...

Страница 18: ...2 42 Carbon spring pair 1 11 Leaf spring 2 43 PH screw M4x10 1 12 Swivelling lever 1 44 Impeller 1 13 Comb plate screw Cattle horse 2 45 Carbon brush 230 V 1 14 Centring sleeve 2 46 Motor bracket 4 1...

Страница 19: ...206 Viehschermaschine Xperience 2 3 4 5 6 7 8 9 15 12 10 13 17 18 19 16 1 30 31 32 51 50 34 35 36 37 39 38 46 52 47 52 49 48 42 44 43 41 37 40 45 52 33 52 14 11 53...

Страница 20: ...s piece of equipment complies with directive 2006 95 EC incl amendments 2004 108 EC incl amendments 93 68 EEC 92 31 EEC Cet appareil se conforme aux directives suivantes 2006 95 CE et annexes 2004 108...

Страница 21: ...nr Serie nummer Sarjanro Kaufdatum Date of purchase Date d achat Data di acquisto Fecha de compra Data de compra Datum van aankoop K bsdato K pdatum Kj psdato Ostop iv Stempel und Unterschrift Stamp a...

Отзывы: