background image

2

3

• 

Check if the voltage indicated on the nameplate of the appliance corresponds to the local mains 

voltage before you connect the appliance.

• 

Do not use the heater close to curtains and other combustible materials.

• 

Do not touch the appliance. Caution! Risk of scald injury!

• 

In case of improper use, there is a risk of electrical shock and/or fire hazard. Operation of the 

appliance must be discontinued and remove the mains plug immediately. Do not try to repair the 

appliance by your-self. Please contact with the service agent or a suitably qualified electrician for 

maintenance.

Maintenance and cleaning

• 

Disconnect the plug from the socket before cleaning or when the product is not in use for prolonged 

periods of time.

• 

Do not clean the product until 60 minutes after it is turned off.

• 

When cleaning, do not spray cleaners or water directly into the product.

• 

Apply the cleaner on a cloth and wipe the product.

• 

Regularly check the cord for damages and ensure that the plug is clean.

• 

If the power cord, lamp or other electrical parts needs replacing, this must be done only by a 

professional electrician.

Troubleshooting

Follow the troubleshooting steps listed below:

• 

Make sure the power cord is connected correctly.

• 

Check the cable for any ruptures.

• 

Make sure the ON/OFF switch has been switched OFF.

• 

Check whether the bulb has blown.

• 

If the product is turned off due to overheating caused by improper use (overheat sensor), the product  

must be disconnected from the socket outlet and cool off. Check the product for defects after 30 

minutes of cooling. If there are no visible defects, try to reconnect the product again. Please contact 

the place of purchase if this did not solve your problem.

Storage

• 

Do not route the cord when heater is in storage, or the heater is not in use. 

Disposal


European directive 2002/96/EC on Electrical and Electronic Equipment Waste (WEEE), requires  


that old household appliances are not thrown into the normal municipal waste stream. The  


appliances should be collected separately to maximize the recovery and recycling of materials  


and reduce the impact on human health and the environment. The symbol of the “crossed off  


dustbin” is stamped on the product to recall the obligations of the separate collection. Consum 


ers should contact their dealer or local authorities regarding the procedure to be followed for  


the removal of their product.

Customer Service 

• 

Repairs must be carried out by authorized specialists, thus ensuring electrical safety. 

• 

Please contact with the service agent or a suitably qualified electrician. 

• 

Improper repairs could lead to danger to the user.

• 

This warranty does not cover damage of failure which results from alteration, accident, misuse, 

abuse, neglect, or improper maintenance. 

• 

In line with our policy of continuous product development we reserve the right to change the product 

and documentation specifications without notice.

GB

Содержание ECO pro-line 2300W

Страница 1: ...1 Good for you and the environment Instructions Brugsanvisning Instruktions manual Ohjeet ECO pro line 2300W 5 Year Warranty...

Страница 2: ...the heater is to be permanently connected to an electrical outlet installation must be carried out by an authorized electrician The heater can only be connected to a timer that will switch off the dev...

Страница 3: ...uct is turned off due to overheating caused by improper use overheat sensor the product must be disconnected from the socket outlet and cool off Check the product for defects after 30 minutes of cooli...

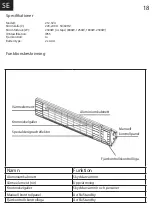
Страница 4: ...s Battery type 2 x AAA Function instruction Name Function Aluminium body Cover the heater Heating element Heater Chrome Nickel grill Avoid damage Remote control eye Turn on off standby Manual control...

Страница 5: ...panel Appliance Connect the plug to the earthed outlet The supply ky on the right side is turned on Your device will be intiated Switching off the appliance As you turn off the heater first turn off...

Страница 6: ...cover of the battery compartment and put two new batteries according to the instructions on the battery compartment marked with the and polarity symbols Replace the batteries as described above CAUTI...

Страница 7: ...m high to avoid touching the heater during use Before drilling make sure that there are no cables or any water pipes in the area where the heater is to be installed The heater must be connected with...

Страница 8: ...eating projection This table is prepared for model 212 324 Your appliance may not feature some functions specified in the table Model A B C H S 212 324 3 2 m 4 6 m 2 m 2 5 m Up to 13 m2 Heating projec...

Страница 9: ...sevarmeren n r alle kabler er tilsluttet korrekt Terrassevarmeren m kun tilsluttes en timer der slukker for enheden efter den indstillede tid Tilslut ikke terrassevarmeren til en timer der starter ter...

Страница 10: ...e brud S rg for at ON OFF kontakten er slukket Kontroller om r ret er spr ngt Hvis produktet er slukket p grund af overophedning for rsaget af forkert brug overophednings f ler skal produktet skal kob...

Страница 11: ...AA Funktions beskrivelse DK Navn Funktion Aluminium cover Beskytter varmeelement Varmeelement r r Opvarmning Beskyttelsesgitter Krom Nikkel Beskytter varmeelement og personer Manuel krontrolpanel T nd...

Страница 12: ...etjening af produktet S t stikket i dit 230 volt v gudtag S t on off knappen p 1 Tryk p varmetrinsknappen 1 4 og din terrassevarmer t ndes Slukke for produktet Start med at slukke p On Off knappen p p...

Страница 13: ...en skydes tilbage batterierne is ttes V r opm rksom p polaritet plus til plus og minus til minus S t d kslet p igen DK Knap til reducering til minium trin ON OFF knap ge varmen Maksimum varme reducere...

Страница 14: ...ontering af terrassevarmeren er 180 cm F r der bores huller til ops tning v r opm rksom p at der ikke er kabler eller r r i v ggene Terrassevarmeren monteres tilsluttes med de medleverede montering og...

Страница 15: ...Varmespredning Denne table er for model 212 324 Dit apparat har muligvis ikke alle funktioner der er angivet i tabellen nedenfor Model A B C H S 212 324 3 2 m 4 6 m 2 m 2 5 m op til 13 m2 Varmespredn...

Страница 16: ...llationen utf rs ska str mmen alltid avbrytas Sl f rst p terrassv rmaren n r alla kablar har anslutits korrekt Terrassv rmaren f r endast anslutas till en timer som st nger av enheten efter den inst l...

Страница 17: ...odukten vara bortkopplad fr n v gguttaget och svalka Kontrollera produkten f r fel efter 30 minuter av kylning Om det inte finns n gra synliga skador f rs k att teransluta produkten again V nligen kon...

Страница 18: ...eri type 2 x AAA Funktionsbeskrivning Namn Funktion Aluminiumkabinett Skyddar v rmr r V rmeelement r r Uppv rmning Kromnickelgaller Skyddar v rmr r och personer Manuell krontrollpanel Av P Standby Fj...

Страница 19: ...g av produkten S tt sladden i ditt 230 volt v gguttag S tt p avknappen p 1 Tryck p v rmeniv knappen 1 4 och din terrassv rmare s tts p St nga av produkten B rja med att st nga av med p avknappen p pro...

Страница 20: ...na s tts i Var uppm rksam p polaritet till plus och till minus S tt p luckan igen OBS Anv nd inte gamla eller olika sorters batterier Knapp som s nker till v rmeniv 1 P Av knapp Knapp som h jer v rmen...

Страница 21: ...av terrassv rmaren r 180 cm Innan det borras h l till upps ttning var uppm rksam p att det inte finns kablar eller r r i v ggarna Terrassv rmaren monteras ansluts med de medf ljande monterings och in...

Страница 22: ...22 V rmespridning Model A B C H S 212 324 3 2 m 4 6 m 2 m 2 5 m op til 13 m2 V rmespridning S SE...

Страница 23: ...orasiaan Jotta v ltytt isiin paloriskilt henkil vahinkoriskilt ja s hk iskun riskilt pit l mmitint k ytett ess aina noudattaa t m n ohjeen kaikkia turvallisuusohjeita mukaan lukien seuraavat L mmitin...

Страница 24: ...o vaurioiden varalta Varmista ON OFF kytkimen asento Tarkista onko infrapunal mmittimen lamppu palanut Mik li infrapunal mmitin on ylikuumentumisen takia sammunut irrota verkkojohdon pistotulppa pisto...

Страница 25: ...mi Toiminto Alumiinikapiniini Suojaa l mp elementti L mp elementti L mmitys kromi Nikkeli ristikko Suojaa l mp elementti ja ihmisis Kontrolli ikkuna kaukos timelle P ll valmiustila Pois Manuaalinen oh...

Страница 26: ...oke 230 voltin pistorasiaan Aseta On Off painike asentoon 1 Paina l mmitysteho painiketta 1 4 ja terassil mmitin kytkeytyy p lle Tuotteen sulkeminen Aloita sulkemalla ensin tuotteen On Off painike ja...

Страница 27: ...en takana oleva kansi liu utetaan taaksep in ja paristot asetetaan paikoilleen Huomioi napaisuudet plus ja miinus Aseta kansi takaisin paikalleen HUOMIO l k yt vanhoja tai erityyppisi paristoja L mm n...

Страница 28: ...men asennuksen v himm iskorkeus on 180 cm Ennen kuin poraat reiki asennusta varten huomio ett seiniss ei ole kaapeleita tai putkia Terassil mmitin on asennettava liitett v mukana toimitettuihin asennu...

Страница 29: ...29 L mm n levi minen Model A B C H S 212 324 3 2 m 4 6 m 2 m 2 5 m Up to 13 m2 L mm n levi minen S FI...

Страница 30: ...30...

Страница 31: ...31...

Страница 32: ...Imported by importeret af NSH NORDIC A S Virkefeltet 4 8740 Br dstrup Danmark www nshnordic com Art no 212 324...

Отзывы: