Heat & Glo RHW-51 Скачать руководство пользователя страница 22

22

35037 Rev F

12/03

RHW-51 FIREPLACE INSTALLATION INSTRUCTIONS

Note:


 Save and pass this instruction manual to subsequent home owners. The informa-

tion provided is intended to notify and warn them about making unsafe future modifications

such as the addition of shelves or the use of unauthorized parts and repairs.

WARNING!

DO  NOT  operate  this  fireplace  with  the  flue

damper  in  the  closed  position.  Combustion

products must vent up the chimney system to

prevent  carbon  monoxide  poisoning,  and  to

prevent hot combustion gases from contacting

and overheating combustible surfaces. Failure

to operate this fireplace with the damper in the

open position may result in asphyxiation or a

structure fire.

CAUTION:

Fireplace operation does require air. Do not take

air from other fuel burning appliances which can

result in improper venting (smoking) or air di-

lution. Always provide adequate makeup air.

H. OPERATING INSTRUCTIONS

1. General Information

This fireplace is intended to operate as a supplemental

heat  source  for  a  single  room.  It  is  not  designed  to

function as a primary heat source for a structure.
Fireplaces, as well as other woodburning appliances,

have been used safely for many years. It has been our

experience that most problems are caused by improper

installation and operation of the fireplace. Make certain

that installation and operation of the fireplace system

is in accordance with these instructions.
It  is  extremely  important  that  the  fire  be  supervised

whenever  the  fireplace  is  in  use.  It  is  also

recommended that an annual inspection be performed

on the fireplace system to determine if the flue system

needs to be cleaned, or as in the case of any appliance,

if minor repairs are required to maintain the system in

top operating condition.
This factory built fireplace is intended for use with either

solid fuel (firewood) or a decorative gas appliance that

has  been  tested  and  listed  to  the 

Standard  for

Decorative  Gas  Appliances  for  Installation  in

Vented  Fireplaces, ANSI  Z21.60

.  When  operating

your fireplace, the flue damper must be in the open

position.
This fireplace was not tested and listed for use with an

unvented gas log heater. Do not install an unvented

gas log heater in this fireplace and operate it with the

flue damper in the closed position unless the unvented

gas log heater has been specifically tested and listed

for use in this fireplace by Underwriters Laboratories

Inc.

Use of an unvented gas log heater in this factory

built  fireplace  may  create  a  fire  hazard  that  can

result in a structure fire.

2. Outside Air

A  source  of  air  (oxygen)  is  required  in  order  for

combustion to take place. Whatever air is consumed

by  the  fire  must  be  replaced  through  cracks  around

windows,  under  doors,  etc.  Most  newly  constructed

houses or existing homes fitted with tightly sealed doors

and windows are relatively air tight. In this case, an

outside  air  source  must  be  made  available  to  feed

combustion air from outside the home.
A  damper  control  handle  allows  you  control  of  the

outside air inlet if your fireplace is equipped with this

option.  Use  of  outside  air  for  combustion  is  highly

recommended  to  conserve  heated  air  within  the

structure  and  to  provide  make  up  air  to  keep  the

fireplace venting properly.
This  fireplace  will  operate  correctly  only  if  adequate

ventilation  is  provided  to  allow  proper  draft  to  the

fireplace  system.  Hearth  &  Home  Technologies

assumes  no  responsibility  for  the  improper

performance  of  the  fireplace  system  caused  by

inadequate draft due to environmental conditions, down

drafts,  tight  sealing  construction  of  the  structure,  or

mechanical  exhausting  devices  which  create  a

negative  air  pressure  within  the  structure  where  the

fireplace is located.
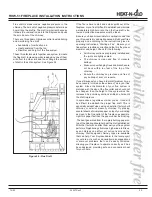
3. Flue Damper

The flue damper must be in a full open position, and is

operated by moving the handle up toward the top of

the  fireplace.  Before  lighting  the  fire,  verify  this  by

looking  up  from  the  inside  of  the  fireplace. Always

operate  this  fireplace  with  the  damper  fully  open.

Please  note:  down  drafts,  obstructions,  damaged  or

poor (wet) fuels can cause smoke spillage.

Содержание RHW-51

Страница 1: ...r installation adjustment alteration service or maintenance can cause injury or property damage Refer to this manual For assistance or additional information consult a qualified installer service agency or the gas supplier Note An arrow Æ found in the text and in the index signifies change in content ...

Страница 2: ...related problems that may result from the lack of adequate combustion air It is the responsibility of the builder contractor to ensure that adequate combustion air has been provided for the fireplace 4 The fireplace must be installed with the Hearth Home Technologies SL Series Chimney System The chimney system must always terminate outside the building Be sure to follow all chimney specifications ...

Страница 3: ...age of the home If you desire to put a fireplace in your basement we recommend that you consider a direct vent gas fireplace Basements always have a significant negative air pressure that causes the fireplace system to be more susceptible to smoke spillage and cold flue backdrafting Since direct vent gas fireplaces are sealed they are not affected by the negative pressure that exists in basements ...

Страница 4: ...arances must be maintained at all times The illustrations and diagrams used throughout these installations instructions are not drawn to scale Figure 1 Typical Fireplace System B DESCRIPTION OF THE FIREPLACE SYSTEM This fireplace system has been tested and listed in accordance with UL 127 standards and has been listed by Underwriters Laboratories Inc for installation and operation in the United St...

Страница 5: ...i F 2 4 3 1 M D k c a l B w e i V r a e l C d l o f i B s r o o D s s a l G B 2 4 3 1 M D s s a r B d e h s i l o P w e i V r a e l C d l o f i B s r o o D s s a l G S 2 4 3 1 M D l e e t S s s e l n i a t S w e i V r a e l C d l o f i B s r o o D s s a l G 4 X H n o i s n e t x E h t r a e H 9 R G e c a l p e r i F h t i w d e d u l c n i e t a r G l a r g e t n I HX4 Hearth Extension GR9 Integra...

Страница 6: ...L S g n o l 8 4 n o i t c e S y e n m i h C 1 1 L S r e z i l i b a t S y e n m i h C 0 3 1 1 L S 0 3 n r u t e R t e s f f O y e n m i h C 8 3 5 S F t h g i a r t S p o t s e r i F 0 4 5 S F 0 3 p o t s e r i F 0 1 S A 4 2 d l e i h S n o i t a l u s n I c i t t A t h g i a r t S 7 7 5 B J d n a B t n i o J y e n m i h C 6 7 5 B C t e k c a r B y e n m i h C 0 7 5 F R h c t i P 2 1 6 o t t a l F ...

Страница 7: ...h t g n e l h t g n e l e v i t c e f f E s a h t i r e t f a t r a p y e n m i h c r e h t o n a o t d e p p a n s n e e b SL11 Chimney Stabilizer SL1130 Offset Return RF570 Roof Flashing Flat to 6 12 Pitch RF571 Roof Flashing 6 12 to 12 12 Pitch CB576 Chimney Bracket JB577 Joint Band AS10 Straight Attic Insulation Shield g o l a t a C A B 8 3 5 S F 0 7 1 0 4 5 S F 0 3 6 2 Chimney Sections Firest...

Страница 8: ...INSTALLATION INSTRUCTIONS LDS33 3 x 3 LDS46 4 x 6 Decorative Shroud ST1175 Square Termination Cap CT56 Chase Top CAK5A Chimney Air Kit TR11T Round Telescoping Termination Cap TR11 Round Termination Cap TCT1175 Terra Cotta Termination Cap Æ ...

Страница 9: ...cations and Space Requirements Several options are available to you when choosing a location for your fireplace This fireplace may be used as a room divider installed along a wall across a corner or used in an exterior chase See Figure 2 Locating the fireplace in a basement near frequently opened doors central heat outlets or returns or other locations of considerable air movement can affect the p...

Страница 10: ...f the fireplace assuming combustible materials are used All required clearances to combustibles around the fireplace must be adhered to Any framing across the top of the fireplace must be above the level of the top standoffs Chimney sections at any level require a 2 minimum air space clearance between the framing and chimney section 3 Sidewalls Surrounds Adjacent combustible side walls must be loc...

Страница 11: ...1 1 1 2 4 4 5 8 1 3 2 5 8 8 4 1 1 7 2 5 5 1 9 2 5 8 9 5 1 1 2 3 5 8 4 6 1 1 5 3 5 8 9 6 1 1 8 3 3 7 5 8 2 1 1 4 8 7 1 1 1 4 4 5 8 5 8 1 1 7 4 9 8 1 8 1 1 1 0 5 5 8 5 9 2 n a n i s t l u s e r s t r a p y e n m i h c d e l o o c r i a f o y l b m e s s a r e p o r P o t n i t l i u b s i h t g n e l e v i t c e f f E 1 f o s t n i o j y e n m i h c t a p a l r e v o e l b a t s i h t Offset Returns...

Страница 12: ...replace installation d Determine the number of firestop spacers stabi lizers roof flashing etc required to complete the fireplace installation 2 Chimney Height Requirements above roof line a Major building codes specify a minimum chimney height above the roof top These specifications are summarized in what is known as the Ten Foot Rule This rule states If the horizontal distance from the side of t...

Страница 13: ...ow the instructions for framing on pages 9 and 10 Slide the fireplace into position Be sure to provide the minimum air clearance at the sides and back of the fireplace assembly 2 Place the Protective Metal Hearth Strips Included with your fireplace you will find two metal hearth strips measuring approximately 28 x 4 These strips are used to provide added protection where the fireplace and the hear...

Страница 14: ...nward until the top section meets the stop bead on the lower section The inner flue is placed to the inside of the flue section below it The outer casing is placed outside the outer casing of the chimney section below it See Figure 10 5 Install Firestop Spacers Mark and cut out an opening in the ceiling for the firestop spacer being utilized 17 x 17 for an FS538 17 x 26 for an FS540 Frame the open...

Страница 15: ...nsupported chimney length limitations that are given on page 11 under Chimney Requirements Check each section by pulling up slightly from the top to ensure proper engagement before installing the succeeding sections If they have been connected correctly they will not disengage when tested 8 Secure the Chimney System When offsets and returns are joined to straight pipe sections they must be locked ...

Страница 16: ...ollowing the instructions shipped with the cap For chase installations you can use a round termination cap TR11 a round telescoping termination cap TR11T or a square termination cap ST1175 A chase installation must use a chase top Chase tops are available from your Heat N Glo distributor See page 20 for building a chase 13 Install the Outside Air Kit The outside air kit is supplied as a standard f...

Страница 17: ... use in this specific model fireplace Unless the unvented gas log heater is tested and listed for use in this factory built fireplace a fire hazard may be created that can result in a structure fire 16 Gas Log Lighter Provisions Knockouts are provided on both sides of the fireplace to allow for connection of a certified gas log lighter or a decorative gas appliance with a maximum input of 100 000 ...

Страница 18: ...ion must be installed with all fireplaces to protect the combustible floor in front of the fireplace from both radiant heat and sparks The construction of and materials used for a hearth extension are shown in Figures 17 and 18 A hearth extension of this construction may be covered with any noncombustible decorative material and may have a maximum thickness as per the illustration Seal gaps betwee...

Страница 19: ...h materials are those consisting entirely of steel iron brick tile concrete slate glass or plasters or any combination thereof c Noncombustible Sealant Material Sealants which will not ignite and burn General Electric RTV103 Black or equivalent Rutland Inc Fireplace Mortar 63 or equivalent After completing the framing and applying the facing material dry wall over the framing a wide maximum bead o...

Страница 20: ...t the 8 level above the fireplace assembly This reduces heat loss through the chase 4 In cold climates the walls of the chase should be insulated to the level of the false ceiling as shown in Figure 21 This will help reduce heat loss from the home around the fireplace A chase is a vertical boxlike enclosure built around the chimney and fireplace A chase may be constructed for the fireplace and chi...

Страница 21: ...23 Installing a TR11T Round Telescoping Termination Cap Figure 24 Installing an ST1175 Square Termination Cap 2 Chase Top Construct a chase of desired materials maintaining a minimum 2 air space around the chimney 3 Termination Cap a Install the chimney sections up through the chase enclosure When using a TR11 round termination cap the uppermost top section of pipe must extend 6 above the top of t...

Страница 22: ...as Appliances for Installation in Vented Fireplaces ANSI Z21 60 When operating your fireplace the flue damper must be in the open position This fireplace was not tested and listed for use with an unvented gas log heater Do not install an unvented gas log heater in this fireplace and operate it with the flue damper in the closed position unless the unvented gas log heater has been specifically test...

Страница 23: ... the amount of moisture in the wood The majority of the problems fireplace owners experience are caused by trying to burn wet unseasoned wood Freshly cut wood can be as much water as it is wood having a moisture content of around 50 Imagine a wooden bucket that weighs about eight pounds Fill it with a gallon of water put it in the fireplace and try to burn it This sounds ridiculous but that is exa...

Страница 24: ...he wood to allow air to circulate freely around and through the woodpile b Elevate the woodpile off the ground to allow air circulation underneath c The smaller the pieces the faster the drying process Any piece over six inches in diameter should be split d Cover the top of the woodpile for protection from rain and snow Avoid covering the sides and ends completely Doing so may trap moisture from t...

Страница 25: ...himney is clean and free of creosote buildup Make sure overhanging trees and branches are cut back within ten feet of the top of the chimney Ensure the chimney cap is clean and free of any buildup of soot or creosote If you still suspect you have a low draft problem it may be necessary to increase the volume of air in your flue system Since the diameter of your flue system is matched with the size...

Страница 26: ...rred If creosote has accumulated it should be removed to reduce the risk of a chimney fire 3 Chimney Cleaning If you do detect a buildup of creosote contact a qualified chimney sweep or clean it yourself To do this perform the following steps a Open the damper b Hang a damp sheet across the fireplace opening to stop dirt and soot from entering the room c Remove the termination cap or housing top S...

Страница 27: ...Spacer 7 Installation 14 Flue 22 Flue Damper 22 Framing 9 10 Fuel 23 G Gas Codes 17 22 Gas Log Lighter Provisions 17 General Information 22 Glass Doors 5 19 Operation 23 Grate 5 23 H Hearth Extension 5 18 Positioning 19 I Installation Fireplace 13 In a Chase 9 In a Corner 9 In a Wall 9 Insulation Shield 7 15 J Joint Band 7 L Leveling the Fireplace 13 Listings and Code Approvals 4 Locations 9 M Mai...

Страница 28: ... During the first six 6 months after installation HHT shall at its option replace or repair the glass doors and any electrical components if operation is faulty This does not include glass panels broken during shipment misuse or careless handling After the first six 6 months HHT will sell to you FOB its factory replacement parts at the current list price but HHT SHALL NOT BE RE SPONSIBLE FOR ANY L...

Отзывы: