background image

4/20/11

Page  73

Heat & Glo • NorthStar EPA Fireplace • 480-1081E

D.   Contact Information

– NOTES –

DO NOT DISCARD THIS MANUAL

CAUTION

•  Important  operating 

a n d   m a i n t e n a n c e 

instructions included.

•  Leave this manual with 

party  responsible  for 

use and operation.

•  Read,  understand 

and  follow  these 

instructions  for  safe 

i n s t a l l a t i o n   a n d 

operation.

DO

 N

OT

DIS

CA

RD

Please contact your Heat & Glo dealer with any questions or concerns. 

For the number of your nearest Heat & Glo dealer, please visit www.heatnglo.com.

Heat & Glo, a brand of Hearth & Home Technologies, Inc. 

600 West Jefferson St. Lake City MN 55041                                                                                                                        

www.heatnglo.com

Содержание NORTHSTAR-BK

Страница 1: ... gases i e carbon monoxide NORTHSTAR EPA CERTIFIED WOODBURNING FIREPLACE Owner s Manual Installation and Operation Model WARNING Hot screen mesh and glass doors will cause burns DO NOT touch screen mesh or glass doors until cooled NEVER allow children to touch screen mesh or glass doors Keep children away CAREFULLY SUPERVISE children in same room as fireplace Alert children and adults to hazards o...

Страница 2: ...l in a sleeping room An outside combustion air inlet must be provided and unrestricted while unit is in use The structural integrity of the manufactured home floor ceiling and walls must be maintained The fireplace needs to be properly grounded to the frame of the manfactured home Components required for installation HTI SLSeries Pipe Termination Cap Hearth Extension and required accessory Chimney...

Страница 3: ... 35 A Selecting Fireplace Locations 35 B Clearances 36 C Frame the Fireplace 37 D Electrical Access Wiring 38 7 Installation of Fireplace 39 A Install the Outside Air Kit 39 B Secure the Fireplace 41 C Place Protective Metal Hearth Strips 41 8 Chimney Assembly 42 A Chimney Requirements 43 B Chimney Termination Requirements 43 C Using Offsets Returns 44 D Assemble the Chimney Sections 45 E Installi...

Страница 4: ...e In the case of new home construction warranty coverage begins on the date of first occupancy of the dwelling or six months after the sale of the product by an independent authorized HHT dealer distributor whichever occurs earlier The warranty shall commence no later than 24 months following the date of product shipment from HHT regardless of the installation or occupancy date The warranty period...

Страница 5: ...in surface finishes as a result of normal use As a heating appliance some changes in color of interior and exterior surface finishes may occur This is not a flaw and is not covered under warranty Damage to printed plated or enameled surfaces caused by fingerprints accidents misuse scratches melted items or other external sources and residues left on the plated surfaces from the use of abrasive cle...

Страница 6: ... fireplace or chimney system to overheat Warning Risk of Fire or Asphyxiation DO NOT install in sleeping room Caution Maintain structural intergrity of manufactured home Floor wall ceiling and or roof Any supporting materal that would affect the structural integrity Do NOT cut through Floor joist wall studs or ceiling trusses Warning Risk of Fire For use with solid wood fuel only Other fuels may o...

Страница 7: ...lified installer service agency or your dealer Notice This fireplace is tested and approved as a decorative fireplace It should not be factored as a primary heat source in residential heating calculations Materials which will not ignite and burn composed of any combination of the following Steel Iron Brick Tile Concrete Slate Glass Plasters Materials reported as passing ASTM E 136 Standard Test Me...

Страница 8: ...way HOT SURFACES Glass and other surfaces are hot during operation AND cool down If you expect that children may come into contact with this fireplace we recommend a barrier such as a decorative screen See your dealer for suggestions A Your Fireplace WARNING DO NOT operate fireplace before reading and understanding operating instructions Failure to operate fireplace according to operating instruct...

Страница 9: ...c Blanket and Baffle Board are NOT in contact with the back of the firebox Ceramic Blanket is NOT in contact with the back of the firebox and NOT even with the Baffle Board in the front Ceramic Blanket is bunched up at the back of the firebox and NOT even with the Baffle Board in the front Ceramic Blanket Back of Firebox Baffle Board INCORRECT POSITIONS Figure 2 3 Ensure correct baffle placement a...

Страница 10: ... hardwood for slow even heat and longer burn time Moisture content Regardless of which species of wood you burn the single most important factor that affects the way your fireplace operates is the amount of moisture in the wood The majority of the problems fireplace owners experience are caused by trying to burn wet unseasoned wood Freshly cut wood can be as much water as it is wood having a moist...

Страница 11: ...ustion air from outside the home The NorthStar Fireplace comes equipped with an outside air intake to feed combustion air from outside the home along with an outside air termination cap The 6 in 152 mm solid flex pipe is not supplied Outside air is required to minimize the effects of negative pressure within the structure It is recommended to utilize the shortest duct run to optimize the performan...

Страница 12: ...tablished then if you wish turn the fan on at a low rate The override switch and the fan speed control are hard wired at time of installation and installed in a standard wall mount with junction box on the wall G Clear Space Near the Fireplace Warning Risk of Fire Do NOT install and or use any component not approved by Hearth Home Tech nologies Inc This fireplace has been tested and listed for use...

Страница 13: ...Symptoms of over firing may include one or more of the following Chimney connector or appliance glowing Roaring rumbling noises Loud cracking or banging sounds Metal warping Chimney fire J Fire Safety Immediately close the door and air controls to reduce air supply to the fire If you suspect a chimney fire call the fire department and evacuate your house Contact your local chimney professional and...

Страница 14: ...tinuous fire throughout the season NOTICE The special high temperature paint that your fireplace is finished with will cure as your fireplace heats You will notice an odor and perhaps see some vapor rise from the fireplace surface this is normal We recommend that you open a window until the odor dissipates and paint is cured M Starting a Fire NOTICE Fireplace should be run full open for a minimum ...

Страница 15: ...T and also slide the Combustion Air Control all the way to the left NOTICE If reloading a bright hot coal bed for longer low burn time setting the ACC may not be required Burn Dry well seasoned wood NOTICE To establish your settings always begin with the air control all the way to the left to STOP and then move it to the right for your desired setting Slide Air Control Slide LEFT to Stop Stop to 1...

Страница 16: ...e to left to stop and then to right for the proper setting MEDIUM 10 000 15 000 BTU After a wood load has been burning on high for 5 to 15 minutes longer for very large pieces or wet wood Combustion Air Control left to 1 8 in 1 2 in 3 mm 13 mm distance open Move the handle to left to stop and then to right for the proper setting LOW Below 10 000 BTU After a wood load has been burn ing on high for ...

Страница 17: ...vices which will create a negative air pressure within the structure where the fireplace is located Flue draft is measured as negative pressure in the chimney The amount of negative pressure determines how strong the draft is The draft is important because it draws the com bustion air into the fireplace and pulls the smoke out of the chimney There are three basic criteria essential in establishing...

Страница 18: ...replace Doors opening and closing Window closed for start up Outside air closed Overhead fan operating Overhanging tree Bird s nest or leaves in termination cap Structural changes in chimney area Creosote buildup in flue Strong win d s a r o u nd chimney termination Unsealed can lights Combustion air control Figure 3 1 Factory built Fireplaces Troubleshooting ...

Страница 19: ...ed previously Pre warm chimney Shut off exhaust devices Open window slightly Does the kindling wood not ignite Condition amount arrangement of kindling and fuel Use more drier well spaced kindling and fuel Does the kindling ignite but the fuel doesn t Amount of kindling Condition of fuel Use more kindling Use smaller dry wood Does the fuel ignite but not burn well Draft problem Condition of fuel U...

Страница 20: ... Replace snap disc How much heat ouput do you expect Unrealistic expectations Heat output too low for square foot age Replace appliance with one with greater heat output How are air controls set Operational problems Follow manufacturer s instructions 5 The wood burns too fast What can I do Diagnostic Question Possible Causes of Condition Solutions What is the condition of the wood Extremely dry wo...

Страница 21: ... the front and back and lift the top off 4 Maintenance Servicing the Fireplace Inspection Inspect the system at the appliance connection and at the chimney top Cooler surfaces tend to build creosote deposits quicker so it is important to check the chimney from the top as well as from the bottom Figure 4 1 Chimney Termination Cap Cleaning Formation and Need For Removal When wood is burned slowly it...

Страница 22: ...ary By Homeowner Task See the following instructions Ashes should be placed in a metal container with a tight fitting lid The closed container of ashes should be placed on a non combustible floor or on the ground well away from all combustible materials pending final disposal If the ashes are disposed of by burial in soil or otherwise locally dispersed they should be retained in the closed contain...

Страница 23: ...lding additions has been maintained 4 Inspect for corrosion or separation 5 Verify weather stripping sealing and flashing remain intact 6 Inspect for creosote and remove as needed See Section 11 6 Maintenance Task List 1 Glass Replacement 9 Start screws to secure glass frames to door keeping them loose for adjusting the glass Then continue to tighten each screw alternately a few turns at a time un...

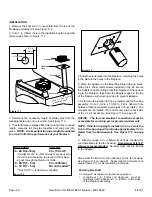
Страница 24: ... in Figures 4 3 4 4 2 Lay bottom bricks in unit 3 Install rear bricks on the top of the bottom bricks Slide top of bricks under clip on back of firebox wall and push bottom of brick back 4 Install side bricks Slide top of brick under clips on side of firebox and push the bottom of the brick until it is flush with the side of the unit 3 3 3 3 3 3 1 1 1 1 1 3 3 4 4 2 2 Brick Size Qty In Set 1 13 1 4...

Страница 25: ...ard baffle pull tube up over the air channel and out of hole at the other end It is only necessary to remove the first tube in order to remove the baffle 6 Slide fiber board baffle forward to front of fireplace and straight out through door See Figure 4 7 7 To install the fiber board baffle repeat steps 2 through 4 in reverse Be sure the fiber board baffle and ceramic blanket are pushed back fully...

Страница 26: ...t and completely remove the panel Removing the fan 1 Unplug the wire harness 2 Lift fan from locating pins and remove Repeat for second fan if necessary See Figure 4 9 3 Connect new fan wires to wire harness 4 Before installing the fan make sure the grommets are tightly in place Insert the right fan and place over the 2 locating pins Repeat for other fan Figure 4 10 5 Re install bottom panel or fi...

Страница 27: ...pry open access door in the bottom of the fireplace with a flat head screw driver Figure 4 12 6 Remove 2 screws from cover plate pull cover plate toward you Figures 4 13 4 14 Use a flat head screwdriver to pry the corner edge loose Pry toward the fireplace and then press down and out Figure 4 15 Remove 2 screws in cover plate Cover Plate Pry pointed edge toward fireplace and then down and out to r...

Страница 28: ...ss door in the floor of the fireplace Let the timer assembly drop down and then rotate it up through the access door Figures 4 18 and 4 19 Linkage Arm Slider Control Rod Linkage Arm Slider Control Rod Remove 2 bolts from timer assembly Timer Assembly with Gasket Figure 4 16 Figure 4 17 Figure 4 18 1 Loosen set screw on timer remove 2 screws and remove timer See Figure 4 20 2 Install new timer usin...

Страница 29: ...Entire Assembly for Point of Refer ence only 4 Rotate linkage control arm into final position and re attach to mounting plate Note that the D cut is now facing the linkage timer arm Re attach the linkage timer arm Figure 4 23 Item Description Qty 1 Door Linkage 1 2 Linkage Control Arm 1 3 Bushing 2 4 Washer SAE 10 2 5 Screw 8 32 x 1 2 PH PHL TC 2 6 Linkage Timer Arm 1 7 Attachment Nut Set Screw 1 ...

Страница 30: ...Page 30 4 20 11 Heat Glo NorthStar EPA Fireplace 480 1081E Date of Service Performed By Description of Service C Service Maintenance Log ...

Страница 31: ...mney if attic is insulated Storm Collar Framing headed off in ceiling joists Mantel Decorative facing and trim Protective metal hearth strip s Hearth extension Factory built fireplace Non combustible roof flashing maintains minimum clearance around chimney Additional lateral support for chimney above roof or enclosed in chase if needed Chimney system Combustible framing header on top of V shaped s...

Страница 32: ...sealing construction of the structure Mechanical exhausting devices Improper location of the chimney D Negative Pressure Warning Risk of Asphyxiation Negative pressure can cause spillage of combustion fumes and soot Fire must draft properly for safe operation Negative pressure results from the imbalance of air avail able for the fireplace to operate properly It can be stron gest in lower levels of...

Страница 33: ... attic joists Take into consideration the termination requirements in Section 8 and Section 9 Notice Locating the fireplace in a basement or in a location of considerable air movement can cause intermittent smoke spillage from fireplace Do not locate fireplace near frequently open doors central heat outlets or returns Marginal Location Below peak Location NOT recommended Not the highest point of t...

Страница 34: ...r safe operation Do NOT install dam aged incomplete or substitute components Keep fire place dry Remove fireplace and components from packaging and inspect for damage Vent system components and doors are shipped in separate packages Report to your dealer any parts damaged in shipment Read all the instructions before starting the installation Follow these instructions carefully during the installat...

Страница 35: ...allations and are FOR DESIGN PURPOSES ONLY Illustrations diagrams are not drawn to scale Actual installation appearance may vary due to individual design preference Hearth Home Technologies reserves the right to alter its products D C A E F A H G B A B B A I In an exterior chase or projecting into a garage Across a corner Along a wall As a room divider 24 in 610mm 24 in 610mm 24 in 610mm 48 in 121...

Страница 36: ...ials i e steel studs concrete boaed etc Failure to comply may cause fire 2 in 51 mm min Attic Insulation Shield Ceiling Firestop ceiling roof attic ceiling Ceiling Firestop Offset Return with hanger straps Storm Collar Roof Flashing 2 in 51 mm min 2 in min 51 mm Must have 2 in 51 mm minimum clearance to header 2 in 51 mm min 2 in 51 mm min 2 in 51 mm min 2 in 51 mm min 1 in 25mm to side of applian...

Страница 37: ...n combustible framing materials must be used above fireplace to height of 84 in 2134mm from base of fire place for all construction materials framing members sheeting and all finish materials 1 MINIMUM CLEARANCES TO COMBUSTIBLES Materials which will not ignite and burn Such materials are those consisting entirely of steel iron brick tile con crete slate glass or plasters or any combination thereof...

Страница 38: ...junction box cover plate on the bottom right side of the fireplace 2 Thread the 14 3 with ground wire through the opening with the strain relief on the cover plate 3 Match colors to wire harness red to red white to white etc and secure with wire nuts NOTICE Wiring for fans must be done before framed enclosure is completed If using a Heat Zone kit it also must be installed before enclosure is compl...

Страница 39: ...uld be positioned in a manner that will not allow snow leaves etc to block the inlet In some instal lations the air duct may need to be run vertically In such an installation a 3 ft 914 mm height difference must be maintained from the top of the uppermost chimney sec tion to the outside combustion air inlet See Figure 7 2 on page 40 See Figure 7 1 for proper placement of outside air inlet The outs...

Страница 40: ...ay from chimney Ceiling firestop on floor of attic 3 ft min from top of uppermost chimney section to air inlet Fiqure 7 2 Outside Air Inlet Locations Termination Cap supplied with fireplace 6 in 152mm metal flex or rigid pipe Open Close Knob for outside air CLOSE OPEN Figure 7 3 Outside Combustion Air Handle Location ...

Страница 41: ...terials Sparks or embers may ignite flooring Refer to Figures 7 4 and 7 5 Locate the two protective metal hearth strips measuring approximately 26 in x 4 in 660 mm x 102 mm included with this fireplace Slide each metal strip 2 in 51 mm under front edge of fireplace Overlap strips in the middle of fireplace opening by 1 in 25mm Metal strips must extend beyond the front and sides of the fireplace op...

Страница 42: ... specified Offsets returns may not exceed 30 from vertical Ceiling firestops are required where chimney passes through ceiling or floor Support straps for offsets returns must be secured to adequate framing Termination Cap Storm Collar Figure 8 1 Typical Chimney System Guidelines for Chimney System Installation 8 Chimney Assembly Notice Chimney performance may vary Trees buildings roof lines and w...

Страница 43: ... 0 FS339 0 0 FS340 0 0 Offsets Returns SL315 13 3 8 340 SL330 15 1 2 394 Roof Flashing RF370 0 0 RF371 0 0 Chimney Sections SL306 4 3 4 121 SL312 10 3 4 273 SL318 16 3 4 425 SL324 22 3 4 578 SL336 34 3 4 883 SL348 46 3 4 1187 Dimensions reflect effective height NOTICE A maximum of two pairs of offsets and returns may be used Minimum overall straight height 13 ft 3 96 m Minimum height with single o...

Страница 44: ... chimney parts result in an overlap at chimney joints of 1 1 4 in 32 mm Effective length is built into this chart Use an offset return to bypass overhead obstructions An offset and return can be used as a single entity or separated by chimney section s Warning Risk of Fire Do not use offset returns greater than 30 Chimney draft will be restricted and could cause over heating and fire Secure offset...

Страница 45: ... meets the stop bead on the lower section Pull on the top section to make sure it is fully engaged and will not separate You may use 6 or 8 sheet metal screws no longer than 1 2 in 13 mm to fasten chimney sections together Do NOT penetrate inner flue Warning Risk of Fire You MUST use screws provid ed to fasten offset returns to chimney sections to keep the chimney parts from twisting Failure to do...

Страница 46: ...ver the chimney penetrates a ceiling floor Chase construction requires ceiling firestops at each floor or every 10 ft 3 05 m of clear space The ceiling firestop slows spread of fire and reduces cold air infiltration Install a ceiling firestop whenever chimney penetrates ceiling floor Mark and cut an opening in ceiling as shown in Figure 8 7 Frame the opening with the same size lumber used in the c...

Страница 47: ... inward 90 Bend remaining tabs to rest against pipe to prevent insulation from falling in 6 Tabs bent in 90 Tabs bent in to rest against pipe Attic Insulation Shield Ceiling Firestop 10 1 2 in 267 mm 14 1 2 in 368 mm diameter Insulation Insulation Pipe Pipe 6 Tabs bent in 90 Tabs bent in to rest against pipe Attic Insulation Shield Ceiling Firestop 10 1 2 in 267 mm 14 1 2 in 368 mm diameter Insula...

Страница 48: ...ger depending on roof pitch Cut out and frame opening Refer to Chapter 25 of the Uniform Building Code for roof framing details Continue assembling the chimney sections up through the ceiling firestops as needed While doing so be aware of the height and unsupported chimney length limitations given un der Section 8 A Chimney Requirements Check each section by pulling up slightly from the top to en ...

Страница 49: ...djacent structures within 10 ft 3 m of the chimney Chimney must extend 3 ft 9 m above the roof Chimney must extend 2 ft 6 m above any portion of the roof or adjacent structures within 10 ft 3 m of the chimney Multiple Chimney Locations A B 6 in minimum up to 20 in 152 mm 508 mm 18 in minimum 457 mm 20 in and over 0 in minimum Gas Wood or Fuel Oil Termination Cap Wood Minimum See illustration above...

Страница 50: ...d overlap the thimble one inch 3 To attach the extension to the thimble drill 1 8 in 3 mm holes through the outer shield of the thimble using the predrilled holes in the extension as guides Attach the extension to the thimble using the screws provided with the extension 4 Install the thimble assembly and nail it securely to the fram ing members 5 Center the flashing over the chimney and nail it to...

Страница 51: ...ther openings should be caulked with high tem perature caulk or stuffed with unfaced fiber glass insulation Ceiling Firestop Metal Chase Top Round Termination Cap False Ceiling Insulation in the outside walls of the chase Attic Insulation Shield Chimney Ceiling Firestop Tabs False Ceiling False Ceiling Insulation Insulation Storm Collar Three examples of chase applications are shown in Figure 9 2 ...

Страница 52: ... Separation allows sparks heat and embers to escape Notice Paint the termination cap with a rust resistant paint to protect against the effects of corrosion on those parts exposed to the weather TR344 Round Termination Cap Storm Collar Chimney Pipe Chase Top Termination Cap Chase 6 in 153 mm Minimum top of chase to top of chimney pipe Collar 2 in 51 mm Minimum Height Do NOT block air holes Caulk g...

Страница 53: ...n cap pipe and chimney section must overlap 1 1 2 in 38 mm Place waterproof sealer under each flange of the termination cap and on top of each screw to help prevent leaks 2 in 51 mm maximum 4 3 4 in 121 mm maximum The last section of pipe must stop between 2 in 51 mm above the top of the chase and 4 3 4 in 121 mm below the top of the chase Figure 9 7 Installing a TS345 TS345P Square Termination Ca...

Страница 54: ...r minimum dimensions This fireplace has been tested and approved for use with a hearth extension insulated to a minimum R value of 2 18 The hearth extension material MUST be covered with tile stone or other non combustible material Manufactured hearth materials will usually have a published R value resistance to heat or k value conductivity of heat Refer to the formula in Table 10 1 to convert a k...

Страница 55: ...gap with High temp noncombustible sealant able to withstand 300 Tile or Marble Minimum 2 1 4 in 57mm Cement Board or equivalent or two 1 2 in pieces and k value 0 49 Micore 300 Minimum 20 in 508mm in front and 8 in 203mm on sides to fuel loading doors Tile or Marble Combustible Floor Fascia Outer Can Flange Ember Strip Seal gap with high temp noncombustible sealant able to withstand 300 Tile or Ma...

Страница 56: ...Metal Hearth Strips Seal with non combustible sealant Figure 10 8 Position the Hearth Extension Protective metal strips are placed 2 in 51mm under the front of the fireplace and must extend beyond the front and sides of fireplace opening by 2 in 51mm Nail or screw metal strips in place Pallet Mounting Brackets 1 in 25mm Overlap E Finishing Material WARNING Do not install combustible materials over...

Страница 57: ... between the metal face of the fireplace and framing members Figure 10 9 Mantel Specifications WARNING Fire Risk Hearth Home Technologies is not responsible for discol oration cracking or other material failures of finishing ma terials due to heat exposure or smoke Choose finishing materials carefully F Mantel Refer to page 37 for clearance requirements Non Combustible Sealant Material Sealants wh...

Страница 58: ...ds are pre drilled for your conve nience Boards MUST be attached in the following order bottom top and then the two sides 2 Attach the bottom board to the bottom of the outer fire place can with enclosed screws ensuring the board is centered 3 Center and attach the top board to the outer can and framing members 4 Using the Super Calstick run a light bead 1 8 in mini mum on the butt edges of the to...

Страница 59: ...l and or national codes Plan the location of the fireplace and warm air duct run s DUCT RUN REQUIREMENTS MAXIMUM Duct Run 40 ft 12m MINIMUM Duct Run 36 in 914mm DUCTING MATERIAL 6 in 152mm B Vent Only DO NOT DUCT into existing furnace plenum MINIMUM CLEARANCE TO COMBUSTIBLES 1 in 25mm from the B Vent 1 2 in 13mm from top bottom of outlet box 0 in 0mm from the sides of outlet box 12 in 305mm from w...

Страница 60: ...Mounting Plate lining up holes Using the 4 sheet metal screws included in the kit secure the Adapter and Mounting Plate into fireplace After secur ing to the fireplace tape down the Adapter edges to the top of the fireplace with aluminum tape to prevent leakage 7 Determine the location for the air register and fan housing assembly Cut a 7 5 8 in x 13 5 8 in 143 x 346mm hole between framing members...

Страница 61: ... 2 x 4 wall Sheet Rock Seal grille using gasketing supplied with the kit Leave 1 4 6mm clearance from all 4 outer edges 10 Install the variable speed wall rheostat with setting on OFF in a convenient location This switch will control the Heat Zone fan operation 11 Remove the Junction Box Wire 110 VAC service TO the wall rheostat and FROM the wall rheostat to the fan Junction Box Use wire nuts to s...

Страница 62: ...ands to stabilize the screen Ensure that the screen is fully attached Be careful not to stack wood close to the front or too high that logs could roll out the front Start with a small fire and adjust your heat to desired setting If smoke spillage occurs put on gloves and then remove the screen and close the doors Refer to Troubleshooting Draft Problems on page 18 WARNING Fire Risk Close firescreen...

Страница 63: ...ce Dimensions L K A B C D E F TOP VIEW FRONT VIEW SIDE VIEW NorthStar A B C D E F in 3 1 2 31 1 8 40 37 40 5 16 43 13 16 mm 89 791 1016 940 1024 1100 G H I J K L in 6 1 2 9 11 16 5 7 8 1 23 1 8 11 1 8 mm 165 246 149 25 587 283 Figure 12 1 Fan Electrical Access right side of fireplace G H I J ...

Страница 64: ...F371 Roof Flashing 6 12 to 12 12 Pitch ID4 Insulated Duct Outside Air TR344 Round Termination Cap UD4 Uninsulated Duct Outside Air TR342 Round Telescoping Termination Cap SL306 Chimney Section 6 in 152mm Long ST375 Square Termination Cap SL312 Chimney Section 12 in 305mm Long TS345 Square Termination Cap SL318 Chimney Section 18 in 457mm Long DTO134 Short Octagon Decorative Cap SL324 Chimney Secti...

Страница 65: ... mm CAK4A Chimney Air Kit TR344 Round Termination Cap 15 3 4 in 400 mm TR342 Round Telescoping Termination Cap TR342 TERMINATION CAP TOP OF UPPERMOST CHIMNEY SECTION 14 1 2 in 368 mm MAX DISTANCE CHASE TOP 13 1 4 in 337 mm 18 in 457 mm 16 1 4 in 413 mm 22 in 559 mm 23 1 8 in 587 mm TS345 TS345P Square Termination Cap CT35M Chase Top 10 7 8 in 276 mm 72 in 1829 mm 36 in 914 mm 2 in 51 mm MH841 Manu...

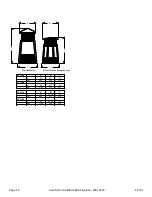
Страница 66: ...EPA Fireplace 480 1081E B C B A C A DTS134 DTS146 DTO134 DTO146 Decorative Caps DTO134 A B C in 34 20 24 mm 864 508 610 DTO146 in 46 22 7 26 mm 1168 576 660 DTS134 A B C in 34 21 18 24 mm 864 538 610 DTS146 in 46 21 18 26 mm 1168 538 660 ...

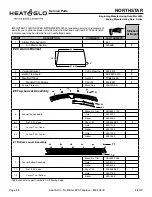
Страница 67: ...ng Fireplace Part number list on following page NORTHSTAR Northstar BK Black Feb 2003 Active Northstar NT Nickel July 2004 Active Northstar GD Gold May 2003 Apr 2004 Northstar GT Gold Trim July 2004 Sept 2007 Beginning Manufacturing Date Mar 2002 Ending Manufacturing Date Active 1 3 4 5 2 10 12 11 9 6 8 7 ...

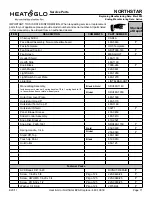
Страница 68: ...ip Screws Pkg of 4 832 0661 Y 5 Fascia Plate only Black Only FASCIA NS 6 Louver Top Assembly Black No Trim SRV480 7100 Gold 482 5320 Nickel 480 5380 6 1 Nut 8 32 Keps Pkg of 40 226 0060 40 Y 6 2 Louver Trim Upper Gold 480 1710 Nickel 480 1830 6 3 Louver Trim Lower Gold 480 1720 Nickel 480 1840 7 Louver Bottom Assembly Black No Trim SRV480 7090 Gold 450 5310 Nickel 480 5370 7 1 Nut 8 32 Keps Pkg of...

Страница 69: ...480 2120 4 Y Washer 3 8 SAE 3 ea 832 0990 Y 8 1 Glass Assembly 480 5430 Y Glass Gasketing 1 4 in 10 Ft 834 1460 Y Glass Frame Bottom 480 1450 Glass Frame Top 480 1440 8 2 Handle Assembly HANDLES 480 Includes 2 door handles securing bracket lock nut latch cam key and cam latch Cam Latch 32084 Cam Latch Key 5 8 in 430 1151 Door Handle Left SRV480 0530 Right SRV480 0520 8 3 Spring Handle 1 2 in Gold ...

Страница 70: ...x 4 1 2 x 1 1 4 Qty 2 req Brick Individual Must indicate Size SRV7000 306 10 Timer Assembly SRV480 5150 Y Gasket Timer 480 1240 Timer SRV480 1940 Y Screw 8 32 x 1 2 Pkg of 25 220 0030 25 Y Washer Pkg of 25 227 0080 25 Y 11 Wiring Harness SRV480 0990 Y 12 Fan Replacement 812 4900 Y 13 Baffle Protection Panel 480 2100 Additional service part numbers on following page NORTHSTAR Beginning Manufacturin...

Страница 71: ...agnet 229 0631 Light Switch 480 1260 Light Switch Cover Plate 480 1270 Lintel Bar LINTELBAR HHT Manual Bag Assembly Includes owner s manual 2 spring handles 1 2 in 1 spring handle 1 4 in fan switches cover plate warranty card Black Gold SRV480 1140 Nickel SRV480 1950 Outer Can cover Plate 480 1300 Outside Air Hood 6 480 5170 Outside Air Term Cap 6 480 1160 Outside Air Shield 33271 Y Panel Blower A...

Страница 72: ...Page 72 4 20 11 Heat Glo NorthStar EPA Fireplace 480 1081E This page intentionally left blank ...

Страница 73: ...ith party responsible for use and operation Read understand and follow these instructions for safe installation and operation D O N O T D I S C A R D Please contact your Heat Glo dealer with any questions or concerns For the number of your nearest Heat Glo dealer please visit www heatnglo com Heat Glo a brand of Hearth Home Technologies Inc 600 West Jefferson St Lake City MN 55041 www heatnglo com...

Отзывы: