background image

3

www.heartlandpaymentsystems.com

Installation

3

Insert the black connector on the 
installation harness into the mating 
connector on the rear of the reader. Make 
sure that the lock-ing tab faces up and 
locks into place with the  protrusion on 
the top of the reader connector.   

Cable 

Part # AYS-168140 

4

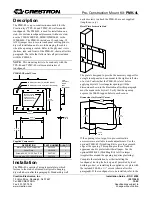
Insert the reader and bracket assembly into the coin vault 
opening. The mounting studs on the rear of the bracket 
should mate with the mounting holes at the rear of the 
meter case. 
Secure the bracket in place by reaching through the top 
access panel and attaching the supplied mounting nuts to 
the mounting studs. Route the free end of the interface 
harness though the opening in the side of the meter case 
and into the backsplash.  

5

Connect the white Molex connector 
on the opposite end to the machine’s 
control board at the interface 
connector shown as “B” at right. Now 
install the “Reader Present Jumper” 
at the location marked “A” at right. 

A

B

6

Close the back panel on the machine while 
ensuring that none of the wiring is pinched 
between the front panel and the console 
housing. Replace the two panel screws and 
tighten them snugly.. 

Содержание Alliance Quantum & MDC

Страница 1: ... Quantum or MDC 1 AYS 168140 Interface Cable 1 MFP 175009 Jumper 1 TBD Mounting Bracket Qty Required Tools 1 Phillips Head Screw Driver medium sized 1 Nut Driver or Deep Well socket TBD Required tools to remove coin drop slide and coin vault Cashless Laundry Kit Contents If you cannot locate and or identify any of the components listed above please contact Micropayments Customer Service at Tel 800...

Страница 2: ...losure designed to fit in the coin vault area of the machine s meter case Although the same reader and installation kit are required for all X model ma chines a different mounting bracket is used for single stacked and front load equipment You should ensure that you have the correct bracket for the specific machine type In addition to the card reader the kit should also contain the MDC wiring harn...

Страница 3: ...the meter case Secure the bracket in place by reaching through the top access panel and attaching the supplied mounting nuts to the mounting studs Route the free end of the interface harness though the opening in the side of the meter case and into the backsplash 5 Connect the white Molex connector on the opposite end to the machine s control board at the interface connector shown as B at right No...

Страница 4: ... the following cards 1 Insert the System Key Card into the card reader Remove when prompted 2 Insert the Price Configuration Card into the card reader Remove when prompted 3 Insert the Sitecode Definition Card into the card reader Remove when prompted Testing Insert a Debit Maintenance Card or User Card into the card reader F 74 This requires the correct programming and configuration card F 03 Thi...

Отзывы: