background image

1-800-221-2099  •  HearingHelp.com

11

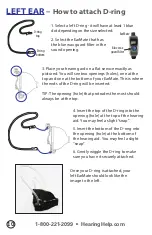
1. Select a right D-ring - it will 

have at least 1 red dot depending 

on the size selected.
2. Select the EarMate that has 

the red wax guard filter in the 

sound opening.

RIGHT EAR 


How to attach D-ring

3. Place your hearing aid on a flat service exactly as

pictured. There are two openings (holes), one at the 

top and one at the bottom of your EarMate. This is 

where the ends of the D-ring will be inserted.

TIP: The hole that protrudes the most

should always be at the top.

4. Insert the top of the D-ring into the 

opening (hole) at the top of the hearing 

aid. You may feel a slight “snap”. 

5. Insert the bottom of the D-ring into 

the opening (hole) at the bottom of 

the hearing aid. You may feel a slight 

“snap”.

6. Gently wiggle the D-ring to make 

sure you have it securely attached.

D-ring

bottom

D-ring

top

Red wax

guard filter

EarMate

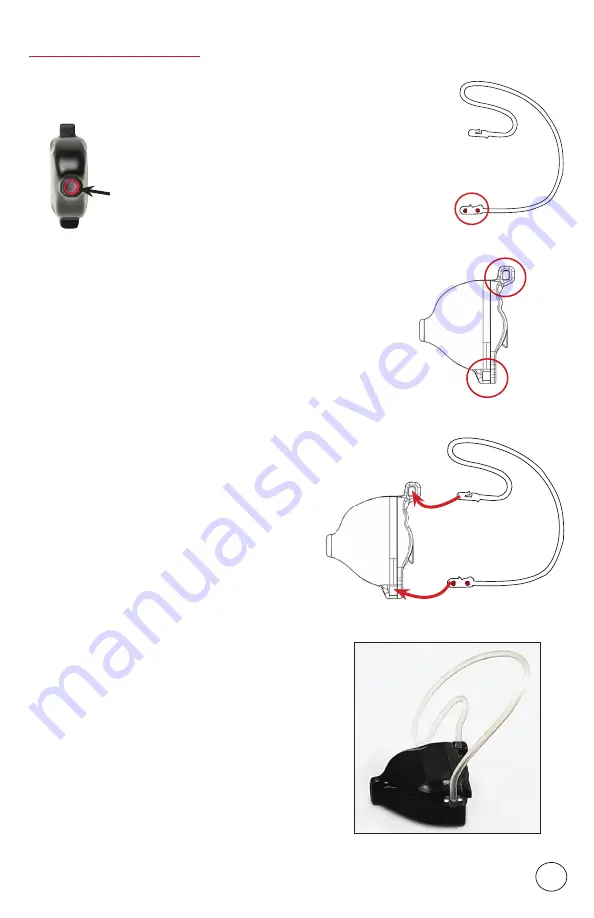
Once your D-ring is attached, your 

right EarMate should look like the 

image to the right.

Содержание EarMate-4210 CLEAR

Страница 1: ...w tab PROVEN QUALITY 100 Digital American Made Technology MEDICALGRADE HEARING AID Doctor Designed Audiologist Approved EarMate 4210 CLEAR User Guide 1 800 221 2099 FDA Listed Advanced Technology 100...

Страница 2: ...FDA Listed hearing aid that is of the same high quality as those sold by Audiologist s Your EarMate was manufactured by our parent company IntriCon one of only two hearing aid manufacturers in the US...

Страница 3: ...0 221 2099 HearingHelp com 1 Helix Lock 2 Microphone 3 Speaker and wax guard filter 4 Battery holder 5 D ring Everything you need to enjoy better hearing Wax guards changing tool Size 10 Eco Gold MAX...

Страница 4: ...tion as the symbol 4 Place the battery in the battery holder NOT directly inside the aid Fit the battery in the holder with the flat positive side facing up 5 Close the battery holder NEVER force the...

Страница 5: ...d opening on your EarMate This is the easiest way to identify which is for the left or right ear Red dot s right ear Blue dot s left ear Left D ring Size small has 1 blue dot Size medium has 2 blue do...

Страница 6: ...he D ring and the area of the ear the arrow is pointing to Choose a larger D ring Too Big The Helix Lock on the D ring should not overlap the area of the ear the arrow is pointing to Choose a smaller...

Страница 7: ...roper fit it may fall out of your ear If you need to try a different D ring see pgs 9 11 SOUND OPENING 1 Hold the EarMate between your thumb and forefinger as shown 1a Double check the color of the wa...

Страница 8: ...e program you will hear a voice prompt tell you which program you are on Program 1 Program 2 Program 3 or Program 4 Program 1 lowest volume level Program 2 Program 3 Program 4 highest volume level You...

Страница 9: ...atching object to push on the end of the D ring just enough to release it Pull the D ring away from the hearing aid Push here Push here Pull here Pull here Grasp the D ring at the top and bottom Pull...

Страница 10: ...rMate This is where the ends of the D ring will be inserted TIP The opening hole that protrudes the most should always be at the top 4 Insert the top of the D ring into the opening hole at the top of...

Страница 11: ...EarMate This is where the ends of the D ring will be inserted TIP The hole that protrudes the most should always be at the top 4 Insert the top of the D ring into the opening hole at the top of the he...

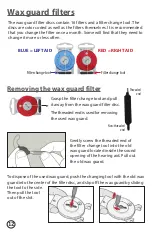
Страница 12: ...he wax guard filter Grasp the filter change tool and pull it away from the wax guard filter disc The threaded end is used for removing the used wax guard Threaded end Gently screw the threaded end of...

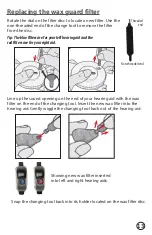
Страница 13: ...ng aid and the red filters are for your right aid Non threaded end Line up the sound opening on the end of your hearing aid with the wax filter on the end of the changing tool Insert the new wax filte...

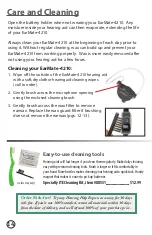
Страница 14: ...he enclosed cleaning brush 3 Gently brush across the wax filter to remove earwax Replace the wax guard filter if brushing does not remove the earwax pgs 12 13 Care and Cleaning 1 Wipe off the outside...

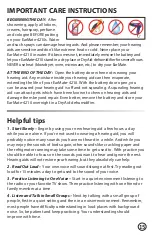
Страница 15: ...ht in a DryAid dehumidifier 1 Start Slowly Begin by using your new hearing aid a few hours a day while you are alone If you re not used to wearing a hearing aid you will probably notice many sounds yo...

Страница 16: ...Help Express 1714 Sycamore Rd PO Box 586 DeKalb IL 60115 0586 If your hearing aid is CAUSING SORENESS IN YOUR EAR 1 Call 1 800 221 2099 for authorization before returning your hearing aid for repair...

Страница 17: ...for a period of time for a nominal fee after which you may decide if you want to purchase the hearing device Federal law restricts the sale of hearing device to those individuals who have obtained a m...

Страница 18: ...cy Response Curve Maximum SSPL90 HFA SSPL90 HFA full on gain Reference test gain Frequency range Equivalent input noise Totalharmonicdistortion Attack time msec Release time msec Battery type and curr...

Страница 19: ...of microorganisms which are often responsible for itchiness allergies and other irritations of the ear canal Includes USB power supply PerfectDry Lux item 88745 90 00 Battery Care Kit Worry free heari...

Страница 20: ...ondition Ship insured mail Your EarMate 4210 hearing aid is warranteed for one year against defects in manufacturer s materials and workmanship That means if they didn t do a good job making your hear...

Отзывы: