background image

4

Thank you for selecting the new HEALTHRIDER

®


H10X exercise bike. Cycling is an effective exercise for 
increasing cardiovascular fitness, building endurance, 
and toning the body. The H10X exercise bike provides 
an impressive selection of features designed to make 
your workouts at home more effective and enjoyable.

For your benefit, read this manual carefully before 
you use the exercise bike.

 If you have questions after 

reading this manual, please see the front cover of this 
manual. To help us assist you, note the product model 
number and serial number before contacting us. The 
model number and the location of the serial number 
decal are shown on the front cover of this manual. 

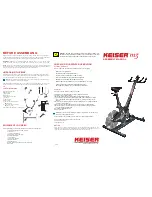
Before reading further, please familiarize yourself with 
the parts that are labeled in the drawing below.

Handgrip Heart 

Rate Monitor

Seat

Seat Post

Seat Knob

Leveling Foot

Wheel

Pedal/Strap

Console

Handlebar

Post Knob

Water Bottle Holder*

*Water bottle is not included

BEFORE YOU BEGIN

Length: 2 ft. 8 in. (81 cm)
Width:  2 ft. (61 cm)

Содержание H10x Bike

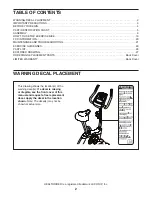
Страница 1: ...e using this equipment Keep this manual for future reference QUESTIONS If you have questions or if parts are damaged or missing DO NOT CONTACT THE STORE please contact Customer Care IMPORTANT Please r...

Страница 2: ...ocation shown Note The decal s may not be shown at actual size WARNING DECAL PLACEMENT 2 IMPORTANT PRECAUTIONS 3 BEFORE YOU BEGIN 4 PART IDENTIFICATION CHART 5 ASSEMBLY 6 HOW TO USE THE EXERCISE BIKE...

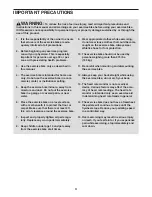
Страница 3: ...it to protect the floor or carpet Make sure that there is at least 2 ft 0 6 m of clearance around the exercise bike 7 Inspect and properly tighten all parts regu larly Replace any worn parts immediate...

Страница 4: ...e questions after reading this manual please see the front cover of this manual To help us assist you note the product model number and serial number before contacting us The model number and the loca...

Страница 5: ...ngs below to identify the small parts needed for assembly The number in parentheses below each drawing is the key number of the part from the PART LIST near the end of this manual The number following...

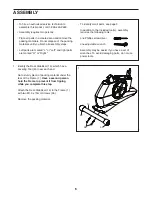
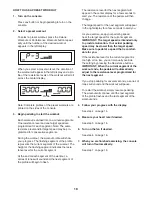
Страница 6: ...an authorized service technician to assemble this product call 1 800 445 2480 Assembly requires two persons Place all parts in a cleared area and remove the packing materials Do not dispose of the pa...

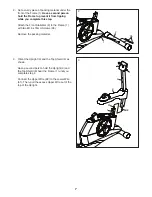
Страница 7: ...ont Stabilizer 2 to the Frame 1 with two M10 x 75mm Screws 36 Remove the packing material 3 Orient the Upright 3 and the Top Shield 9 as shown Have a second person hold the Upright 3 and the Top Shiel...

Страница 8: ...t Knob 8 from the Seat Carriage 56 Next attach the Seat 12 to the Seat Carriage 56 with four M8 Locknuts 37 Note The Locknuts may be preattached to the underside of the Seat Next orient the Seat Carri...

Страница 9: ...upward or downward to the desired position and release the Adjustment Knob 11 into one of the adjustment holes in the Seat Post Move the Seat Post upward or downward slightly to make sure that the Ad...

Страница 10: ...together or alkaline standard and rechargeable batter ies together IMPORTANT If the Console has been exposed to cold temperatures allow it to warm to room temperature before insert ing batteries Othe...

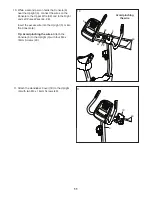
Страница 11: ...he Right and Left Pulse Wires 42 28 Insert the excess wire into the Upright 3 or into the Console 6 Tip Avoid pinching the wires Attach the Console 6 to the Upright 3 with four M4 x 16mm Screws 40 11...

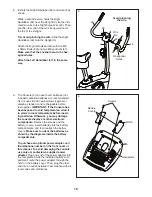
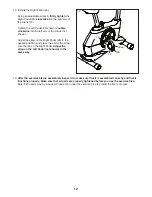
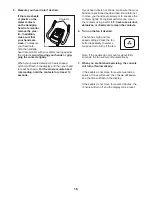
Страница 12: ...6 to the desired position and press the end of the strap onto the tab on the Right Pedal Adjust the strap on the Left Pedal not shown in the same way 13 After the exercise bike is assembled inspect it...

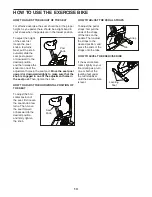
Страница 13: ...t holes in the seat post Then tighten the knob HOW TO ADJUST THE HORIZONTAL POSITION OF THE SEAT To adjust the hori zontal position of the seat first loosen the seat knob a few turns Then move the sea...

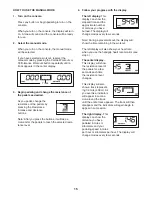
Страница 14: ...effective workout designed to help you achieve the results you want The console also offers a selection of preset work outs Each preset workout automatically changes the resistance of the pedals as i...

Страница 15: ...r progress with the display The left display This display can show the elapsed time and the approximate number of calories you have burned The display will change modes every few seconds Note During a...

Страница 16: ...your hands are positioned as described Be careful not to move your hands excessively or to squeeze the contacts tightly For optimal performance clean the contacts using a soft cloth never use alcohol...

Страница 17: ...workout a series of tones will sound and the next segment of the profile will begin to flash The resistance level for the next segment will appear in the center display for a few seconds to alert you...

Страница 18: ...ill begin to flash The resistance level for the next segment will appear in the center display for a few seconds to alert you The resistance of the pedals will then change The target speed for the nex...

Страница 19: ...ect the user mode press and hold down the Performance Workouts button for a few seconds until the user mode information appears in the display The console can show pedaling speed and distance in eithe...

Страница 20: ...equipment does cause harmful interference to radio or television reception which can be determined by turning the equipment off and on try to correct the interference by one or more of the following m...

Страница 21: ...ch you must remove the seat post the post knob and the top shield see the instruc tions below To remove the Seat Post 5 loosen the Post Knob 11 a few turns pull the Post Knob outward and remove the Se...

Страница 22: ...lat screwdriver release the tabs along the bot tom edge of the Top Shield 9 and slide the Top Shield upward Then using an adjustable wrench turn the Right Pedal 26 counterclockwise and remove it Remov...

Страница 23: ...c Exercise If your goal is to strengthen your cardiovascular system you must perform aerobic exercise which is activity that requires large amounts of oxygen for prolonged periods of time For aerobic...

Страница 24: ...lles Stretch With one leg in front of the other reach forward and place your hands against a wall Keep your back leg straight and your back foot flat on the floor Bend your front leg lean forward and...

Страница 25: ...25 NOTES...
Страница 26: ...rew 34 2 M4 x 25mm Screw 35 4 M8 x 18mm Screw 36 4 M10 x 75mm Screw 37 8 M8 Locknut 38 2 Carriage Cap 39 2 M10 Flange Nut 40 13 M4 x 16mm Screw 41 4 M4 x 12mm Screw 42 1 Right Pulse Wire 43 2 Leveling...

Страница 27: ...24 13 9 49 19 6 51 30 45 45 51 14 43 43 40 34 40 40 40 10 40 40 17 4 4 3 48 40 54 20 11 2 15 15 27 35 35 37 30 40 40 21 18 10 36 36 5 53 37 53 37 27 47 56 57 38 38 16 16 28 42 32 34 39 55 55 8 39 44...

Страница 28: ...to freight damage to the product This warranty will automatically be voided if the product is used as a store display model if the product is purchased or transported outside the USA if all instructio...

Отзывы: