


7
Vedpak 177_Version 2_061013
171850 - 171853
171909 - 171914
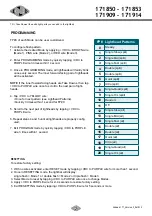
FP#0 of each Mode can be user customized.
To configure flash pattern:
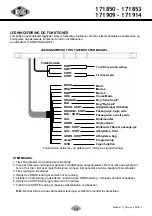
1. Activate the desired Mode by apVDC to: BROWN wire
(Mode 1), PINK wire (Mode 2), or RED wire (Mode 3).
2. Enter PROGRAMMING mode by quickly tVDC to
PURPLE wire 3 times within 1 second.
3. Once in PROGRAMMING mode, all lightheads will faintly blink
once every second. The inner forward-facing pair of lightheads
will be activated.
NOTE
: If the inner foward-facing heads are Take Downs, then tap
+VDC to PURPLE wire once to scroll to the next pair of light-
heads.
4. Tap +VDC to YELLOW wire:
• Once for next pattern (see Lighthead Patterns).
• Quickly 3 times within 1 second for FP#0.
5. Scroll to the next pair of lightheads by tVDC to
PURPLE wire.
6. Repeat steps 4 and 5 until all lightheads are properly config
ured.
7. Exit PROGRAM mode by quickly tVDC to PURPLE
wire 3 times within 1 second.
FP# Lighthead Patterns
0
Steady
1
Single Slow (split)
2
Single Mid (split)
3
Single Fast (split)
4
Double (split)
5
Double (split)
6
Quint (split)
7
Ultra (split)
8
Single-Quad (split)
9
Single H/L (split)
10
Random
11
Off
12
Single Slow (all)
13
Single Mid (all)
14
Single Fast (all)
15
Double (all)
16
Double (all)
17
Quint (all)
18
Ultra (all)
19
Single-Quad (all)
20
Single H/L (all)
TD = Take Downs (the extra light parts you can add to the lightbar)
PROGRAMMING
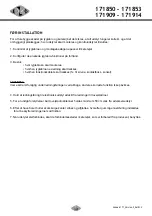
RESETTING
To restore factory setting:
1. With no wires activated, enter RESET mode by tVDC to PURPLE wire for more than 1 second.
2. Once in RESETTING mode, the lightbar will display:
single flash = Mode 1 or double flash = Mode 2 or triple flash = Mode 3
3. Select Mode to reset by tVDC to PURPLE wire once to change Modes.
4. Apply +VDC to PURPLE wire for 2~4 seconds to restore factory setting.
5. Exit RESETTING mode by tVDC to PURPLE wire for 5 seconds or more.


