background image

3.

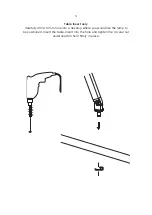
Table Insert only

Carefully drill a 10 mm hole into a desktop where you would like the lamp to 

be positioned. Insert the table. Insert into the hole and tighten the circular nut 

underneath to hold firmly in place.

Содержание PIERRE CHARPIN PC TASK Series

Страница 1: ... INSTRUCTION MANUAL DESIGN BY PIERRE CHARPIN PC TASK COLLECTION ...

Страница 2: ......

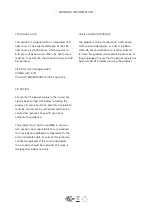
Страница 3: ...tion must be carried out by authorised electricians contractors please check with your local authority for guidance The product must not be modified in any way HAY accepts no responsibility for any products that have been modified or tampered with The external flexible cable or cord of this luminaire cannot be replaced If the cord is damaged the luminaire should be replaced This lamp is designed f...

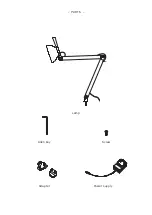
Страница 4: ...Lamp Allen key PARTS Screw Adapter Power supply ...

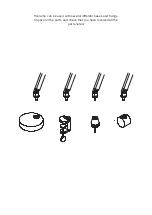
Страница 5: ...The lamp can be used with several different bases and fixings Unpack all the parts and check that you have received all the parts listed ...

Страница 6: ...1 Table Lamp only Insert the lamp into the base packed separately Using the provided Allen key and screw the lamp can be fixed to the base through a hole underneath ...

Страница 7: ...2 Clamp only Clamp the clamp base in place by adjusting the grip Insert the lamp body into the clamp base ...

Страница 8: ...le Insert only Carefully drill a 10 mm hole into a desktop where you would like the lamp to be positioned Insert the table Insert into the hole and tighten the circular nut underneath to hold firmly in place ...

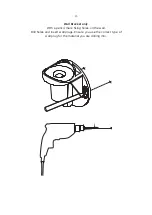
Страница 9: ...4 Wall Bracket only With a pencil mark fixing holes on the wall Drill holes and insert wall plugs Ensure you use the correct type of wall plug for the material you are drilling into ...

Страница 10: ...5 Wall Bracket only Screw the internal bracket to the wall with the fixings provided and place the external plastic cover over the wall bracket ...

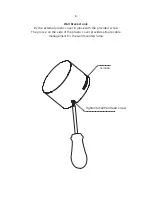
Страница 11: ...de of the plastic cover provides simple cable management for the wall mounted lamp Tighten Small Pan Head screw Groove 6 Wall Bracket only Fix the external plastic cover in place with the provided screw The groove on the side of the plastic cover provides simple cable management for the wall mounted lamp ...

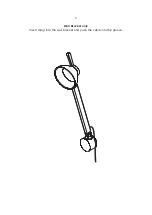
Страница 12: ...7 Wall Bracket only Insert lamp into the wall bracket and push the cable into the groove 7 Wall Bracket only Insert lamp into the wall bracket and push the cable into the groove ...

Страница 13: ...8 The lamp can be freely moved and will hold in any position 8 The lamp can be freely moved and will hold in any position ...

Страница 14: ...ng the provided torx tool Carefully tighten the bolts until the lamp supports itself in any position 9 If necessary the joints can be adjusted using the provided torx tool Carefully tighten the bolts until the lamp supports itself in any position ...

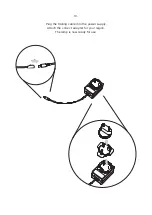
Страница 15: ...10 Plug the trailing cable into the power supply Attach the correct adapter for your region The lamp is now ready for use ...

Страница 16: ...dvice and instructions on cleaning and caring for specific materials to prolong the life of your lighting Please find our Care Maintenance guide by scanning the QR code You can find more relevant information on PC Task Collection by scanning the QR code You can also find the same information here hay dk downloads ...

Страница 17: ......

Страница 18: ......

Страница 19: ......

Страница 20: ...10 01 2022 Havnen 1 8700 Horsens Denmark 45 4282 0282 hay hay com www hay com ...

Отзывы: