background image

PREPARATION

4

1. Check all nuts and bolts are tight before starting.
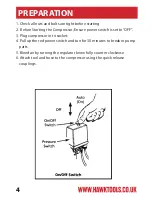
2.  Before Starting the Compressor; Ensure power switch is set to “OFF”.
3. Plug compressor in to socket.
4. Pull up the red power switch and tun for 30 minutes to break in pump
    parts.
5. Bleed air by turning the regulator know fully counter clockwise.
6. Attach tool and hose to the compressor using the quick release
    couplings.

Содержание HWKAC1

Страница 1: ...6 Litre Oil Less Air Compressor Operator s Manual WARNING Before using this appliance read the Operator s manual and follow all its safety rules and instructions...

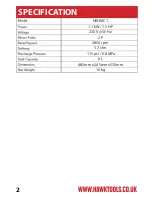
Страница 2: ...SPECIFICATION ITEM 2 1 1 kW 1 5 HP 230 V 50 Hz HWKAC1 2 P 2850 rpm 5 7 cfm 115 psi 0 8 MPa 6 L 485mm x 265mm x550mm 16 kg...

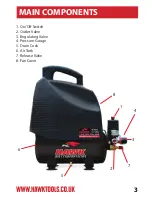
Страница 3: ...8 1 4 3 7 2 5 6 MAIN COMPONENTS 3 1 On Off Switch 2 Outlet Valve 3 Regulating Valve 4 Pressure Gauge 5 Drain Cock 6 Air Tank 7 Release Valve 8 Fan Cover...

Страница 4: ...mpressor Ensure power switch is set to OFF 3 Plug compressor in to socket 4 Pull up the red power switch and tun for 30 minutes to break in pump parts 5 Bleed air by turning the regulator know fully c...

Страница 5: ...ch This is a necessary condition before restarting or the motor will be damaged 3 The output pressure of compressed air can be regulated by using the regulating valve turn the regulation valve knob cl...

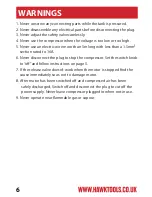
Страница 6: ...an a 1 5mm section rated to 16A 6 Never disconnect the plug to stop the compressor Set the switch knob to off and follow instructions on page 5 7 If the release valve doesn t work when the motor is st...

Страница 7: ...em Drain moisture from tank by opening drain cock located on the underside of the tank 4 Clean dust and dirt from the motor tank airlines pump and cooling fins while compressor is off 5 Unclip the air...

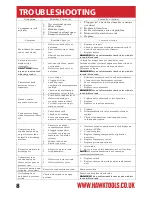
Страница 8: ...ve with air in tank bleed tank Knocks rattles excessive vibration 1 Loose bolts tank not level 2 Defective bearing on eccentric or motor shaft 3 Cylinder or piston ring is worn or scored 1 Tighten bol...

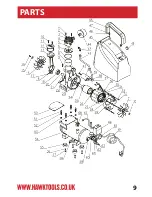
Страница 9: ...PARTS 9...

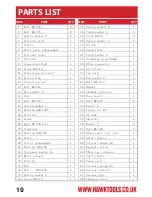
Страница 10: ...1 49 Thermal protector 1 16 Fan 1 50 Base board 1 17 Bolt M4 20 1 51 Bolt M8 25 4 18 Spring washer 4 1 52 Washer 8 4 19 Bearing 6005 2RS 1 53 Flange nut M8 1 20 Pin 4x14 1 54 6L tank 1 21 Crank 1 55 A...

Страница 11: ...in moving parts Always tie long hair back and wear suitable clothing 8 Clear the work area of all unnecessary tools debris and furniture 9 During operation the motor connections compressor body cylind...

Страница 12: ...WARNING Before using this appliance read the Operator s manual and follow all its safety rules and instructions...

Отзывы: