


33
User Controls
IND100064-25
OSD Menu Quick Start
To understand the workflow of the OSD menu, follow these steps for a quick start. The table shows the various OSD
overlays you might encounter while navigating, adjusting parameters or when text messages are displayed. The OSD
menu always remembers its last position which is indicated by the red bar.
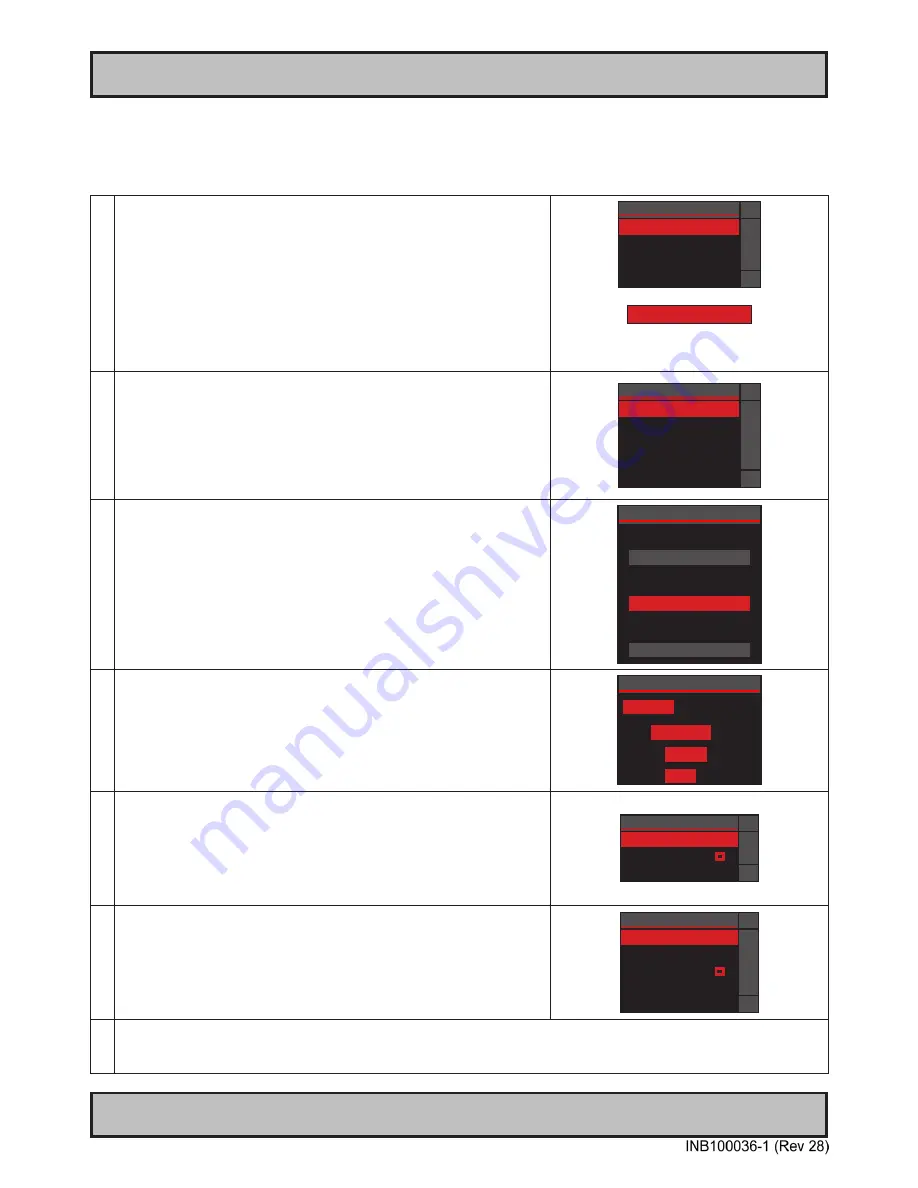
1
Press the
physical MENU
button for 3 sec. The OSD menu will pop-up as a overlay
over the existing image on screen. All the available functions you can adjust or
control are now available as an easy understandable menu structure.
The current choice will be marked with a red selection bar.
You can now navigate up or down in the menu with the
physical up/down
buttons
(indicated as
+/-
symbols on the user control).
To select a function, press the
physical right arrow button
. You will now enter the
sub menu of that function or execute it (if its available).
- Display
▲
Picture ►
█
Setup
Source
Power Off
▼
Picture ►
The arrow indicates either a sub-menu or function
is available. It is now required to press the
physical
right button
to access the function / sub-menu.
2
The top header will indicate what the contents of the menu group consists of. In this
example
“-Picture”
. The previous menu will not be visible. To navigate to the
previous menu, press the
physical left arrow button
.
The first choice in the sub-menu will be marked with a red bar. Navigate with the
physical up/down
buttons
(indicated as
+/-
symbols on the user control).
To select a function, press the
physical right arrow button
. You will now enter the
sub menu for that function or execute it (if its available).
- Picture
▲
Example 1 ►
█
Example 2
Example 3
Example 4
▼
3
Example of the adjust parameter OSD overlay:
Use the
physical up/down
(indicated as +/- on the user control) buttons to adjust
the value. All changes happen in real-time while adjusting these parameters and the
number in the middle of the OSD will also change real-time.
After you are satisfied with the value, press the
physical left arrow button
to store
the parameter. Depending on the function, you will now either enter the previous
menu or exit from it completely.
Example 1
+
78
-
4
Example of the text information OSD overlay:
After you have read the information displayed, press the
physical left arrow
buttons
to enter the previous menu and exit the information displayed.
- Source Info
Analog 1
Res:
1280x1024
HFreq:
31.4KHz
VFreq:
60Hz
5
Example of the indicator symbol (white box):
When you have several parameters to choose from, the white box will indicate which
parameter are now currently activated. In this example; The “PIP” function is
configured to be active.
To active any other function, just navigate to it press the
physical right arrow but-
ton.
The box will appear next to the text indicating it is activated.
- Source
▲
Single
█
PIP
▀
PBP
▼
6
Example of a non active function (greyed out text):
Please note that certain functions may be disabled by factory default or by means of
customized menu structure/product setup. These functions cannot be accessed or
executed when they appear in gray text color. In this illustration the S-Video inputs
are disabled in the OSD menu as the product does not have any physical S-Video
input connectors.
- Main Source
▲
Analog RGB 1 ►
█
Analog RGB 2
Digital
▀
S-Video 1
S-Video 2
▼
7
To exit from the OSD menu at any menu level or in any other OSD overlay, just press the
physical MENU button
. The menu will
disappear, and the last setting adjusted will be stored. Alternatively you can wait for the OSD to reach time-out and exit automatically
without user interaction. Parameters will be saved.
OSD Menu Overview
Содержание JH 15T17 MMD Series
Страница 7: ...7 General...
Страница 18: ...18 This page left intentionally blank...
Страница 19: ...19 Installation...
Страница 28: ...28 This page left intentionally blank...
Страница 29: ...29 Operation...
Страница 52: ...52 This page left intentionally blank...
Страница 53: ...53 Specifications...
Страница 64: ...64 This page left intentionally blank...
Страница 65: ...65 Technical Drawings...
Страница 73: ...73 Technical Drawings Accessories...
Страница 114: ...114 This page left intentionally blank...
Страница 115: ...115 Appendixes...
Страница 127: ...127 Revision History Appendix IND100077 70...
Страница 128: ...www hatteland display com...


