background image

PROGRAMMING THE UNIT

6

Form No. TFC461RM-0108

GENERAL

Thermo-Finisher conveyor units have both an
upper and lower heating zone. The upper
elements heat the product on the pan/plate and
the lower elements heat the bottom of the
pan/plate.

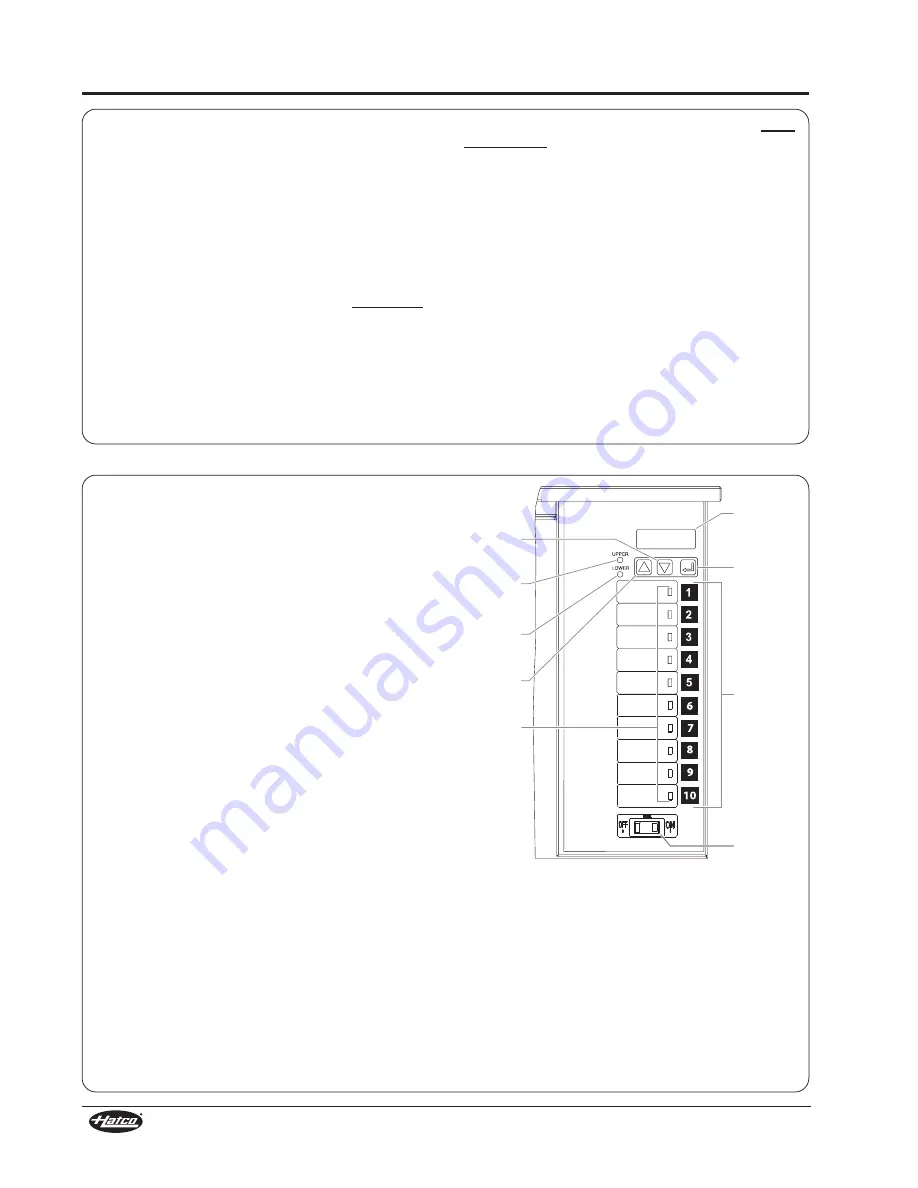
There are 10 programmable selection keys
allowing the operator to fine-tune the radiant heat
input and heating time for a variety of menu items.

Keys 1–8:

When pressed, the unit will

cycle once

,

conveying the product into the heating area,
pausing

to

heat

the

food

at

a

preset

time/temperature, and then conveying the product
out the opposite side of the unit and stopping.

PROGRAMMING CONTROLS

The following terms are used when programming
the unit:

UP = UPPER POWER VALUE: Power setting

for the upper heating elements.

UT = UPPER

TIME

VALUE:

Time

setting

for the upper heating elements.

LP = LOWER POWER VALUE: Power setting

for the lower heating elements.

LT = LOWER

TIME

VALUE:

Time

setting

for the lower heating elements.

When the display shows a Power Value (UP for
upper, LP for lower), the number is shown as a
percentage. Example: P20 = 20%. These values
are adjustable from 5-100%, in 5% increments
every time an arrow key is pressed.

When the display shows a Time Value (UT for
upper, LT for lower) the number shows the time
the heating element will be on. Example: T35 = 35
seconds. These values are adjustable from zero
minutes to 9 minutes 59 seconds. Values change
by 1 second every time an arrow key is pressed.
Holding down an arrow key will cause the
numbers to change rapidly.

NOTE: All settings are retained in memory, even

when the unit is turned off or unplugged

from power source.

Keys 9 and 10:

When pressed, the unit will

cycle

continuously

. The conveyor will advance in 1/2

second increments, pausing to heat the food at a
preset time/temperature, then convey the product
out the opposite side of the unit. The product is
then removed but the conveyor continues to
operate.

Thermo-Finisher

conveyors

also

feature

a

programmable IDLE mode and AUTO-OFF mode
for additional cooking flexibility. See

programming

for these modes for additional information.
NOTE: After reading and understanding how to

program the unit, see PROGRAMMING

HINTS and RECOMMENDED FOOD

FINISHING GUIDE in this manual for

further helpful information.

Digital

Display

Down

Arrow

Key

Enter

Key

Program

Selection

Keys

(1–10)

POWER

ON/OFF

Switch

Upper

Heat

Indicator

Lower

Heat

Indicator

Up

Arrow

Key

Program

Indicator

Lamps

Figure 6. Control Panel

NOTE: If no settings are made within 15 seconds,

the unit will revert to READY mode

without accepting any setting changes.

Also, if any other numbered program

selection key is pressed before step 12,

unit will revert to READY mode without

saving any of the setting changes.

Содержание THERMO-FINISHER TFC-461R

Страница 1: ...to understand the contents of this manual please bring it to the attention of your supervisor Keep this manual in a safe location for future reference No opere este equipo al menos que haya le do y c...

Страница 2: ...ner Information i Introduction i Important Safety Information 1 Model Designation 2 Model Descriptions 3 All Models 3 TFC 461R Model 3 TFC 461R L Model 3 Specifications 3 Plug Configuration 3 Electric...

Страница 3: ...e performing any maintenance Unit is not waterproof DO NOT submerge in water Do not operate if it has been submerged in water Do not steam clean the interior or flood with water or liquid solution WAR...

Страница 4: ...y hot upon removal use oven mitt protective clothing or pan gripper to remove CAUTION Do not remove the glass from the unit for cleaning purposes Doing so may cause injury or damage to the unit To avo...

Страница 5: ...RNING NEMA L15 30P NEMA 6 50P Figure 3 Plug Configurations ELECTRICAL RATING CHART ALL MODELS Thermo Finisher conveyor food finisher models have an easy to clean interior constructed of stainless stee...

Страница 6: ...559 mm TFC 461R L 63 7 8 29 3 8 22 1622 mm 746 mm 559 mm DIMENSIONS EXTERIOR DIMENSIONS EFFECTIVE FINISHING AREA Figure 4 Dimensions TFC 461R L D D B B F F TFC 461R A E C A E C TFC 461R TFC 461R L Wid...

Страница 7: ...educe the risk of fire the appliance is to be installed on a non combustible surface only The appliance is to be installed on floors or counters of non combustible construction with non combustible fl...

Страница 8: ...ng element will be on Example T35 35 seconds These values are adjustable from zero minutes to 9 minutes 59 seconds Values change by 1 second every time an arrow key is pressed Holding down an arrow ke...

Страница 9: ...Down arrow key to scroll to desired setting 4 Press the Enter key to proceed to the next step 5 The display shows Upper Time Value Repeatedly press Up or Down arrow key to scroll to desired setting Ho...

Страница 10: ...re pressed or the unit goes into AUTO OFF Mode NOTE Begin with an IDLE mode setting of 30 and adjust the program accordingly to achieve optimum performance 1 Simultaneously press hold the Up arrow key...

Страница 11: ...enough adjust by pressing the Up arrow key Each time the Up or Down arrow key is pressed the valve will change by 0 1 of a second 2 Press the Enter key to save the new setting into memory CANCELLING...

Страница 12: ...lation of supplied legs NOTE See RECOMMENDED FOOD FINISHING GUIDE for specific information 1 Plug unit into an electrical outlet of the correct voltage size and plug configuration See SPECIFICATIONS f...

Страница 13: ...es see Figure 9 Most menu items will require the Lower Power Value to be set higher than the Upper Power Value Frozen or refrigerated food product can be heated in the unit Frozen items do not have to...

Страница 14: ...that has accumulated on the glass Do not remove the glass from the unit for cleaning purposes Doing so may cause injury or damage to the unit WARNING WARNING CAUTION CAUTION 5 Remove any stains from...

Страница 15: ...frozen 30 seconds 20 seconds PAN USED 18 457 mm perforated aluminum pizza pan Pizza 12 305 mm Thin Crust 30 6 minute 35 7 minutes Frozen 30 seconds 15 seconds PAN USED 18 457 mm perforated aluminum pi...

Страница 16: ...inside of unit are tight and secure If secure replace Electronic Control Board Hatco part number 02 01 226 00 Check ON OFF switch If there is power to switch but no power out replace switch Wiring ope...

Страница 17: ...necessary Check gear motor for power See PROGRAMMING THE UNIT and reset program settings With the unit unplugged and the element isolated from the circuit verify with an Ohmmeter that the element lea...

Страница 18: ...OTHER WARRANTY EXPRESSED OR IMPLIED INCLUDING BUT NOT LIMITED TO ANY IMPLIED WARRANTY OF MERCHANTABILITY OR FITNESS FOR A PARTICULAR PURPOSE OR PATENT OR OTHER INTELLECTUAL PROPERTY RIGHT INFRINGEMENT...

Страница 19: ...NOTES Form No TFC461RM 0108 17...

Страница 20: ...ercial Kitchen Services St Louis 314 890 0700 Kaemmerlen Parts Service St Louis 314 535 2222 NEBRASKA Anderson Electric Omaha 402 341 1414 NEVADA Burney s Commercial Las Vegas 702 736 0006 Hi Tech Com...

Отзывы:

Похожие инструкции для THERMO-FINISHER TFC-461R