


INSTALLATION
Form No. MDWM-0311
6
General
The Mini Display Warmer is shipped with most components
installed and ready for operation. The following installation
instructions must be performed before plugging in and operating
the unit.
ELECTRIC SHOCK HAzARD: Unit is not weatherproof.
Locate unit indoors where ambient air temperature is a
minimum of 70°F (21°C) and a maximum of 85°F (29°C).
FIRE HAzARD: Locate unit a minimum of 1″ (25 mm) from
combustible walls and materials. If safe distances are not
maintained, discoloration or combustion could occur.
Locate unit in an area that is convenient for use. The loca-
tion should be level and strong enough to support the
weight of the unit and contents.
Transport unit in upright position only. Failure to do so may
result in damage to unit or personal injury.
Do not lay unit on the side with the control panel or damage
to the unit could occur.
CAUTION
WARNING
NOTICE
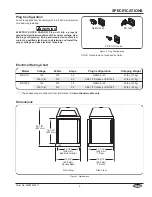
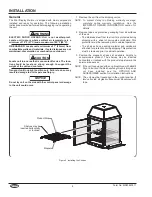
Product Stop
Magnet
Shelves may be
inserted horizontally
or inclined.
Figure 5. Installing the Shelves
1. Remove the unit from the shipping carton.
NOTE: To prevent delay in obtaining warranty coverage,
complete online warranty registration. See the
IMPORTaNT OWNER INFORMaTION
section for
details.
2. Remove tape and protective packaging from all surfaces
of the unit.
• The stainless steel floor in all units is protected during
shipping with a sheet of corrugated cardboard. This
protection must be removed prior to cabinet operation.
• The shelves have packing material and cardboard
attached for protection during shipping. This protection
must be removed prior to cabinet operation.
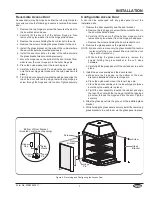
3. Position the magnetic shelves at adequate heights to
accommodate product. The shelves may be inserted
horizontally or inclined with the product stops toward the
service area access.
NOTE: If the unit is equipped with an optional Hood with Backlit
Sign Cutout and the Merchandising Graphic Image has
not been installed, see the
OPTIONS aND
aCCESSORIES
section for installation instructions.
NOTE: The unit must be transported in the upright position. If
laid on its side, all glass surfaces must be secured with
tape.
Содержание MDX-1X
Страница 14: ...NOTES Form No MDWM 0311 14 ...
Страница 15: ...NOTES Form No MDWM 0311 15 ...


