background image


Montageanleitung   


Nassmarkierwagen 
>Roll-Liner> 
Art.-Nr.: 1986


Vielen Dank, dass Sie sich für ein 

Haspo - 

Produkt entschieden haben. Damit Sie viel 

Freude an diesem Produkt haben, erhalten Sie im Folgenden wichtige Hinweise für die 
Sicherheit sowie den Gebrauch und die Wartung des Gerätes. Lesen Sie bitte diese 
Anleitung vollständig durch, bevor Sie mit der Montage bzw. Nutzung beginnen. 


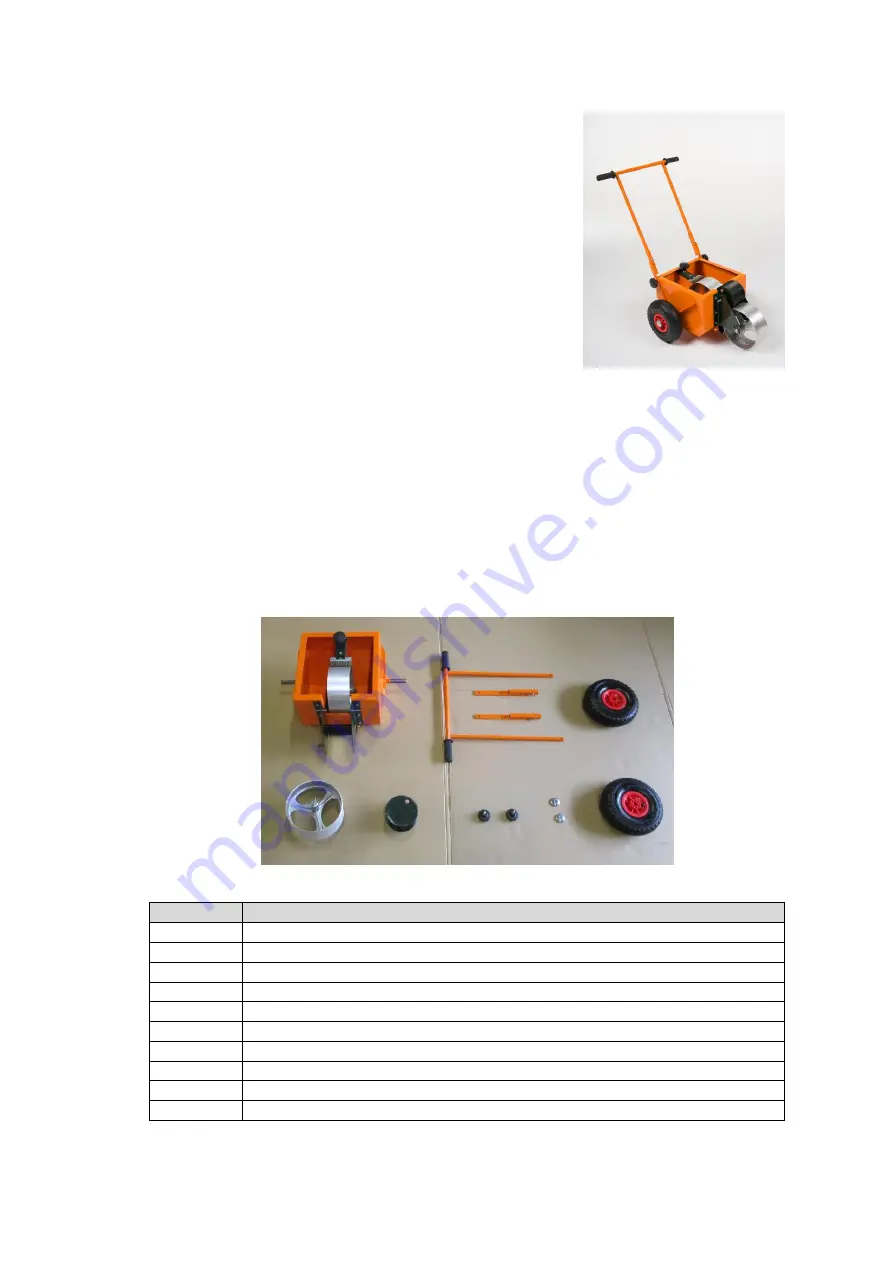
1.   Lieferumfang: 


Bitte prüfen Sie den nachfolgend angegebenen Inhalt auf Vollständigkeit, bevor  
Sie mit dem Aufbau beginnen. 


Inhalt gesamt: 


Stück 

Beschreibung 

Behälter  

Lenkerbügel 

Halterung für Lenkerbügel                                       

Markierungsrad 

Transferrad mit Gummibezug 

Handrad 

Radkappe 

Rad 


Montageanleitung 


Содержание 1986

Страница 1: ...ie den Gebrauch und die Wartung des Gerätes Lesen Sie bitte diese Anleitung vollständig durch bevor Sie mit der Montage bzw Nutzung beginnen 1 Lieferumfang Bitte prüfen Sie den nachfolgend angegebenen Inhalt auf Vollständigkeit bevor Sie mit dem Aufbau beginnen Inhalt gesamt Stück Beschreibung 1 Behälter 1 Lenkerbügel 2 Halterung für Lenkerbügel 1 Markierungsrad 1 Transferrad mit Gummibezug 2 Hand...

Страница 2: ...terialien aus dem Behälter entfernen Zur Montage werden folgende Werkzeuge Hilfsmittel benötigt 2 Ring Maulschlüssel 10mm 3 Montage a Montage Räder Behälter auf den Boden stellen sodass die beiden Achsen rechts und links frei zugänglich sind Die Achsen mit einem geeigneten Fett einfetten Anschließend beidseitig jeweils 1 Stck Rad aufstecken Dabei darauf achten dass sich die Ventile an den Radaußen...

Страница 3: ...lzen durch Halterung und Markierungsrad schieben Die Unterlegscheibe auf der gegenüberliegenden Seite der Halterung auf den Bolzen stecken und den Splint zur Sicherung des Markierungsrades durch die Bohrung am Bolzen führen c Montage Transferrad Den Gummistöpsel am Transferrad entfernen und das Transferrad durch die Öffnung vollständig mit Sand befüllen Anschließend die Öffnung wieder mit dem Gumm...

Страница 4: ...Bohrung Die Lenkerhalterung mit dieser Bohrung jeweils seitlich auf den hinten am Behälter befindlichen Bolzen hängen Dann die darüberliegende kleinere Bohrung deckungsgleich mit der Gewindebohrung am Behälter ausrichten Dabei darauf achten dass das angeschweißte Vierkantrohr zur Innenseite des Lenkerbügels zeigt Zur Befestigung der Halterung jeweils 1 Stck Handrad durch die Bohrung in das Gewinde...

Страница 5: ...ngslinie zu stellen Das Farbgemisch wird über das Rollensystem auf den Rasen aufgetragen Dieses dazu ein fach von oben in den Behälter einfüllen Die Farbintensität und somit auch der Verbrauch wird über das einstellbare Bürstensystem reguliert Zum Regulieren der Farbmenge das oberhalb der Bürste angebrachte Handrad drehen bis die gewünschte Farbmenge aufge tragen wird und den Wagen dabei zum Auftr...

Страница 6: ...er kontinuierlichen Qualitätsprüfung der Produkte können sich technische Änderungen ergeben Achten Sie darauf dass der Wagen bei der Nutzung oder Lagerung auf waagerechtem Untergrund abgestellt wird um ein Wegrollen zu vermeiden Wir empfehlen das Produkt nach jeder Benutzung mit klarem Wasser abzuspülen und dann mit einem weichen Tuch vorsichtig trocken zu reiben __________________________________...

Страница 7: ...please note the following instructions for safety use and maintenance before assembly 1 Scope of delivery Please check the following content before assembly Total content Piece Description 1 tank 1 handlebar 2 handlebar holder 1 marking wheel 1 transfer wheel with rubber cover 2 handwheel 2 wheel cap 2 wheel 1 assembly instruction ...

Страница 8: ...assembly Remove remaining transport locking devices of the marking wheel and packing material of the tank The following tools are necessary 2 combination wrenches 10 mm 3 Assembly a Assembly of wheels Place tank on the ground Grease wheel shafts Then stick wheels on both sides Take care that valves face to the wheels outsides To fasten wheels stick caps on the wheel shafts valve ...

Страница 9: ...ank Push bolt through holder and marking wheel Stick washer on the bolt at the opposite side of the holder and push the splint through the bolt s hole to fix the marking wheel c Assembly of transfer wheel Remove the rubber stopper and fill sand in the transfer wheel Then close it again with the rubber stopper fill sand here bolt ...

Страница 10: ...es at the flat ends of the 2 handlebar holders Hook these holes in the bolts situated at both sides of the tank Then adjust small holes and tanks holes Take care that the welded square tube faces to the handlebar s inside To fix the holders screw handwheels into the threads of the tank and tighten them adjust screw if necessary adjust screw if necessary tube faces to the handlebar s inside large h...

Страница 11: ...uction We recommend to place the marker at the requested position before filling as marking starts with moving the marker Pour the colour in the tank A brush adjusts intensity and consumption of the colour Move the marker and turn the handwheel until the requested quantity is applied Note Tip the marker backwards if marking shall be stopped After having finished marking remove the remaining colour...

Страница 12: ...us quality check of products and equipment technical modifications are possible Take care that during use or storage the marker is located on a horizontal surface We recommend to clean the marker with clear water after each use and to dry it carefully with a soft cloth ______________________________________________________________________ All images and texts are intellectual property of Haspo Spo...

Отзывы: