


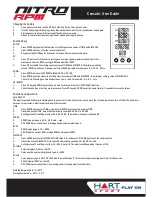

Changing the battery
1
Open battery cover and insert 2 AAA or 2 UM-4 batteries, then replace cover.
2.
If the LCD shows partial display, please take out batteries, wait for 15 seconds and insert again.
3.
Previous exercise data will be removed if batteries are removed.
4.
Please follow local environment regulations when disposing of batteries.
Function Keys
ENTER:
1.
Press ENTER key to select the functions for setting exercise values of TIME and DISTANCE.
2.
Press ENTER key to confirm the set exercise values.
3.
Keep pressing ENTER key for 2 seconds to remove all previous exercise data.
UP:
1.
Press UP key to switch the functions of speed, average speed, maximum speed, heart rate,
maximum heart rate, RPM, average RPM and maximum RPM.
2.
Press UP key to add the setting exercise values of TIME and DISTANCE. The minimum setting
value of TIME is 5 minutes. Pressing one time will add 5 minutes, for example: 0, 5, 10, 15, 20 etc.
DOWN:
1.
Press DOWN key to switch SPEED/DISTANCE, CAL/ PULSE
2.
Press DOWN key to decrease the setting exercise values of TIME and DISTANCE. The minimum setting value of DISTANCE is
1 km or mile. Pressing one time will decrease 1 km or mile, for example : 5, 4, 3, 2, 1 etc
UP+DOWN:
1.
Press UP key and DOWN key at the same time for 3 seconds to start “AUTO SCAN”function.
2.
Under the condition of setting exercise values, Press UP key and DOWN key at the same time for 1 second to remove the values.
Function and Operation
Auto ON/OFF
The monitor automatically starts working once the user starts to do the exercise on the machine. It will automatically turn off after the machine is
not used for 4 minutes, and all exercise value will be removed.
TIME
1.
Press ENTER key to select TIME, and press UP/DOWN keys to set the exercise TIME.
2.
If users do not set TIME, time will automatically count up 00:00:00~99:59:59
3.
Setting value of Count Down is from 5:00~99:59:00. The monitor will beep it reaches 0:00.
SPEED
1.
SPEED display range is 0.00 ~ 99.9 kmh / mph
2.
3 SPEED display: current speed, average speed and maximum speed.
RPM
1.
RPM display range is 15 ~ 9999.
2.
3 RPM display: current RPM, average RPM and maximum RPM.
DISTANCE
1.
Press ENTER key to select DISTANCE (TIME value is 0), and press UP/DOWN keys to set the exercise value.
2.
If users do not set DISTANCE, distance will automatically count up 0.0~999.9 km/mile
3.
Setting value of Count Down is from 1.0~999.0 km/mile. The monitor will beep when it reaches 0:00.
CALORIE
1.
Calorie displays K/Cal on the LCD.
2.
Calories will be automatically count up 0.0~9999
PULSE
1.
Pulse display range is 40~200. The Pulse value will display “P”, after user stops measuring heart rate for 16 seconds.
2.
PULSE display“BPM” on the LCD.
3.
3 PULSE display: current heart rate, average heart rate and maximum heart rate.
Working Temperature: 0°C~ 50°C
Storage Temperature: -10°C~ 60°C
Console - User Guide
Содержание NITRO RPM
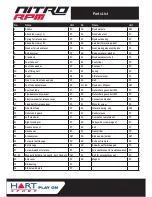
Страница 3: ...Exploded Drawing...


