


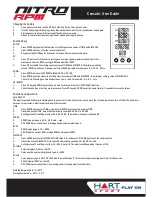

Instruction Use
1.
The bike is designed to be used as a “spin” cycle in fitness studios and health clubs. It has a fixed wheel driven flywheel and should only be
used under professional supervision.
2.
Installation
– it is important that the bike is correctly assembled and we recommend that suitably qualified personnel carry out installation
and assembly.
3.
Handlebar and seat adjustment.
It is important that the handlebar and seat are set at the correct height for your body. Ask your
instructor for assistance. To adjust the handlebar height undo the release lever that is located where the handlebar post fits into the frame.
Slide the handlebar post up or down to the required height and re-tighten the release lever. Make sure it is securely tightened and that there
is no lateral or vertical movement of the handlebar. The handlebar position can also be adjusted forwards or backwards. Undo the Release
lever located below the handlebar slider. Slide the handlebar assembly forwards and backwards until you reach the required position. Then
securely re-tighten the Release lever.
4.
Adjusting the seat height
- undo the release lever located where the seat post fits into the frame. Adjust the seat to the required height.
Then retighten the knob. Make sure it is tightened enough to prevent the seat from twisting side to side. The seat position can be adjusted
forwards and backwards. Undo the release lever located directly to the side of the seat slider. Loosen the release lever then slide the seat to
the required position. Then make sure the knob is re-tightened.
5.
Pedals and toe straps
- your feet should be securely positioned in the toe clips during the exercise. Put your foot as far forwards as you
can into the toe-clip and then pull the strap tight.
6.
Levelling
- The bike should operate on a level surface with no lateral movement. There is a height adjuster pad located on either side
underneath of the foot tube. Turn these pads clockwise or anti-clockwise until the bike is totally stable on the ground.
7.
Emergency brake
– Press down brake system (24) for stop.
8.
Maintenance
– It may be unsafe when bolts are loosened or there is noise from the flywheel, please contact your supplier. Like any other
mechanical cycling device, the bike should be regularly maintained. We recommend you follow the maintenance chart in this manual.
Содержание NITRO RPM
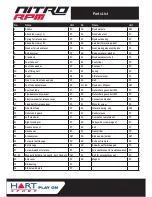
Страница 3: ...Exploded Drawing...


